
Operation Manual


5) Select the My Templates folder.
6) Select Save.
7) In the dialog that opens, type a name for the new template and click OK.
8) Close the Template Manager dialog.
Note
Although the Template Manager shows only a Documents tab when saving a new
template of any type, the template will appear on the correct tab (Documents,
Spreadsheets, Presentations, Drawings) when you return to this dialog.
Creating a template using a wizard
You can use wizards to create templates for letters, faxes, and agendas, and to create
presentations and Web pages.
For example, the Fax Wizard guides you through the following choices:
• Type of fax (business or personal)
• Document elements like the date, subject line (business fax), salutation, and complimentary
close
• Options for sender and recipient information (business fax)
• Text to include in the footer (business fax)
To create a template using a wizard:
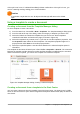
1) From the Menu bar, choose File > Wizards > [type of template required] (see Figure 55).
2) Follow the instructions on the pages of the wizard. This process is slightly different for each
type of template, but the format is very similar.
3) In the last section of the wizard, you can specify the template name which will show in the
Template Manager, and also the name and location for saving the template. The two names
can be different but this may later cause confusion. The default location is your user
templates directory, but you can choose a different location.
4) To set the file name or change the directory, select the Path button (the three dots to the
right of the location). The Save As dialog opens. Make your selections and click Save to
close the dialog.
Figure 55: Creating a template using a wizard
Chapter 3 Using Styles and Templates | 73