
Operation Manual


Calc spreadsheets
There are two ways to transfer data into a Calc spreadsheet. One enters the data into the
spreadsheet cells. The other creates complete new records in the spreadsheet. While you can
directly access the data inserted into the spreadsheet cells, new records created in the
spreadsheet are read-only.
Entering data directly to the spreadsheet cells uses the Data to Text icon as when making a table
in a Writer document. But there are certain differences.
The steps are straightforward.
1) Click the cell of the spreadsheet which you want to be the top left cell of your data,
including the column names.
2) Use F4 to open the database source window and select the table whose data you want to
use.
3) Select the rows of data you want to add to the spreadsheet:
– Click the gray box to the left of the row (the row header) you want to select if only
selecting one row. That row is highlighted.
– To select multiple rows, hold down the Ctrl key while clicking the gray box of the rows
you need. Those rows are highlighted.
– To select all the rows, click the gray box in the upper left corner. All rows are highlighted.
4) Click the Data to text icon to insert the data into the spreadsheet cells.
5) Save the spreadsheet.
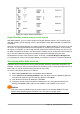
Adding records to a spreadsheet is fairly easy. You need to have the Data Source window open,
your spreadsheet open, and the table you want to use selected.
1) Click the gray box containing the field name for the table’s ID field (the column header).
2) Drop and drag the gray box for the table’s ID field to where you want the record to appear
in the spreadsheet.
3) Repeat until you have moved all of the fields you need to where you want them.
4) Name and save the spreadsheet.
5) Click a row of the table in the Data Source window.
6) Drag the data in the ID field in the selected row onto the ID field in the spreadsheet. The
Save icon should activate.
7) Click the Edit File button to make the spreadsheet read-only. Click Save when asked if you
want to save the file.
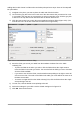
The Data Sources window goes blank, the fields in the spreadsheet are populated with data
from the row you selected, and the Form Navigation toolbar appears at the bottom of the
spreadsheet.
8) Click the arrows on the Form Navigation toolbar to view the different records of the table.
(The arrows are circled in red.) The number in the box changes when you change the
record number by clicking an arrow. The data in the fields changes correspondingly to the
data for that particular record number.
Figure 271: Navigation arrows of a form
270 | Getting Started with LibreOffice 5.1