
Operation Manual
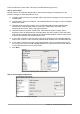


Click Use Wizard to Create Table. This opens the Table Wizard (Figure 212).
Step 1: Select fields
We will use the CD-Collection Sample table in the Personal category and Employees in the
Business category to select the fields we need.
1) Category: Select Personal. The Sample Tables drop down list changes to a list of personal
sample tables.
2) Sample tables: Select CD-Collection. The Available fields box changes to a list of available
fields for this table.
3) Selected fields: Using the > button, move the following fields from the Available fields
window to the Selected fields window in this order: CollectionID, AlbumTitle, Artist,
DatePurchased, Format, Notes, and NumberofTracks.
4) Selected Fields from another sample table. Click Business as the Category. Select
Employees from the drop down list of sample tables. Use the > button to move the Photo
field from the Available fields window to the Selected fields window. It will be at the bottom
of the list directly below the NumberofTracks field.
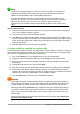
5) If you make a mistake in selecting fields, click on the field name in the Selected fields list
and use the < button to move it from the Selected fields list back to the Available fields list.
6) If you make a mistake in the order of the selected fields, click on the field name that is in
the wrong order and use the Up or Down arrow on the right side of the Selected fields list
to move the field name to the correct position.
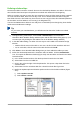
7) Click Next.
Figure 212: Selecting fields for the table
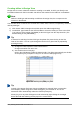
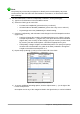
Step 2: Set field types and formats
Figure 213: Changing field types
Chapter 8 Getting Started with Base | 231