
Operation Manual


Some of these additional toolbars are context sensitive and will automatically appear depending on
the position of the cursor. For example, when the cursor is in a table, a Table toolbar appears, and
when the cursor is in a numbered or bullet list, the Bullets and Numbering toolbar appears.
Customizing toolbars
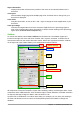
You can customize toolbars in several ways, including choosing which icons are visible and locking
the position of a docked toolbar. You can also add icons and create new toolbars, as described in
Chapter 14 Customizing LibreOffice. To access the customization options for a toolbar, right-click in
an empty space between the icons on a toolbar to open a context menu as follows:
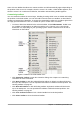
• To show or hide icons defined for the selected toolbar, click Visible Buttons. Visible icons
on a toolbar are indicated by an outline around the icon ( Figure 6) or by a check mark
beside the icon, depending on your operating system. Select or deselect icons to hide or
show them on the toolbar.
Figure 6: Selection of visible toolbar icons
• Click Customize Toolbar to open the Customize dialog; See Chapter 14 Customizing
LibreOffice for more information.
• Click Dock Toolbar to dock the selected floating toolbar. By default, a toolbar will dock at
the top of the workspace. You can reposition the toolbar to a different docked position. See
“Moving toolbars” on page 22.
• Click Dock All Toolbars to dock all floating toolbars. By default, toolbars will dock at the
top of the workspace. You can reposition the toolbars to different docked positions. See
“Moving toolbars” on page 22.
• Click Lock Toolbar Position to lock a docked toolbar into its docked position.
• Click Close Toolbar to close the selected toolbar.
Chapter 1 Introducing LibreOffice | 23