
Operation Manual


Sub-menus and tool palettes
Toolbar icons with a small triangle to the right will display sub-menus, tool palettes, and alternative
methods of selecting items, depending on the icon.
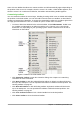
Tool palettes can be made into a floating toolbar. Figure 4 shows an example of a tool palette from
the Drawing toolbar made into a floating toolbar. See “Moving toolbars” and “Floating toolbars”
below for more information on moving and floating these toolbars created from tool palettes.
Figure 4: Example of tearing off a tool palette
Moving toolbars
Docked toolbars can be undocked and moved to a new docked position or left as a floating toolbar.
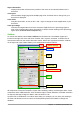
1) Move the mouse cursor over the toolbar handle, which is the small vertical bar to the left of
a docked toolbar and highlighted in Figure 5.
2) Hold down the left mouse button and drag the toolbar to the new location. The toolbar can
be docked in a new position at the top, sides or bottom of the main window, or left as a
floating toolbar.
3) Release the mouse button.
To move a floating toolbar, click on its title bar and drag it to a new floating location or dock the
toolbar at the top or bottom of the main window.
Figure 5: Toolbar handles
Note
You can also dock a floating toolbar by holding down the Ctrl key and double-clicking in
the title bar of the toolbar.
Floating toolbars
LibreOffice includes several additional toolbars, whose default setting appear as floating toolbars in
response to the current position of the cursor or selection. You can dock these toolbars to the top
or bottom of the main window, or reposition them on your computer display (see “Moving toolbars”
above).
22 | Getting Started with LibreOffice 5.1