
Operation Manual


Setting up a slide show
As mentioned in “Modifying the slide show” on page 174, Impress allocates reasonable default
settings for slide shows, while at the same time allowing for customizing many aspects of the slide
show experience. This section covers only some aspects; more advanced techniques are
explained in the Impress Guide Chapter 9 Slide Shows.
Most of the tasks are best done in Slide Sorter view where you can see most of the slides
simultaneously. Go to View > Slide Sorter on the Menu bar or click the Slide Sorter tab at the top
of the Workspace.
One slide set – multiple presentations
In many situations, you may find that you have more slides than the time available to present them
or you may want to provide a rapid overview without dwelling on the details. Rather than having to
create a new presentation, you can use two tools that Impress offers: hiding slides and custom
slide shows.
Hiding slides
1) Select the slide you want to hide in the Slide Pane or Slide Sorter view on the Workspace
area.
2) Go to Slide > Hide Slide on the Menu bar or right-click on the slide thumbnail and select
Hide Slide from the context menu. Hidden slides are marked by a diagonal bars across the
slide.
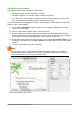
Custom slide shows
If you want to create a custom slide show from the same presentation:
1) Select the slides you want to use in your custom slide show.
2) Go to Slide Show > Custom Slide Show on the Menu bar.
3) Click on the New button to create a new sequence of slides and save it with a different
name. You can have as many slide shows as you want from a single presentation.
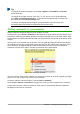
Slide transitions
Slide transition is the animation that is played when a slide is changed for the next slide in your
presentation. You can configure the slide transition from the Slide Transition section in the Tasks
Pane.
1) Go to Slide > Slide Transition on the Menu bar or click on the Slide Transition icon
on the Sidebar to open the options available for slide transitions.
2) Select the desired transition, the speed of the animation, and whether the transition should
happen when you click the mouse (preferred) or automatically after a certain number of
seconds.
3) Click Apply to All Slides to apply the transition for all of your presentation or continue
selecting transitions to place between each slide in your presentation.
Tip
The Slide Transition section has a very useful choice: Automatic preview. Select its
checkbox and when you make any changes in a slide transition, the new slide is
previewed in the Slide Design area, including its transition effect.
190 | Getting Started with LibreOffice 5.1