
Operation Manual


Modifying a slide master
The following items can be changed on a slide master:
• Background (color, gradient, hatching, or bitmap)
• Background objects (for example, a logo or decorative graphics)
• Size, placement, and contents of header and footer elements to appear on every slide
• Size and placement of default frames for slide titles and content
For more information on modifying slide masters, see the Impress Guide Chapter 2 Using Slide
Masters, Styles, and Templates.
1) Select View > Slide Master from the Menu bar. This unlocks the properties of a slide
master so you can edit it.
2) Select a slide master in Master Pages in the Slides pane.
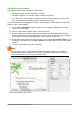
3) Select an object on the slide master in the Workspace and the Sidebar will display the
property options that can be changed for the selected object. Figure 159 shows a graphic
object selected with the Graphic properties section open on the Sidebar.
4) Make all necessary changes to the slide master, then click the Close Master View icon on
the Master View toolbar or go to View > Normal on the Menu bar to exit from editing slide
masters.
5) Save your presentation file before continuing.
Note
Any changes made to one slide when in Master View mode will appear on all slides
using this slide master. Always make sure you Close Master View and return to Normal
view before working on any of the presentation slides.
Figure 159: Editing a slide master
186 | Getting Started with LibreOffice 5.1