
Operation Manual


2) Alternatively, after inserting a new slide, click the Insert Image icon (Figure 146 on page
172) on the new slide and select the file from the Insert Image dialog that opens. To see a
preview of the picture, select Preview at the bottom of the Insert Image dialog.
3) Move the picture to the desired location.
4) The picture will automatically resize to fill the area of the content box. Follow the directions
in the note below when manually resizing a graphic.
Note
When resizing a graphic, right-click the picture. Select Position and Size from the
context menu and make sure that Keep ratio is selected. Then adjust the height or
width to the size you need. As you adjust one dimension, both dimensions will change
to keep the width and height ratio the same, ensuring that the picture will not become
distorted. Remember also that resizing a bitmap image will reduce its quality; it is better
to create an image of the desired size outside of Impress.
Adding tables
To add basic tables to a slide:
1) Go to Insert > Table on the Menu bar, or click the Table icon on the Standard toolbar.
2) If there is a table already on the slide and it is selected, click the Table icon on the
Table toolbar. The Table toolbar is only visible after selecting View > Toolbars > Table on
the Menu bar and when a table is selected.
3) Alternatively, and after inserting a new slide into your presentation, click the Insert Table
icon (Figure 146 on page 172).
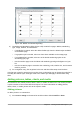
4) Select the number of rows and columns required from the Insert Table dialog that opens.
5) Alternatively, click the small triangle to the right of the Table icon and select the number
of rows and columns by dragging the cursor.
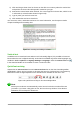
6) Select a design style from the available options for your table in the Table Design deck in
the Properties section of the Sidebar (Figure 154). If the Table Design section does not
automatically open after inserting or selecting a table, click on the Properties icon at the
side of the Sidebar.
Note
Selecting from any of the styles in the Table Design section in the Sidebar creates a
table based on that style. If you create a table by another method, you can still apply a
style of your choice later.
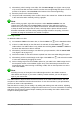
The Table toolbar in Impress offers the same functions as the Table toolbar in Writer, with the
exception of the calculation functions Sort and Sum. To use Sum and Sort in your presentation,
you have to insert a Calc spreadsheet.
After the table is created, you can modify it by adding and deleting rows and columns, adjusting
width and spacing, adding borders, background colors and so on. For more information on working
with tables see the Impress Guide Chapter 3 Adding and Formatting Text and the Writer Guide
Chapter 9 Working with Tables.
180 | Getting Started with LibreOffice 5.1