
Operation Manual


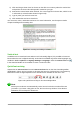


3) Click and drag to draw a box for the text on the slide. Do not worry about the vertical size
and position as the text box will expand if needed as you type.
4) Release the mouse button when finished. The cursor appears in the text box, which is now
in edit mode (a colored border shown in Figure 149).
5) Type or paste your text in the text box.
6) Click outside the text box to deselect it.
You can move, resize, and delete text boxes. For more information, see the Impress Guide
Chapter 3 Adding and Formatting Text.
Figure 149: Creating and editing text boxes
Vertical text
In addition to the normal text boxes where text is horizontally aligned, it is possible to insert text
boxes where the text is aligned vertically. Vertical text is available only when Asian languages are
enabled in Tools > Options > Language Settings > Languages. Click the Vertical Text icon
in the Standard toolbar or Text toolbar to create a vertical text box.
Quick font resizing
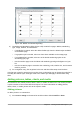
Impress has an Increase Font icon and a Decrease Font icon on the Text Formatting toolbar
(highlighted in Figure 150) to increase or decrease the font size of selected text. The amount by
which the font size changes depends on the standard sizes available for the font in use.
Figure 150: Quick font resizing on Text Formatting toolbar
Note
AutoLayout text boxes can automatically resize fonts to let the box contain all the text
you insert. If you insert a long piece of text, the font size may shrink to fit into the box.
Otherwise, the font keeps its default size.
Chapter 6 Getting Started with Impress | 175