
Operation Manual


Use Outline view for the following purposes:
• Quickly inserting text for fast content creation or editing, when formatting and adding
graphic objects is postponed until the final stages of creating the presentation.
• Making changes in the text of a slide:
– Adding and deleting the text in a slide as in the Normal view.
– Moving the paragraphs of text in the selected slide up or down by using the up and
down arrow buttons (Move Up or Move Down) on the Text Formatting toolbar
(highlighted in Figure 134).
– Changing the outline level for any of the paragraphs in a slide using the left and right
arrow buttons (Promote or Demote) on the Text Formatting toolbar.
– Moving a paragraph and changing its outline level at the same time using a combination
of these four arrow buttons.
• Comparing slides with your outline (if you have prepared one in advance). If you notice
from your outline that another slide is needed, you can create it directly in the Outline view
or you can return to the Normal view to create it.
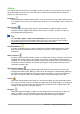
Notes view
Use the Notes view (Figure 135) to add notes to a slide. These notes are for your information and
are not seen by the audience when the presentation is shown.
Figure 135: Notes view
1) Click the Notes tab in the Workspace.
2) Select the slide to which you want to add notes: click the slide in the Slides pane, or
double-click the slide name in the Navigator.
3) In the text box below the slide, click on the words Click to add notes and begin typing.
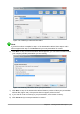
You can resize the Notes text box using the colored resizing handles which appear when you click
on the edge of the box. You can also move the box by placing the pointer on the border, then
clicking and dragging. To make changes in the text style, click on the Styles and Formatting icon
on the Sidebar.
164 | Getting Started with LibreOffice 5.1