
Operation Manual


4) Scroll down to the Scrollbars setting. Change the selection from None to Vertical in this list.
5) Close the Properties window. (Esc key)
6) Lengthen the Misc. Notes field by moving the cursor over the middle green handle at the
bottom of the field and dragging down until the length is 6 cm (2.4 inches).
Step 7: Change labels and fields in the subform
The subform is located at the bottom of the form. We want to widen the Date column, and change
the label for the PaymentType column to two words.
• To widen the Date column, move the mouse pointer over the dividing line between the Date
and FuelCost columns. When the pointer changes shape, click and drag to move the
divider to the right.
• To change the PaymentType column:
– Right-click the label PaymentType to open the menu.
– Select Column to open the Properties dialog. In the Label property, change
PaymentType to Payment Type.
– Close the Properties dialog.
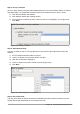
Step 8: Add headings to groups
This step is easier to do if you have end-of-paragraph markers visible. Choose View > Non
printing Characters to turn them on.
Figure 228: Apply Styles list
1) Make sure the cursor is in the upper left corner. If it is not, click in that corner to move it
there.
2) Press the Enter key to move the cursor down to the space between the Date field and the
Breakfast field.
3) Change the Apply Styles drop down list from Default to Heading 2.
4) Use the spacebar to move the cursor to where you want the heading to start.
5) Type the heading Meals.
6) Use the spacebar to move the cursor to the center of snack area.
7) Type the heading Snacks.
8) Use the Enter key to move the cursor between the Supper control and the subform.
9) Use the spacebar to move the cursor to the center of the subform.
10) Change the Apply Styles drop down list from Default to Heading 2.
11) Type the heading Fuel Data.
240 | Getting Started with LibreOffice 5.0