
Operation Manual


Tip
To see what the Date field will look like, click the Form Mode On/Off icon (the second
icon from the left in Figure 224). You can do this any time you want to see the form with
the changes you have made.
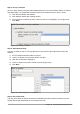
Step 2: Shorten the width of some fields
All of the fields with a label containing the word payment are too wide. They need to be shortened
before the controls are moved.
Figure 225: Selecting a field
1) Control+click the BPayment field.
2) Move the cursor over the middle green handle on the right. The cursor becomes a double-
headed arrow.
3) Drag the cursor to the left until the field is 2.5 cm (1 inch) wide.
4) Repeat these steps to shorten these fields: Lpayment, SPayment, SnPayment, Mpayment,
and MiscPayment.
Tip
If you have the Snap to Grid and Guides when moving icons selected in the Design
Format toolbar, you will see how wide the field is as you shorten it.
Step 3: Move the controls to group them by category
We want to move the controls so that they look like Figure 226.
1) Click the first control you want to move. A border appears around the control with eight
green handles.
2) Move the cursor over the label or field of the control. It changes shape to a drag icon.
3) Drag and drop the control to where you want it.
4) Use the same steps to move the rest of the controls to where they belong.
Figure 226a: Positioning of controls (left side of form)
Chapter 8 Getting Started with Base | 237