
Operation Manual


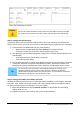


Figure 219: Positioning of controls
Caution
Do not use Control+click when moving a field. It moves either the field or the label
but not both. To move both, use a plain mouse click and drag to the desired spot.
Step 4: Change the label wording.
Field names have been required to be single words for some time. However, the labels for the
fields in a form can be more than one word. So we will change them by editing the text in the label.
1) Control+click the SnackNo label. Do one of the following:
• Right-click the SnackNo label and select Control from the pop-up menu.
• Or click the Control icon in the Form Control toolbar (Figure 217).
2) The dialog that opens is labeled Properties: Label Field. It contains all the properties of the
selected label.
• In the Label selection, edit the label to Snack No.
• Close the Properties dialog.
3) Use the same procedure to change these labels as well: BPayment to Payment, LPayment
to Payment, SPayment to Payment, Miscellaneous to Misc., SnackCost to Snack Cost,
MPayment to Payment, MiscPayment to Misc. Payment, and MiscNotes to Misc. Notes.
Tip
You can modify all of the listings in the Properties window. For example, if you
change the Alignment from Left to Center, the word or words in the label are
centered within the label. When you have some time, you might want to experiment
with different settings just to see the results you get.
Step 5: Change the widths of the labels and fields.
We want the following controls to be 2 cm wide (0.8 inches): Breakfast, Lunch, Supper, Odometer,
Snack No., Tolls, Snack Cost, Motel, and Misc. All of the payment fields were changed in step 2,
but Misc. Payment needs to be changed to 3 cm (1.2 inches).
1) Right-click Breakfast and choose Position and Size. On the Position and Size dialog,
change Width to 2 cm.
2) Repeat for the other listed controls, using 3 cm for Misc.Payment.
Chapter 8 Getting Started with Base | 233