
Operation Manual


Inserting and editing pictures
Draw contains a number of functions for editing pictures or raster graphics (bitmaps); for example,
photos and scanned images. This includes the import and export of graphics, and the conversion
of one graphic format to another.
Draw includes a large range of graphic filters so that it can read and display several graphic file
formats. It also includes several tools for working with raster graphics, but does not have the same
functionality as specialized graphic programs like Gimp or Adobe Photoshop. See the Draw Guide
Chapter 6 Editing Pictures for more information.
You can add pictures from several sources:
• Directly from a scanner (Insert > Picture > Scan)
• Images created by another program, including photographs from a digital camera (Insert >
Picture > From File)
• The Draw Gallery; see Chapter 11 Graphics, the Gallery, and Fontwork in this guide for
more information.
Working with 3D objects
Although Draw does not match the functionality of the leading drawing or picture editing programs,
it is capable of producing and editing very good 3D drawings.
Draw offers two types of 3D objects: 3D bodies and 3D shapes. Depending on which type you
choose, there are different methods of editing of a 3D object (rotation, illumination, perspective,
and so on) with 3D shapes being simpler to set up and edit than 3D bodies. However, 3D bodies
currently allow for more customization.
See the Draw Guide Chapter 7 Working with 3D Objects for more information.
Exporting graphics
Draw saves graphics and images in the open source format *.odg. To save a graphic or the entire
file in another format, use File > Export and select a format from the list displayed. The graphic
formats that Draw can export and save to are listed in Appendix B Open Source, Open Standards,
OpenDocument in this guide.
You can also export Draw files to HTML, XHTML, PDF, or Flash. PDF export for modules of
LibreOffice is described in Chapter 10 Printing, Exporting, and E-mailing of this guide.
HTML export uses a conversion wizard that creates as many web pages as there are pages in
your Draw document. You can optionally choose to display pages in frames with a navigator and
set an index page. For more information, see Chapter 12 Creating Web Pages in this guide.
Inserting comments in a drawing
You can insert comments into your drawing using a similar process to the one used in Writer and
Calc.
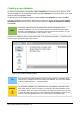
1) Go to Insert > Comment on the menu bar. A small box containing your initials appears in
the upper left-hand corner of your drawing with a larger text box beside it (Figure 198).
Draw automatically adds your name and the date at the bottom of this text box.
2) Type or paste your comment into the text box. You can apply basic formatting to parts of
the text by selecting it, right-clicking, and choosing from the context menu. From this menu,
Chapter 7 Getting Started with Draw | 213