
Operation Manual


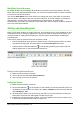


Figure 143: Bullets and Numbering dialog
For the entire list:
1) Select the entire list or click on the border of the text box so that the resizing handles are
displayed.
2) Select Format > Bullets and Numbering on the main menu bar or click on the Bullets
and Numbering icon on the Text Formatting toolbar.
3) The Bullets and Numbering dialog (Figure 143) contains five pages: Bullets, Numbering
type, Graphics, Position, and Customize.
a) If a bullet list is needed, select the desired bullet style from the default styles available
on the Bullets page.
b) If a graphics style is needed, select one from those available on the Graphics page.
c) If a numbered list is needed, select one of the default numbering styles on the
Numbering type page.
d) The Position page allows you to set the indent and numbering spacing and alignment of
your list.
e) The Customize page allows you to customize the numbering, color, relative size and
character used for your list.
For a single list entry, click anywhere in the text and then follow steps 2 and 3 above.
If the list was created in an AutoLayout text box, then an alternative way to change the entire list is
to modify the Outline styles. Changes made to the outline style will apply to all the slides using
them.
Adding pictures, tables, charts and media
A contents box can also contain pictures, tables, charts or media as well as text and this section
provides a quick overview of how to work with these objects. For more information on adding
pictures, tables, charts or media, please refer to the Impress Guide.
170 | Getting Started with LibreOffice 4.0