
Operation Manual


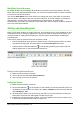


Figure 135. Selecting a slide design
c) Open existing presentation continues work on a previously created presentation. The
wizard changes to show a list of existing presentations. Choose the presentation you
want.
2) Click Next. Figure 135 shows the Presentation Wizard step 2 as it appears if you selected
Empty Presentation at step 1. If you selected From template, an example slide is shown in
the Preview box.
3) Choose a design under Select a slide design. The slide design section gives you two
main choices: Presentation Backgrounds and Presentations. Each one has a list of choices
for slide designs. If you want to use one of these other than <Original>, click it to select it.
a) The types of Presentation Backgrounds are shown in Figure 135. When you select a
presentation background, you will see a preview of the slide design in the Preview
window.
b) <Original> is for a blank presentation slide design.
4) Select how the presentation will be used under Select an output medium. The majority of
presentations are created for computer screen display. It is recommended to select Screen.
You can change the page format at any time.
Note
The Screen page is optimized for a 4:3 display (28cm x 21cm) so it is not suitable for
modern widescreen displays. You can change the slide size at any time by switching
to Normal view and selecting Format > Page.
5) Click Next. The Presentation Wizard step 3 appears (Figure 136).
a) Choose the desired slide transition from the Effect drop-down menu.
b) Select the desired speed for the transition between the different slides in the
presentation from the Speed drop-down menu. Medium is a good choice for now.
6) Click Create. A new presentation is created.
Note
If you selected From template on step 1 of the Wizard, the Next button will be active
on step 3 and other pages will be available. These pages are not described here.
Chapter 6 Getting Started with Impress | 161