
Operation Manual


Printing options
To select the printing options of page order, details, and scale to be used when printing a
spreadsheet:
1) Go to Format > Page on the main menu to open the Page Style dialog ().
2) Select the Sheet tab and make your selections from the available options.
3) Click OK.
For more information on printing options, see the Calc Guide Chapter 6 Printing, Exporting, and
E-mailing.
Repeat printing of rows or columns
If a sheet is printed on multiple pages, you can set up certain rows or columns to repeat on each
printed page. For example, if the top two rows of the sheet as well as column A need to be printed
on all pages, do the following:
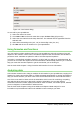
1) Go to Format > Print Ranges > Edit. on the main menu bar to open the Edit Print
Ranges dialog (Figure 122).
2) Type the row identifiers in the Rows to repeat box. For example, to repeat rows 1 and 2,
type $1:$2. This automatically changes Rows to repeat from, - none - to - user defined -.
3) Type the column identifiers in the Columns to repeat box. For example, to repeat column A,
type $A. In the Columns to repeat list, - none - changes to - user defined -.
4) Click OK.
Figure 122: Edit Print Ranges dialog
For more information on editing print ranges, see the Calc Guide Chapter 6 Printing, Exporting,
and E-mailing.
Page breaks
While defining a print range can be a powerful tool, it may sometimes be necessary to manually
adjust the Calc printout manually using a manual or page break. A page break helps to ensure that
your data prints properly according to your page size and page orientation. You can insert a
horizontal page break above or a vertical page break to the left of the active cell.
For more information on manual breaks, see the Calc Guide Chapter 6 Printing, Exporting, and
E-mailing.
Inserting a break
To insert a page break:
1) Navigate to the cell where the page break will begin.
2) Go to Insert > Page Break on the main menu bar.
Chapter 5 Getting Started with Calc | 147