
Operation Manual


Hiding and showing data
In Calc you can hide elements so that they are neither visible on a computer display nor printed
when a spreadsheet is printed. However, hidden elements can still be selected for copying if you
select the elements around them. For example, if column B is hidden, it is copied when you select
columns A and C.
For more information on how to hide and show data, including how to use outline groups and
filtering, see the Calc Guide Chapter 2 Entering, Editing, and Formatting Data.
Hiding data
To hide sheets, rows, and columns:
1) Select the sheet, row or column you want to hide.
2) Go to Format on the main menu bar and select Sheet, Row or Column.
3) Select Hide from the menu and the sheet, row or column can no longer viewed or printed.
4) Alternatively, right-click on the sheet tab, row header or column header and select Hide
from the context menu.
To hide and protect data in selected cells:
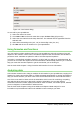
1) Go to Tools > Protect Document and select Sheet from the menu options. The Protect
Sheet dialog dialog will open (Figure 119).
2) Select Protect this sheet and the contents of protected cells.
3) Create a password and then confirm the password.
4) Select or deselect the user selection options for cells.
5) Click OK.
6) Select the cells you want to hide.
7) Go to Format > Cells on the main menu bar, or right-click and select Format Cells from
the context menu, or use the keyboard shortcut Ctrl+1 to open the Format Cells dialog.
8) Click the Cell Protection tab (Figure 120) and select an option to hide the cells.
9) Click OK.
Note
When data in cells are hidden, it is only the data contained in the cells that is
hidden and the protected cells cannot be modified. The blank cells remain visible
in the spreadsheet.
Figure 119: Protect Sheet dialog
Chapter 5 Getting Started with Calc | 143