OWNER'S MANUAL WASHING MACHINE Before beginning installation, read these instructions carefully. This will simplify installation and ensure that the product is installed correctly and safely. Leave these instructions near the product after installation for future reference. EN ENGLISH WXL-1014* MFL71694703 Rev.01_041620 www.lg.com Copyright © 2019-2020 LG Electronics Inc. All Rights Reserved.
TABLE OF CONTENTS This manual may contain images or content that may be different from the model you purchased. This manual is subject to revision by the manufacturer. SAFETY INSTRUCTIONS READ ALL INSTRUCTIONS BEFORE USE .................................................... 5 Safety Messages...................................................................................................5 WARNING ....................................................................................................
Installing the Drain Hose ........................................................................ 17 Installing the Drain Hose with the Elbow Bracket .........................................17 OPERATION Operation Overview................................................................................. 18 Using the Appliance ...........................................................................................18 Preparing the Wash Load ................................................................
Smart Diagnosis ....................................................................................... 32 Using LG ThinQ to Diagnose Issues.................................................................32 Using Audible Diagnosis to Diagnose Issues .................................................32 MAINTENANCE Cleaning After Every Wash...................................................................... 33 What to Clean ...................................................................................
SAFETY INSTRUCTIONS 5 EN SAFETY INSTRUCTIONS READ ALL INSTRUCTIONS BEFORE USE The following safety guidelines are intended to prevent unforeseen risks or damage from unsafe or incorrect operation of the appliance. The guidelines are separated into ‘WARNING’ and ‘CAUTION’ as described below. Safety Messages This symbol is displayed to indicate matters and operations that can cause risk. Read the part with this symbol carefully and follow the instructions in order to avoid risk.
EN 6 SAFETY INSTRUCTIONS • Children should be supervised to ensure that they do not play with the appliance. • If the power cord is damaged, it must be replaced by the manufacturer, its service agent or similarly qualified persons in order to avoid a hazard. • Use a new hose or hose-set supplied with the appliance. Reusing old hoses can cause a water leak and subsequent property damage. • Ventilation openings must not be obstructed by a carpet. • This appliance is intended to be used in household only.
SAFETY INSTRUCTIONS 7 EN • Do not modify the power plug provided with the appliance. If it does not fit the power outlet, have a proper outlet installed by a qualified electrician. • This appliance is equipped with a power cord having an equipmentearthing / grounding conductor (earthing pin) and a grounding power plug. The power plug must be plugged into an appropriate outlet socket that is installed and earthed / grounded in accordance with all local codes and ordinances.
EN 8 SAFETY INSTRUCTIONS • Do not put in, wash or dry articles that have been cleaned in, washed in, soaked in, or spotted with combustible or explosive substances (such as waxes, wax removers, oil, paint, gasoline, degreasers, drycleaning solvents, kerosene, petrol, spot removers, turpentine, vegetable oil, cooking oil, acetone, alcohol, etc.). Improper use can cause fire or explosion.
SAFETY INSTRUCTIONS 9 EN • When the air temperature is high and the water temperature is low, condensation may occur and thus wet the floor. • Wipe off dirt or dust on the contacts of the power plug. Maintenance • Disconnect the appliance from the power supply before cleaning the appliance. Setting the controls to the OFF or stand by position does not disconnect this appliance from the power supply. • Securely plug the power plug in the outlet socket after completely removing any moisture and dust.
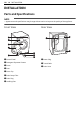
EN 10 INSTALLATION INSTALLATION Parts and Specifications NOTE • Appearance and specifications may change without notice to improve the quality of the appliance.
INSTALLATION 11 Accessories *1:The included accessories vary depending on the model you purchased.
EN 12 INSTALLATION Installation Place Requirements WARNING Before installing the appliance, check the following information to make sure that the appliance should be installed in a correct place. • This appliance must only be used for domestic household purposes and should not be used in mobile applications. Installation Location NOTE • This appliance must be installed on firm flooring to minimize vibration during the spin cycle.
INSTALLATION 13 NOTE EN grounded/earthed in accordance with all local codes and ordinances. • You can purchase rubber cups (part No. 4620ER4002B) from the LG service centre. Unpacking the Appliance Ventilation • Make sure that air circulation around the appliance should not be impeded by carpets, rugs, etc. Ambient Temperature Lifting the Appliance Off the Foam Base * This feature may vary depending on the model purchased.
EN 1 14 INSTALLATION Starting with the bottom two transit bolts a, use the spanner (included) to fully loosen all transit bolts by turning them counterclockwise. • If the appliance rocks when pushing the top plate of the appliance diagonally, adjust the feet again. • Check whether the appliance is perfectly level after installation. NOTE • Timber or suspended type flooring may contribute to excessive vibration and unbalance.
INSTALLATION 15 manufactured by LG Electronics for use with this model. 2 Check if the appliance is perfectly level using a spirit level a. noise and vibration. If this occurs, install the antislip sheets under the levelling feet and adjust the level. 1 3 4 Clean the floor to attach the anti-slip sheets. • Use a dry rag to remove and clean foreign objects and moisture. If moisture remains, the anti-slip sheets may slip. 2 3 EN Adjust the level after placing the appliance in the installation area.
EN 16 INSTALLATION Connecting the Water Supply Hose that the curved end of the water supply hose is connected to the appliance. Note for Connection • Water pressure must be between 100 kPa and 800 kPa (1.0 – 8.0 kgf/cm²). If the water pressure is more than 800 kPa, a decompression device should be installed. • Periodically check the condition of the water supply hose and replace the water supply hose if necessary.
INSTALLATION 17 Connecting the Hose to the Appliance EN • Securing the drain hose correctly will protect the floor from damage due to water leakage. Screw the supply hose to the water inlet valve on the back of the appliance. DN • Do not connect the hose to the hot water supply for models with one water inlet. Connect to the cold water supply only. NOTE • After completing connection, if water leaks from the hose, repeat the same steps.
EN 18 OPERATION OPERATION Operation Overview • Add the proper amount of detergent to the detergent dispenser. If desired, add bleach or fabric softener to the appropriate areas of the dispenser. Using the Appliance Before the first wash, select the Cotton wash programme and add a half amount of the detergent. Start the appliance without clothes. This will remove possible residues and water from the drum that may have been left during manufacturing. 1 Sort clothes and load items.
OPERATION 19 • Soil level (Heavy, Normal, Light): Separate clothes according to soil level. If possible, do not wash heavily soiled items with lightly soiled ones. • Colour (White, Lights, Darks): Wash dark or dyed clothes separately from whites or light colours. Mixing dyed clothes with light clothes can result in dye transfer or discolouration of lighter clothes. • Lint (Lint producers, Collectors): Wash separately lint producing fabrics from lint collecting fabrics.
EN 20 OPERATION • If you wish to use liquid detergent, follow the guidelines provided by the detergent manufacturer. • You can pour liquid detergent directly into the main detergent drawer if you are starting the wash cycle immediately. 1 2 Open the dispenser drawer. Add the detergent and softener into the appropriate compartments.
OPERATION 21 maximum fill line can cause it to dispense too early, which may stain the clothes. EN Adding Water Softener A water softener, such as anti-limescale can be used to cut down on the use of detergent in areas with high water hardness level. • First add detergent, and then the water softener. Dispense according to the amount specified on the packaging.
EN 22 OPERATION Control Panel The actual control panel may differ from model to model. Control Panel Features Description a Power On/Off Button • Press this button to turn the washing machine on. b Programme Knob • Programmes are available according to the clothes type. • The lamp will light up to indicate the selected programme. c Start/Pause Button • This button is used to start the wash programme or pause the wash programme.
OPERATION 23 EN Description e Customizing Washing Programme Buttons Use these buttons to adjust the water temperature, spin speed and soil level settings for the selected programme. • The current settings are shown in the display. • Press the button for that option to select other settings. f Display • The display shows the settings, estimated remaining time, options, and status messages. When the appliance is turned on, the default settings in the display will illuminate.
EN 24 OPERATION Programme Table Washing Programme Cotton Description 40 °C (Cold to 60 °C) Max. Load: Rating Washes normally soiled clothes by combining various drum motions. • Pressing the Start/Pause button without selecting a programme will cause the Cotton programme to begin immediately, using the default settings. NOTE • Programme setting with Cotton, Heavy Wash, Rinse 3, Extra High Spin, 40 °C, Turbo Clean option for test in accordance or in conformity with AS/NZS 2040.
OPERATION 25 Sportswear Description 30 °C (Cold to 30 °C) EN Max. Load 5 kg Washes special garments like sports and outdoor wear. • Use for water-repellent fabric laminate used on clothing. Duvet Description Washes large items such as bed covers, pillows, sofa covers, etc. Speed Wash Description 40 °C (Cold to 40 °C) - Max. Load 3 kg Rinses and spins clothes. Use fabric softener if needed. Download Cycle Description Max. Load 5 kg Washes small loads of lightly soiled clothes in a short time.
EN 26 OPERATION Programme Steam Turbo Clean Crease Care Hygiene # # # Allergy Care # # # Sportswear # # Duvet # Speed Wash # Delicates Rinse+Spin # Max. Spin Speed Programme Max.
OPERATION 27 Extra Options and Functions You can use the extra options and functions to customize the programmes. Customizing a Washing Programme Each programme has default settings that are selected automatically. You may also customize these settings using these buttons. Wash Press the Wash button repeatedly until the desired soil level is selected. EN Follow the next steps to customize a washing programme: 1 Prepare the clothes and load the drum. 2 Press the Power button. 3 Add detergent.
EN 28 OPERATION Using Basic Options You can customize the programmes by using the following basic options: Add Item You can use this option in order to add or remove clothes after the washing programme has started. time may vary due to water temperature, clothes and other factors. • To cancel the function, the Power button should be pressed. • Avoid using liquid detergent for this function. 1 Press the Power button. 2 Select a washing programme.
OPERATION 29 Saving and Recalling your Favourite Programme Use the Favourite and Save Favourite functions to save and recall your favorite washing programmes. You can customize washing programmes by adjusting options, if needed. NOTE • Washing method, number of rinses, spin intensity and water temperature etc. can be saved in this customized function. How to save your favourite programme 1 2 3 Press and hold the Favourite button for 3 seconds to save the favorite programme.
EN 30 SMART FUNCTIONS SMART FUNCTIONS LG ThinQ Application The LG ThinQ application allows you to communicate with the appliance using a smartphone. LG ThinQ Application Features notifications on a smartphone. The notifications are triggered even if the LG ThinQ application is off. NOTE Communicate with the appliance from a smartphone using the convenient smart features.
SMART FUNCTIONS 31 NOTE • To verify the Wi-Fi connection, check that f icon on the control panel is lit. • The appliance supports 2.4 GHz Wi-Fi networks only. To check your network frequency, contact your Internet service provider or refer to your wireless router manual. • LG ThinQ is not responsible for any network connection problems or any faults, malfunctions, or errors caused by network connection. • If the appliance is having trouble connecting to the Wi-Fi network, it may be too far from the router.
EN 32 SMART FUNCTIONS Open Source Software Notice Information Using Audible Diagnosis to Diagnose Issues To obtain the source code under GPL, LGPL, MPL, and other open source licenses, that is contained in this product, please visit http:// opensource.lge.com. Follow the instructions below to use the audible diagnosis method. In addition to the source code, all referred license terms, warranty disclaimers and copyright notices are available for download.
MAINTENANCE 33 EN MAINTENANCE WARNING • Unplug the appliance before cleaning to avoid the risk of electric shock. Failure to follow this warning may result in serious injury, fire, electric shock, or death. • Never use harsh chemicals, abrasive cleaners, or solvents to clean the appliance. They may damage the finish. Cleaning After Every Wash Cleaning the Exterior What to Clean Proper care of your appliance can extend the service life.
EN 34 MAINTENANCE Cleaning the Appliance Periodically & Performing an Emergency Water Evacuation Tub Clean This is a special function to help clean the inside of the appliance by soaking, washing, rinsing and spinning. Run this function once a month (or more often if needed) to reduce build-up of detergent and softener and other residue. • If there is a bad smell or mildew inside the appliance, run this function once a week for 3 weeks in addition to the regularly prompted intervals.
MAINTENANCE 35 Cleaning the Drain Pump Filter and Performing an Emergency Water Evacuation The drain filter collects threads and small objects that may have been accidently left in the laundry. Check regularly that the filter is clean to ensure smooth running of your appliance. Allow the water to cool before cleaning the drain pump filter. Open the door in an emergency or perform an emergency water evacuation. 1 Unplug the appliance. 2 Open the cover cap and pull out the drain tube.
EN 5 36 MAINTENANCE Return the inserts to the proper compartments and replace the drawer.
TROUBLESHOOTING 37 EN TROUBLESHOOTING Operation of your appliance can lead to errors and malfunctions. The following tables contain possible causes and notes for resolving an error message or malfunction. It is recommended to read the tables carefully below in order to save your time and money that may cost for calling to LG Electronics service centre. Before Calling for Service Your appliance is equipped with an automatic error-monitoring system to detect and diagnose problems at an early stage.
EN 38 TROUBLESHOOTING Symptoms OE WATER OUTLET ERROR Possible Cause & Solution Drain hose is kinked or clogged. Water in the appliance does not drain or drains slowly. • Clean and straighten the drain hose. The drain filter is clogged. • Check and clean the drain filter. dE dE1 dEz dE4 Door sensor malfunctions. DOOR ERROR • Please call LG service centre. You can find your local LG service centre phone number in the warranty card. tE This is a control error.
TROUBLESHOOTING 39 EN Noises You Might Hear Symptoms Possible Cause & Solution Rattling and clanking noise Foreign objects, such as keys, coins, or safety pins may be in the drum. Thumping sound Heavy clothes may produce a thumping sound. This is usually normal. • Stop the appliance, check the drum for foreign objects. If the noise continues after the appliance is restarted, call for service. • If the sound continues, the appliance is probably out of balance. Stop and redistribute the clothes.
EN 40 TROUBLESHOOTING Symptoms Appliance does not operate. Possible Cause & Solution Control panel has powered off due to inactivity. • This is normal. Press the Power button to turn the appliance on. Appliance is unplugged. • Make sure that the cord is plugged securely into a working outlet. Water supply is turned off. • Turn the water supply tap completely. Controls are not set properly. • Make sure that the programme is correctly set. Close the door and press the Start/Pause button. Door is open.
TROUBLESHOOTING 41 Symptoms Appliance is not filling properly. EN Possible Cause & Solution Inlet filter clogged. • Make sure the inlet filters on the fill valves are not clogged. Inlet hoses may be kinked. • Check that inlet hoses are not kinked or clogged. Insufficient water supply. • Make sure that both hot and cold water taps are turned on all the way. Hot and cold supply hoses are reversed. • Check supply hose connections. Appliance does not drain water. Kinked drain hose.
EN 42 TROUBLESHOOTING Performance Symptoms Poor stain removal Possible Cause & Solution Previously set stains. • Articles that have been previously washed may have stains which have been set. These stains may be difficult to remove and may require hand washing or pre-treating to aid in stain removal. Staining Bleach or softener is dispensed too soon. • Dispenser compartment is overfilled. It makes bleach or softer dispensed rapidly. Always measure bleach or softener to prevent overfilling.
TROUBLESHOOTING 43 EN Odour Symptoms Musty or mildewy odour in appliance Possible Cause & Solution Inside of drum is not cleaned properly. • Run the Tub Clean function regularly. The drain hose is not properly installed, causing siphoning (water flowing back inside of the appliance). • When installing the drain hose, make sure that it does not get kinked or blocked. The detergent dispenser is not cleaned regularly.
EN 44 TROUBLESHOOTING Wi-Fi Symptoms Your home appliance and smartphone are not connected to the Wi-Fi network. Possible Cause & Solution The password for the Wi-Fi that you are trying to connect to is incorrect. • Find the Wi-Fi network connected to your smartphone and remove it, then register your appliance on LG ThinQ. Mobile data for your smartphone is turned on. • Turn off the Mobile data of your smartphone and register the appliance using the Wi-Fi network.
Memo
Memo
Memo
Memo
Memo
Memo
Memo