RELEASING THIS DRAWING WITHOUT PERMISSION LG Electronics SHOULD BE ACCUSED ACCORDING TO THE LAWS AND COMPANY RULES. MFL67983115 이 도면은 LG전자의 자산으로 불법 유출시 관계법과 회사규정에 의해 처벌됨. WORK SEC. 15 재 적용모델 VS8400SCW 질 모조지 80g OFFSET 인쇄 인쇄방법 인쇄도수 표지 내지 REMARK PAGE GBU향 2 OFFSET 인쇄 1도 40 36, A5 1도 English Arabic << 주기 >> 210 1. 2. 3. 4. 5. 재질, 인쇄방법, 인쇄도수, 외곽치수등은 작업표에 준한다. 인쇄내용, 문자크기 및 형상, 선의 굵기 등은 설계에서 제시된 도면에 준함. 외곽치수는 절단후 치수임. 양산전에 설계 한도를 득할 것.
OWNER’S MANUAL LG CORDLESS HANDY-STICK CLEANER This manual contains important information and instructions for the safe use and maintenance of the vaccum cleaner. Please read all of the information on page 3, 4, 5 for your safety. Please keep this manual in an easily accessible place for future reference. Be sure to charge the battery fully before using the product for the first time after purchase. VS84***** VS86***** www.lg.
Table of contents Important safety instructions ............................................................................. 3~5 Components and functions...................................................................................... 6 How to use ......................................................................................................... 7~15 Assembling vacuum cleaner ................................................................................................. 7 Assembling Charger .
IMPORTANT SAFETY INSTRUCTIONS Read and follow all instructions before using your vacuum cleaner to prevent the risk of fire, electrical shock, personal injury, or damage when using the vacuum cleaner. This guide does not cover all possible conditions that may occur. Always contact your service agent or manufacturer about problems that you do not understand. This is the safety alert symbol. This symbol alerts you to potential hazards that can kill or hurt you and others.
IMPORTANT SAFETY INSTRUCTIONS WARNING • This appliance is designed for normal indoor domestic use only. It is not to be used for any office or commercial application. • No one other than a repair technician shall disassemble or modify the product. It may cause fire or electrical shock. • Do not spray combustible materials such as gasoline or solvents, or surfactants such as detergents or bathing goods, or drinks near the cleaner and its charging stand. It can cause an explosion or fire.
IMPORTANT SAFETY INSTRUCTIONS CAUTION • Do not use this cleaner on anything other than rated voltage. It may cause fire and unrepairable product damage. • If the product is not in use for a long period of time, pull out the power plug. • Static Electricity may be generated at main body during the cleaning. Cleaner may malfunction due to electrostatic energy, so pull out the power cord and put it back in again. • Big objects such as socks, stocking, tissues, etc.
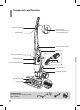
Components and functions Stick power button Speed button Finger hanger - Place your finger here for comfortable use.
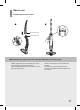
How to use Assembling vacuum cleaner 1 2 Upper body part Lower body part ➊ Assembling the Upper and Lower body parts ➋ Fasten the fixing screw Attach upper body part to the lower body part in arrow direction as shown in the figure. (When assembling the product, make sure not to get your finger stuck.) There is a fixing hole on the rear side the product. Use the fixing screw provided with the product to assemble and secure upper and lower parts.
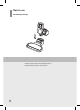
How to use Assembling Charger Insert the upper part of the charging stand to the base until you hear a “click” sound.
How to use Using the Product Handle power button Speed button (High or Low) Battery indicator Projection Vacuum power button Battery indicator Groove Make sure the assembly part has docked correctly. Press the power button to turn on the product. • When you use the vacuum cleaner, select the motor speed with the speed button. • If the product doesn’t work, check the battery indicator for a visual display. Place the rear bottom of the main body on the charger as shown on the figure.
How to use Using the Product The anti-tangle brush is ideal for cleaning short-furred carpet or a normal timber floor surface. ① It is not recommended to vacuum a carpet with long fur. ② If you vacuum a long piled carpet, it may cause the anti-tangle brush to stop rotating. – When the anti-tangle brush stops due to a motor overload, turn the vacuum cleaner off and on again to allow it to work again.
How to use Using the Product For the convenience of the user,a built-in brush is attached to the hand held cleaner. When using the hand held cleaner alone, refer to the following instructions. Using built-in brush Retracting the built-in brush Pull out the built-in brush until it secures into place at the bottom of the vacuum cleaner in the arrow direction. Firmly slide the built-in brush in the arrow direction. Move the brush in the arrow direction until it is locked into place.
How to use Charging 1 Battery indicator Charging indicator 2 ➊ If the voltage gets low during ➋T he charging time may vary depending on the battery condition. When the minimum amount of charge is left, it takes about operation, the power is 4.5 hours to fully charge the battery. (Charging one battery) automatically turned off to protect the battery. • The battery fitted to the vacuum cleaner is charged first, and You must then recharge the then the battery attached to the charging stand is charged.
How to use Cleaning Dust bin ① Dust bin release button ② Filter cover Dust bin ③ Inner Filter Dust separator ⑤ Clean and dry Inner Filter (non mesh side) ④ Fig.1 ①T o detach the dust bin, push and hold the release button and pull it in arrow direction. ② Remove the filter cover assembly in the direction indicated by the arrow, then remove the dust separator from the dust bin. (Beware that the dust that may fall from the filter in the process.) ③ Empty the dust bin.
How to use Assembling Dust bin Filter cover Inner Filter ① Dust separator ② ①A ttach the inner filter back onto the filter cover. ② Put the dust separator back into the dust bin. ③A ssemble the filter cover back onto the dust separator in the direction indicated by the arrow. Helpful tip • Refer to the following figure to assemble the filter cover, filter holder and dust bin by aligning in the right direction.
How to use Cleaning Nozzle 1 2 Hook Anti-tangle brush 4 3 5 6 Click ck Cli Hook Belt ➊A s showing in the figure, press the hook to release the antitangle brush cover. ➋ Lift the anti-tangle brush in the arrow direction and detach it from the drive belt. ➍ Put the anti-tangle brush back onto the belt inside the vacuum nozzle. ➌C lean the brush when brush is tangled with hairs and threads. - Use another vacuum cleaner to remove the hair and threads from the anti-tangle brush.
Troubleshooting Guide If there is an abnormality in the product, check the following items first before requesting for a service center or calling the store. A service cost will be charged if the appliance has a user related malfunction, or no malfunction is found. Following simple actions in the user manual may solve the problem. CHECK PLEASE PERFORM THE FOLLOWING ACTIONS Weak or no suction and vibration noise.
Note
Note
كالمال ليلد المكنسة اليدوية الالسلكية من LG تتضمن هذه المعلومات تعليمات هامة بشأن استخدام المكنسة الكهربائية وصيانتها بأمان� يرجى قراءة كافة المعلومات الموجودة في الصفحات 3و 4و 5المتعلقة بسالمتك� كما يرجى االحتفاظ بهذا الدليل في مكان يسهل الوصول إليه للرجوع إليه في المستقبل� احرص على شحن البطارية بالكامل قبل استخدام المنتج للمرة األولى بعد شرائه� *****VS84 *****VS86 www.lg.
جدول المحتويات تعليمات هامة متعلقة بالسالمة المكونات والوظائف ّ طريقة االستخدام 5~3............................................................. 6. .......................................................................... 15~7. .........................................................................
تعليمات هامة متعلقة بالسالمة اقرأ كافة التعليمات قبل استخدام المكنسة الكهربائية واتبعها لمنع نشوب حريق أو حدوث صدمة كهربائية أو إصابة جسدية أو إلحاق ضرر بالمكنسة عند استخدامها. تجدر اإلشارة إلى أن هذا الدليل ال يذكر كافة الظروف المحتملة التي قد تحدث .لذا ،اتصل دائمًا بوكيل الخدمة أو جهة الصنع في ما يتعلق بالمشاكل التي ال تفهمها. هذا هو رمز التنبيه المتعلق بالسالمة . ينبّهك هذا الرمز إلى المخاطر المحتملة التي يمكن أن تؤدي إلى وفاتك أو إصابتك وإصابة أشخاص آخرين.
تعليمات هامة متعلقة بالسالمة تحذير • تم تصميم هذا الجهاز لالستخدام الداخلي العادي فقط .وليس مخصصًا لالستخدام في أي مكتب أو مكان تجاري. • ال يحق ألي شخص غير ف ّني التصليح ف ّك المنتج أو تعديله. فقد يؤدي ذلك إلى نشوب حريق أو حدوث صدمة كهربائية. • ال ترشّ موادًا قابلة لالشتعال مثل الجازولين أو المذيبات أو المواد الخافضة للتوتر السطحي مثل المنظفات أو مواد االستحمام أو المشروبات بالقرب من المكنسة وقاعدة الشحن الخاصة بها. فقد يؤدي ذلك إلى وقوع انفجار أو نشوب حريق.
تعليمات هامة متعلقة بالسالمة تنبيه • ال تستخدم هذه المكنسة مع جهد كهربائي يختلف عن الجهد المقدّر. فقد يؤدي ذلك إلى نشوب حريق وحدوث عطل ال يمكن إصالحه في المنتج. فأزله قبل استخدام • عند التصاق كائن غريب بأسفل حاوية الغبارِ ، المنتج. فقد يؤثر ذلك في أداء محرك الشفط ويؤدي إلى عطل وتلف. • في حال لن يتم استخدام المنتج لفترة طويلة ،فافصل قابس الطاقة. • ال تستخدم أبدًا المنتج إلزالة الغازات السامة.
المكونات والوظائف ّ زر الطاقة على العصا موضع اإلصبع ضع إصبعك هنالالستخدام المريح .
طريقة االستخدام تركيب المكنسة الكهربائية 1 2 الجزء العلوي من العصا الجزء السفلي من العصا ➊ تركيب المكنسة اليدوية بالعصا قم بتوصيل الجزء العلوي من العصا بالجزء السفلي منها في اتجاه السهم كما هو موضح في الصورة. )عند تركيب المنتج ،احرص على عدم انحشار إصبعك(. ➋ تركيب برغي التثبيت توجد فتحة تثبيت على الجهة الخلفية من المنتج. استخدم برغي التثبيت المتوفر مع المنتج لتركيب الجزأين العلوي والسفلي.
طريقة االستخدام تركيب الشاحن أدخل الجزء العلوي من قاعدة الشحن في القاعدة حتى تسمع صوت "طقطقة".
طريقة االستخدام استخدام المنتج زر الطاقة على العصا مؤشر البطارية البروز زر السرعة زر الطاقة السهل االستخدام مؤشر البطارية التجويف تأكد من تركيب القطع بإحكام. اضغط على زر الطاقة لتشغيل المنتج. • عند استخدام المكنسة اليدوية ،اضبط سرعة المكنسة باستخدام زر السرعة. • إذا لم يعمل المنتج ،فتحقق من البطارية وتأكد من أن طاقتها ليست منخفضة كثيرً ا. ضع الجزء األسفل الخلفي من الهيكل الرئيسي على الشاحن كما هو موضح في الصورة.
طريقة االستخدام استخدام المنتج تعتبر الفرشاة المانعة للتشابك مثالية لتنظيف السجاد القصير الوبرة أو أسطح األرضيات العادية. ① ال يوصى بتنظيف السجاد الطويل الوبرة. ② إذا نظفت سجا ًدا طويل وبرة باستخدام المكنسة الكهربائية لفترة طويلة ،فقد يؤدي ذلك إلى توقف تشغيل الفرشاة المانعة للتشابك. – عندما تتوقف الفرشاة المانعة للتشابك عن التشغيل بسبب الحمل الزائد على المحرك ،أوقف تشغيل المكنسة الكهربائية ثم أعِ د تشغيلها لتسمح لها بالعمل من جديد.
طريقة االستخدام استخدام المنتج لراحة المستخدم ،تجد الفرشاة المضمنة في المكنسة اليدوية. عند استخدام المكنسة اليدوية وحدها ،راجع التعليمات التالية. استخدام الفرشاة المضمنة إعادة تركيب الفرشاة المضمنة اسحب الفرشاة المضمنة من أسفل المكنسة الكهربائية في اتجاه السهم. حرّ ك فرشاة الفرشاة المضمنة باتجاه السهم. حرك الفرشاة باتجاه السهم حتى يتم توصيلها وتثبيتها. أعِ د وضع الفرشاة المضمنة في الهيكل الخارجي باتجاه السهم.
طريقة االستخدام الشحن مؤشر البطارية 2 مؤشر الشحن ➊ إذا انخفض الجهد الكهربائي أثناء االستخدام، فسيتم إيقاف تشغيل الطاقة تلقائيًا لحماية البطارية. ثم عليك إعادة شحن البطارية. قبل البدء بإعادة الشحن ،تأكد من أن المكنسة اليدوية مثبتة بإحكام بالهيكل الرئيسي ثم ضعها على قاعدة الشحن. ➋ قد تختلف مدة الشحن وف ًقا لحالة البطارية. إذا بقيَ الحد األدنى من مستوى للشحن ،فسيستغرق الشحن الكامل للبطارية حوالى 4.5ساعات( .
طريقة االستخدام تنظيف حاوية الغبار زر تحرير حاوية الغبار ① غطاء الفلتر ② ③ حاوية الغبار الغطاء الداخلي فاصل الغبار الغطاء الداخلي )جانب منع التشابك( ⑤ ④ نظيف وجاف ① لفصل حاوية الغبار ،اضغط باستمرار على زر التحرير واسحبها باتجاه السهم. أزل فاصل الغبار. أزل غطاء الفلتر باالتجاه الذي يشير إليه السهم ،ثم ِ ② ِ )انتبه إذ إن الغبار قد يتساقط من الفلتر أثناء هذه العملية(. ③ افرغ الحاوية. ④ افصل الفلتر عن غطاء الفلتر كما هو مبيّن في الصورة.
طريقة االستخدام تركيب حاوية الغبار غطاء الفلتر الغطاء الداخلي فاصل الغبار ① ② ① أعِ د تركيب الفلتر الداخلي على غطاء الفلتر. ② أعِ د وضع فاصل الغبار في حاوية الغبار. ③ قم بتركيب غطاء الفلتر باالتجاه الذي يشير إليه السهم. تلميح حول االستخدام • راجع الصورة التالية لتركيب غطاء الفلتر وحامل الفلتر وحاوية الغبار عبر محاذاتها في االتجاه الصحيح.
طريقة االستخدام تنظيف الفوهة 1 2 الخطاف الفرشاة المانعة للتشابك 4 3 6 5 انقر ا نقر الخطاف الحزام ➊ كما هو موضح في الصورة، اضغط على الخطاف لتحرير غطاء الفرشاة المانعة للتشابك. ➋ ارفع الفرشاة المانعة للتشابك باتجاه السهم. ➍ ضع الفرشاة المانعة للتشابك في الحزام داخل فوهة المكنسة. ➌ استخدم المكنسة الكهربائية إلزالة الشعر والخيوط من الفرشاة المانعة للتشابك.
دليل استكشاف األخطاء وإصالحها في حال وجود عيب في المنتج ،تحقق من العناصر التالية أوالً قبل طلب مركز خدمة العمالء أو االتصال بالمتجر. سيتم فرض تكلفة على الخدمة إذا لم يكن الجهاز معطالً. قد يح ّل اتباع اإلجراءات البسيطة التالية في دليل المستخدم المشكلة. الفحص يرجى اتباع اإلجراءات التالية شفط ضعيف أو منعدم وضوضاء ناتجة من االهتزاز. • تحقق مما إذا كان المدخل أو حاوية الغبار مسدودة بأي كائن غريب أو بقايا تضعف عملية الشفط.
مالحظة
مالحظة