OWNER’S MANUAL BEDDING CLEANER This manual contains important information and instructions for the safe use and maintenance of the bedding cleaner. Please read all of the information on page 3, 4, 5 for your safety. Please keep this manual in an easily accessible place for future reference. VH920*DS VH920*D www.lg.
Table of contents Important safety instructions ........................................................................... 3~5 How to use ....................................................................................................... 6~14 Bedding Cleaner ................................................................................................................ 6 Sterilizer Station ................................................................................................................
IMPORTANT SAFETY INSTRUCTIONS Read and follow all instructions before using your vacuum cleaner to prevent the risk of fire, electrical shock, personal injury, or damage when using the vacuum cleaner. This guide does not cover all possible conditions that may occur. Always contact your service agent or manufacturer about problems that you do not understand. This appliance complies with the following EC Directives :-2006/95/EC Low Voltage Directive -2004/108/EC EMC Directive. This is the safety alert symbol.
IMPORTANT SAFETY INSTRUCTIONS WARNING • Use it only on bedding items such as blankets, mattresses, pillows, or cloth sofas. Do not use this appliance to suck in dust, cement, or any construction debris. Do not use on leather upholstered surfaces. It may cause fire and unrepairable product damage. • This appliance is designed for normal indoor domestic use only. It is not to be used for any office or commercial application. • No one other than a repair technician shall disassemble or modify the product.
IMPORTANT SAFETY INSTRUCTIONS CAUTION • Do not use this cleaner on anything other than rated voltage. It may cause fire and unrepairable product damage. • If the product is not in use for a long period of time, pull out the power plug. • Static Electricity may be generated at main body during the cleaning. Cleaner may malfunction due to electrostatic energy, so pull out the power cord and put it back in again. • Big objects such as socks, stocking, tissues, etc.
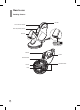
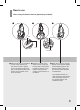
How to use Bedding Cleaner Handle Touch Power Switch Tank Separation Button Dust bin Cleaning Brush Wheel Outlet Bottom Plate Brush Inlet 6 Vibration Plate
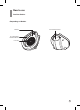
How to use Sterilizer Station Window Cord Storage Groove UV Lamp Status Indicator Window UV Lamp 7
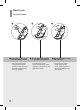
How to use Using the Product 1 ➊ Insert the power cord into the power socket. • When the power cord is inserted into the power socket, the unit will emit a chime and default to the stand by operation. 8 2 p~ bee ➋ Touch the power switch to operate an appliance. • Pressing touch power switch sounds ‘beep,’ starts operation of the product, and lights the indicator. 3 p~ bee ➌ When you want to stop the operation.
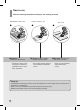
How to use When using sterilization station (Depending on Model) 1 2 3 Sill Groove Gap Protrusion ➊ Place the product on the station ➋ Place the product on the in such a way that the front station in such a way that side of the product is placed the rear side of the product first on the station to allow the to allow the groove on the gap on the vibration plate of the bottom of the product is product to be inserted on the caught on the protrusion of sill of the station. the station.
How to use Effective cleaning methods according to the cleaning surfaces Bed Mattress, Bed Cover Pillows, Cushions, etc. 1 2 ➊ Bedding: Mattress, Bed Cover • Divide the surface to half, and apply a forward and backward motion to both sides separately. Using tip ➋ Pillows: Large cushion, normal cushion, pillow • For smaller surfaces apply an even forward and backward motion. Thin cover 3 ➌ Blankets: Thick cover, thin cover, blanket • Apply an even backward and forward stroke motion.
How to use How to Wash Inlet Bottom Plate 1 2 4 3 5 6 Fixing Grooves ➊ Place a soft cloth on the surface, and flip over the main body on it with the product not connected to the socket outlet. ➋ Wipe down the intake area with a damp cloth. Make sure that there is no foreign objects, lift the left and the right of the bottom plate by pulling it up. Hold the brush and separate it by lifting it up. ➍ Clean the roller brush with a vacuum cleaner or an old unused tooth brush.
How to use Emptying Dust bin MAX 12 The Dust indicator should be observed regularly. Cleaning must be carried out before or when the fine dust and debris has reached the MAX line by emptying the dust bin and cleaning it (refer to next page) before using the appliance again.
How to use Cleaning Dust bin ① ② ③ Click ⑥ ⑤ ④ Click ① Press the tank separation button. Then lift the dust bin from the main body. ② Hold both ends, open the filter (sponge filter + HEPA filter), and empty the dust. ③ After separating dust bin and filter, wash dust bin thoroughly with running water. Refer to page 14 if sponge filters require cleaning. ④ Completely dry it in a shady place with good ventilation for about a day. ⑤ Insert Filter (Sponge filter + HEPA filter) into dust bin.
How to use Care of Dust Filter ① ② Sponge Filter HEPA Filter HEPA Filter ④ Sponge Filter HEPA Filter ③ HEPA Filter ① After separating the filter from dust bin, separate sponge filter from HEPA Filter in the above figure. ② Clean the HEPA filter and the gaps around the filter using the brush and a vacuum cleaner. ③ Wash the Sponge Filter in running water, and completely dry it in a shady place with good ventilation for about a day before using it again.
Troubleshooting Guide If there is an abnormality in the product, check the following items first before requesting for a service center or calling the store. A service cost will be charged if the appliance does not have any malfunctions. Following simple actions in the user manual may solve the problem. CHECK PLEASE PERFORM THE FOLLOWING ACTIONS Weak or no suction and vibration noise. • Check if inlet or dust bin is blocked by any foreign objects or debris that weaken the suction.
Made in Korea