
Installation Manual


8 Multi Air Conditioner
Installation of Indoor, Outdoor Unit
Read completely, then follow step by step.
Indoor unit
1. Do not have any heat or steam near the unit.
2. Select a place where there are no obstacles in
front of the unit.
3. Make sure that condensation drainage can be
conveniently routed away.
4. Do not install near a doorway.
5. Ensure the unit is unobstructed, allow proper
space on all sides according to the arrows and
distance measurements in the figures.
6.
Use a Metal Detector or Metal Scanner to locate
studs to prevent unnecessary damage to the wall.
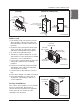
Select the best location
Top view
Front view
H=20(25/32) or more
Ceiling
Unit: mm(inch)
[Ceiling Concealed Duct Type] [Ceiling Cassette Type]
[ART COOL Gallery]
600
(23-5/8)
600
(23-5/8)
Inspection hole
[600(23-5/8) x 600(23-5/8)]
Control box
Ceiling
Ceiling Board
Ceiling Board
At least
3 600(141-
23
/
32
) or less
1 000(39-
3
/
8
)
or more
500(19-
11
/
16
)
or more
10(
13
/
32
)
or more
500(19-
11
/16)
or more
300(11-
13
/16) or less
30(1-3/16)
±3(1/8)
More than
200(7-87/100)
More than
500(19-11/16)
More than
1 500(59-11/200)
More than
500(19-11/16)
FloorFloorFloor
Service Space
A
B
Capacity(kBtu/h class)
AB
24 800(31-1/2) 1 010(39-3/4)
36 800(31-1/2)
1 359(53-1/2)
* Suitable dimention “H” is necessary to get a slope to
drain as show in the figure.
More than 200(7-7/8)
Recommended height
2 000(78-3/4)
More than
100(3-15/16)
More than
100(3-15/16)
Unit:mm(inch)
[Wall mounted / ART COOL Mirror]
❈
Note : remove obstructions to prevent blockage of airflow path
Floor
Installation of Indoor, Outdoor Unit