
Owner's Manual


50
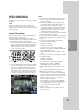
Main Screen of DVR Client
Program
1. Program Menu
• File
- Exit: Exit the program.
- Save to JPEG: You can capture and save
the current image in JPEG file format while
the play back recorded data of the selected
channel. The save folder is “C:\LG Exported
Files”.
•
View
- OSD
>
Channel Number: Displays or removes the
channel number in the channel window.
>
Site Name: Displays or removes the site
name in the channel window.
>
Camera Name: Displays or removes the
camera name in the channel window.
>
Playback Time: Displays or removes the
date/time of playback data in the channel
window.
>
PTZ: Displays PTZ camera icon in the
channel window.
>
Audio: Displays audio icon in the channel
window.
>
Select All: Displays all OSD options in the
channel window.
- Sequence (Dwell Time): Select the sequence
to 5 seconds, 10 seconds, 15 seconds or 20
seconds.
-
Sequence mode
>
Channel Sequence: Each channel of the
selected site in the sequence mode will be
displayed in sequence.
>
Site Sequence: Each channel of the
logged site in the sequence mode will be
displayed in sequence.
-
Language: Select the language for client
program.
Relay Out: Select to use the relay off function.
<How to use Relay Out function>
1.
Select [View] > [Relay Out].
2. Select the registered site name and click
the right mouse button.
3.
Select the relay out channel to ON or OFF.
If you select [Relay Out Off ] option, alarm
out of the all channels are stopped.
•
Tools
- Connection Information: To register a site
name.
•
Help
- Client Information: Displays Network Client
Version Information.
2. Mode Selection Icons
• Live Mode
- Camera View: You can see the surveillance
camera's images in the window(s) and the
camera information.
- Pan/Tilt/Zoom: You can control the PTZ
cameras.
-
Log View: Displays system log list.
• Search Mode
You can search the recorded data as shown
below.
-
Date/Time Search (See page 54)
- Event Search (See page 54)
- Bookmark Search (See page 54)
- Smart Search (See page 55)
•
Remote Setup Mode
You can set the configuration of the unit.
- Camera / Display (See page 55-57)
- Schedule (See page 57-58)
- Event (See page 58)
- Network (See page 59)
- System (See page 60)
3. Remote Export Icon
Click to display the Remote Export pop-up win-
dows. (See page 61)
4. Print Icon
When you click the PAUSE button to pause the
playing the recorded data of the selected chan-
nel, the Print Icon is activated. You can print
the paused picture of the recorded data of the
selected channel.
-