
Owner's Manual


52 Client program
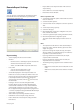
Schedule Copy Settings
1. Select the source day to copy.
2. Select the destination day from the day of
the week, weekday or weekend options.
3.
Click the copy button to copy the schedule data.
Special day Settings
1. Mark up the special day option.
2. Select the date to set the special day schedule.
3. Mark up the desired recording option.
4. Select the channel to set the schedule.
5. Click the start time cell block and drag & drop to select
a time period cell block.
or
Click the start time cell block of a channel and drag &
drop across the channels to select the time period block
for multi channel setting at the same time.
The color of the cell block will change.
6.
Enter the name of the special day.
7. Click the add button to add the special day settings.
The special day is added to the list.
If you want to cancel the registered special day, select
the special day in the list and click the delete button.
Event setup
1. Set the event options.
Sensor: Displays the number of the ALARM-IN ter-
minal.
Sensor Type: The alarm state can be set to either
N.O. (Normally Open) or N.C. (Normally Closed).
Linked Camera: Select the connected camera chan-
nel with the ALARM-IN terminal.
Relay Output: Select the alarm output number of
the ALARM-OUT terminal for the output alarm sig-
nal.
2.
Setting [Etc] options.
Relay Off: Set the "Alarm Acknowledged" or "Post
Alarm Time" option to off.
System Alarm Out:
ON: Outputs the alarm (relay) signal via the
ALARM-OUT terminal below cases.
When the HDD has bad sector.
When a video signal from the camera has
stopped because of a cable disconnection or
malfunction of a camera.
OFF: Not used.
Network setup
•
•
•
•
•
•
-
>
>
-