
Owner’s Manual


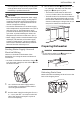


Table Of Contents
- IMPORTANT SAFETY INSTRUCTIONS
- PRODUCT OVERVIEW
- INSTALLATION
- OPERATION
- Before Using
- Control Panel
- Wash Cycles
- Options and Extra Functions
- Loading the Dishwasher
- Loading the Silverware Basket
- Loading the Lower Rack
- Loading the Upper Rack
- Loading the Cutlery Rack
- Adding Cleaning Products
- SMART FUNCTIONS
- MAINTENANCE
- TROUBLESHOOTING
- LIMITED WARRANTY

14 INSTALLATION
Removable Shipping Brace
The rear shipping brace can be removed if
additional clearance is needed when installing the
dishwasher under a low countertop.
Removing Lower Cover
CAUTION
• If you lay the dishwasher on its back, do so
carefully to avoid damaging the drain hose and
the tub.
1 Remove the screws at either side which attach
the lower cover to the dishwasher.
2 Remove the lower cover.
3 If there is insulation padding behind the lower
cover, remove it.
4 Set the parts aside until the installation is
complete.
Removing Packing Materials from
the Interior
Remove all packing materials from the interior of
the dishwasher before installing the appliance.
Attaching Installation Brackets
For countertops made of wood or other materials
that will not be damaged by drilling, use the metal
installation brackets provided.
For countertops made of granite, marble, or other
materials that could be damaged by drilling, use
the wood screws to attach the dishwasher to the
cabinet. See installation instructions in Securing
Dishwasher to Cabinet Opening.
NOTE
• Installation brackets and screws can be found in
the silverware basket.
1 Insert the tabbed end of the installation
brackets into the slots in the upper frame.
Rotate the brackets until the tabbed ends are
facing up.
2 Bend the tabs on the brackets to secure them
to the frame using a pair of needle nose
pliers.