Visit us at http://www.lgservice.com OWNER'S MANUAL FRANÇAIS LG Room Air Conditioner ENGLISH LG ESPAÑOL Dear Owner Thank you for installing LG air conditioner. Your best choice guarantees you a great performance and service to make your life comfortable & pleasant. IMPORTANT • Please read this owner's manual carefully and thoroughly before installing and operating your room air conditioner. • Please retain this owner's manual for future reference after reading it thoroughly.
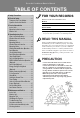
Room Air Conditioner Owner’s Manual TABLE OF CONTENTS A. Safety Precautions ..............................3 B. Electrical Safety...................................6 Temporary Use of an Adapter ...............6 Symbols used in this Manual.................6 C. Product Introduction...........................7 Indoor Units ...........................................7 Operation Indication Lamps ..................7 Outdoor Unit ..........................................7 D. Operating Instructions................
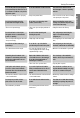
Safety Precautions Safety Precautions This symbol indicates the possibility of death or serious injury. This symbol indicates the possibility of injury or damage. ■ Meanings of symbols used in this manual are as shown below. Be sure not to do. Be sure to follow the instruction. Always use a power plug and socket with a ground terminal. • There is a risk of electric shock. For electrical work, contact the dealer, seller, a qualified electrician, or an Authorized Service Center.
Safety Precautions Indoor/outdoor wiring connections must be secured tightly and the cable should be routed properly so that there is no force pulling the cable from the connection terminals. Safely dispose off the packing materials. Like screws, nails, batteries, broken things etc after installation or svc and then tear away and thraw away the plastic packaging bags. • Improper or loose connections can cause heat generation or fire. • Children may play with them and cause injury.
Safety Precautions Do not use the product for special purposes, such as preserving foods, works of art, etc. It is a consumer air conditioner, not a precision refrigeration system. • There is risk of damage or loss of property. • There is risk of personal injury. Do not insert hands or other objects through the air inlet or outlet while the product is operating. • There are sharp and moving parts that could cause personal injury. Do not tilt the unit when removing or uninstalling it.
Electrical Safety Electrical Safety • This appliance must be properly grounded. To minimize the risk of electric shock, you must alway plug into a grounded oulet. • Do not cut or remove the grounding prong from the power plug. • Attaching the adapter ground terminal to the wall receptacle cover screw does not ground the appliance unless the cover screw is metal and not insulated, and the wall receptacle is grounded through the house wiring.
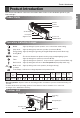
Product Introduction Product Introduction Here is a brief introduction of the indoor and outdoor units. Please see the information specific to your indoor unit type. ENGLISH Indoor Units Air inlet Air filter Plasma filter Air discharge Front panel Power cord ON/OFF button Signal receiver Operation Indication Lamps On/Off : Lights up during the system operation, error code and auto restart setting. Sleep mode : Lights up during sleep mode auto operation.
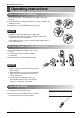
Operating Instructions Operating Instructions How to insert the Batteries 1. Remove the battery cover by pulling it according to the arrow direction. 2. Insert new batteries making sure that the (+) and (-) of battery are installed correctly. 3. Reattach the cover by sliding it back into position. NOTE 1. Always use/replace both batteries of same type. 2. If the system is not to be used for a long time, remove the batteries to save their working life. 3.
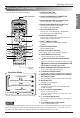
Operating Instructions Wireless Remote Controller 16 11. Signal transmitter 5 1 6 3 4 10 2 7 11 8 13 CANCEL ON OFF SET AUTO CLEAN 15 Flip-up door (opened) Operation Mode Cooling Operation Auto Operation or Auto Changeover Healthy Dehumidification Operation Heating Operation • Cooling Model( ), Heat Pump Model( ) AIR CIRCULATION BUTTON(OPTIONAL) Used to circulate the room air without cooling or heating. ENERGY-SAVING COOLING MODE BUTTON (OPTIONAL) For inverter type models 12.
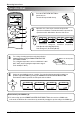
Operating Instructions Operation Mode 1 3 1 Press the START/STOP BUTTON to turn the unit on. The unit will respond with a beep. 2 Open the door of the remote controller and press the operation mode button. Each time the button is pressed, the operation mode is shifted in the direction of the arrow.
Operating Instructions Healthy Dehumidification Operation To run the healthy dehumidification mode follow steps 1, and 2 and 4 (See operation mode) Auto Operation (Cooling Only Model) In this operation mode the actual setting temperature and the fan speed are automatically set by the electronic control logic based on the current room temperature. If you feel hot or cold press the temperature setting buttons respectively for more cooling or heating effect.
Operating Instructions Jet Cool/Heat Operation Jet cool function can be used to cool the room quickly in hot summer. When this function is turned on, the air conditioner runs in cooling operation mode with super high fan speed and 18°C(64°F) setting temperature for 30 minutes for fast and effective cooling. Similarly, jet heat function (available only in some models) warms up the room quickly by operating at super high fan speed and 30°C(86°F) setting temperature for 60 minutes.
Operating Instructions Energy-Saving Cooling Mode (Optional) 1. Press the START/STOP BUTTON to start the unit. 2. Open the door on the remote controller. Select cooling operation or healthy dehumidification operation. 3. Press the ENERGY-SAVING COOLING MODE BUTTON. 4. To cancel the energy-saving cooling mode, press the ENERGY-SAVING COOLING MODEL BUTTON again and unit will operate in previous mode(Cooling or healty dehumidification mode).
Operating Instructions Sleep Mode 1. Press the SLEEP MODE AUTO BUTTON to set the time when you want the unit to stop automatically. 2. The timer is programmed in one-hour increments by pressing the SLEEP MODE AUTO BUTTON 1 to 7 times. The sleep mode is available for 1 to 7 times. To alter the time period in steps of 1 hour, press the SLEEP MODE AUTO BUTTON while aiming at air conditioner. 3. • (In case of non-Inverter Model) Make sure the sleep mode LED lights up.
Operating Instructions Vertical / Horizontal Airflow Direction Control (Optional) The left/right(Horizontal airflow) can be adjusted by using the remote control. 1. Press the START/STOP BUTTON to start the unit. 1. Press the START/STOP BUTTON to start the unit. 2. Press CHAOS SWING BUTTON. 2. Press the HORIZONTAL AIRFLOW DIRECTION BUTTON. 3. The louvers will swing up & down automatically. 4. To stop the louver at a desired angle, press again 3. The louvers will swing left & right automatically. 4.
Maintenance and Service Maintenance and Service Before performing any maintenance, turn off the main power to the system, disconnect the circuit breaker and unplug the power cord. Indoor Unit Clean the unit with a soft dry cloth. Do not use bleach or abrasives. Never use any of these • Water hotter than 40°C(104°F). It may cause deformation and discoloration. • Volatile substances. They may damage the surface of the air conditioner.
Maintenance and Service How to use the front panel 1. Front panel closing Move the link upward and close the front panel. 2. Front panel removing Raise the link up to hook hanger and remove front panel forward. ENGLISH Outdoor Unit The heat exchanger coils and panel vents of the outdoor unit should be checked regularly. If clogged with dirt or soot, the heat exchanger and panel vents may be professionally steam cleaned.
Maintenance and Service Troubleshooting Tips! Save time and money! The air conditioner may be operating abnormally when: Problem Air conditioner does not start Air conditioner does not cool as it should Possible Causes What To Do ■ The air conditioner is unplugged. • Make sure the air conditioner plug is pushed completely into the outlet. ■ The fuse is blown/circuit breaker is tripped. • Check the house fuse/circuit breaker box and replace the fuse or reset the breaker. ■ Power failure.
P/No.