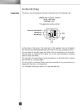
Electrical Connections (In the UK Only) The wires in this mains lead Important are coloured in accordance with the GREEN AND YELLOW BLUE : Green and appliance code : EARTH NEUTRAL BROWN This : following : LIVE must be earthed Yellow(Earth) Brown(Live) Fuse Blue(Neutral) Cord grip As the colours of the wires in the mains lead with the coloured markings identifying of this apparatus may not the terminals in your plug, proceed correspond as follows : The wire which is coloured Gr
Table of Contents Introduction Installation Entry 3 Important Safety Instruction 3 Identification of Parts 4 Where to Install 5 Door Removal 6 Mount the freezer and Feed Water Operation Pipe Installation food on storage Care and maintenance 2 7 7 Height Adjustment 8 Method to Connect Cables 9 Starting 10 Adjusting the Temperatures and Functions (Dispenser / Automatic ice maker) 10 Use to Screen 15 Use to Remote Control 15 Shelf 16 Egg Box 17 Convert into Suggestion re
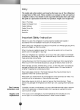
Introduction Entry The model and serial numbers are found on compartment of this unit. These numbers the inner are case unique of the refrigerator to this unit and not available to others. You should record this requested information here and retain guide as a permanent record of your purchase. Staple your receipt here. Date of Purchase : Dealer Purchased From : Dealer Address : Dealer Phone No. : Model No. : Serial No.
Introduction Child entrapment DANGER: Risk of child entrapment. Before you throw away your old refrigerator or freezer: Take off the doors but leave the shelves in place so that children may not inside. warning easily climb appliance is not intended for use by young children or infirm persons without supervision. Young children should be supervised to ensure that they do not play with the appliance. The Don't store Don't store or use gasoline any other appliance.
Installation Where to lnstall Unstable installation may cause vibration and noise. If the floor to install the refrigerator on Strong and even floor is not even, make the refrigerator level by rotating the height adjusting screw. Carpet or floorcloth on which a refrigerator is installed may be discolored by heat from the bottom of the refrigerator. So, it is necessary to place a thick pad below the refrigerator.
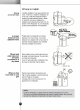
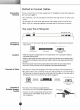
Installation Door Removal If your access door is too narrow for the refrigerator to pass the the refrigerator door and pass the refrigerator through, laterally. Remove lower cover and then feed water remove Lower Cover Remove the lower cover by lifting upward, and then pull up the feed water tube while pressing area | shown in the figure to the right. Feed Water Tube pipe NOTE ? If a tube end is deformed or abraded, cut the part away.
Installation Remove the refrigerator 3) door Remove keeper by rotating it clockwise (|) and then remove the upper hinge by lifting it up(~). 4) Keeper Upper Hinge Remove the lifting it up. refrigerator compartment door by Lower Pass the Pass the door refrigerator as refrigerator laterally through right figure. the Mount them in the door.
Installation Height Adjustment If the freezer Make them level by inserting flat ( type) driver into the groove of the left and rotating it clockwise (|). - compartment door height adjusting screw is lower than the refrigerator compartment door | If the freezer Make them level by adjusting screw and compartment door is higher than the refrigerator compartment door inserting flat ( type) driver rotating it clockwise (|).
Installation Method to Connect Cables Connection Terminal There is a port be can the on rear upper part of In connection of round wires, take ? care so right Rear Upper Side of Connect the TV terminal Round Wire. ? expansion antenna terminal and fix it using round that copper wires will not be bent. SB/2, COM1/2 is external expansion terminals used in ? where the refrigerator plugged-in. For connection, turn the connection terminal to the wires.
Operation Starting When your refrigerator is first installed, allow it to stabilize at normal operating temperatures for 2-3 hours prior to filling it with fresh or frozen foods. If is operation interrupted, Adjusting External wait 5 minutes before restarting.
Operation LCD Back LCD back Light ? ? ? When When When light turns on to easily see display powering on touching desired button opening doors of refrigerator (refrigerator Only LCD back light turns on if tu rned off. No setting status is The LCD back light ? When a ? When a minute has ? When there is turns for power passed after minute has passed after (refrigerator room, freezer room) no touching changed.
Operation Automatic ice maker ? The automatic ice maker automatically make 8 pieces of ice cube at a time, 80 pieces a day. But these quantities may be varied according to various conditions including how many times the refrigerator door opens and closes. ? Ice can when the ice storage bin is full. making stops NOTE ? It is normal that noise is a produced when ice made is dropped into the ice storage bin.
Operation The other functions Ambient temperature ? ? ? Temperature Temperature displayed window. from --9°C 88 49°C. ~ less than -10°C is indicated with 'LO' and temperature more than 50°C is indicated with 'HI'. Temperature may differ from the actual ambient temperature on the upper part of refrigerator (top of door). Door open ? is display as it is monitors warning 3 chimes at the interval of 30 seconds if minute passes with the door of a refrigerator opened continuously.
Operation Cautions Throw away the ice (about 20 after refrigerator installation. and water pieces) The first ice and water may include particles water box. This is necessary in case that the or (about 7 glasses) odor from the feed water refrigerator first made pipe or has not been used for a feed long time. Keep children away from the dispenser. push switch incorrectly or damage Children may lamps. Be careful that food does not block the ice passage.
Operation For more details, see the screen guide. with knife Use To Screen Do not scrub the the Pressing screen It is better write - - screen too a or auger with strongly may damage LCD by using a touch pen for more The touch pen is attached to the right side of the screen. Push the frame of the screen with hands in order to close the a sharp end. screen. clarity. screen at its own place after using it if pulling the screen out.
Operation Shelf Slide type shelf allows you to place or take or put it in more conveniently. Slide type food out tempered glass shelf (In select models only) Attachable wine (In select models only) corner Bottles can corner. This be stored laterally with this wine be attached to any shelf. can Wine holder adjustment : be separated by pulling out and installed by placing it at straight Wine holder it can the end of the shelf you want and pushing it inward.
Operation Egg You Box the egg box to can move according a place you want and select another form of box to the amount of eggs. [Normal] [For Many Eggs] NOTE ? ? Never use the egg box Convert into ? as an ice storage bin. It Never store the egg box in the freezer a Vegetable or The Bottom drawer in the can break. compartment refrigerator can or fresh compartment.
Operation Deodorizer (In select Models Only) This system efficiently absorbs strong odors by using the optical catalyst. This system does hot have any affect on stored food. How to use the ? deodorizing system Since it is installed the ? 18 already installed onto the cool air intake duct from the from refrigerator compartment, you Please need no separate installation. closed containers to store food with pungent odors. Otherwise, this oder can be absorbed by other food in the compartment.
Suggestion on Food storage Location of Foods (Refer to 4pages, Automatic ice maker Automatically Wine rack Identification of Parts) made ice is stored. Store wine. Store small foods such Snack Drawer Freezer as bread, snacks, etc. Store various frozen foods such ice cream, frozen snacks, etc. compartment as meat, fish, shelf Freezer ? compartment ? door rack Store small packaged frozen food. Temperature is likely to increase as opens. So, do not store ice cream.
Suggestion Store fresh food in the important ? storage Foods Storing ? Food on factor in refrigerator compartment. How food maintaining its freshness and flavor. Do not store food which goes bad easily at is frozen and thawed is low temperatures, such as an bananas, and melons. ? Allow hot food to cool other food, and lead to in the refrigerator could spoil storing the food, cover it with vinyl wrap or store in a container with a lid.
Care and Maintenance How to Dismantle Parts NOTE ? Dismantling is done in the reverse sequence of assembly. sure to unplug the power plug before dismantling and assembly. Never apply severe force to dismantle parts. Parts may be damaged. Be Freezer Separate the lamp by pulling it out (~)while slightly lifting the lamp cover (| ). compartment lamp Turn the bulb counterclockwise. Max. 60 W bulb for refrigerator is used and purchased at a service center. Dispenser lamp Max.
Care and Maintenance To Upper lamp in refrigerator compartment remove cover the pull the lamp pressing the bottom cover lamp upwards. Turn the lamp cover, forwards while side of the bulb counterclockwise. Max. 60 W bulb for can lamp in refrigerator compartment Lower Rack be purchased Separate the refrigerator is used and at a service center. lamp by holding both pulling it it forwards. cover lower sides of it and Turn the bulb counterclockwise. Max.
Care and Maintenance General Information During average length vacations, you will probably find it best to leave the refrigerator operation. Place freezable items in freezer for longer storage. When you plan not to operate, keep it running remove all food, disconnect the power cord, clean the interior thoroughly, and leave each door OPEN to prevent odor Vacation time in formation. Power failure Most power failures are corrected in hour an or two will not affect your refrigerator temperatures.
Care and Maintenance Trouble Shooting Before for service, review this list. It may save you both time and expense. common occurrences that are not the result of defective calling This list includes workmanship Occurrence or materials in this appliance. Possible Cause Solution Normal Operations Refrigerator Refrigerator compressor does not run. Refrigerator control is off. Set Refrigerator is in defrost This is normal for Power outage.
Care and Maintenance Occurrence Possible Cause Refrigerator Thermostat is at a constant compressor does not run. Temperatures keeping the Solution refrigerator temperature. This is normal. The Refrigerator goes on and off to keep the temperature constant. are too cold in the freezer is too cold but the Refrigerator Temperature is Temperature Set the freezer control to a warmer freezer temperature is Freezer control is set too cold setting until the satisfactory. Satisfactory.
Care and Maintenance Possible Cause Occurrence Solution Sound and Noise Louder sound levels when Refrigerator is on. Today's refrigerators storage capacity and even Louder sound levels when have increased maintain more It is normal for sound levels to be higher. temperatures. Refrigerator operates at higher pressures during the start of the ON cycle. This is normal. The sound will level off the refrigerator continues to run. as compressor comes on. Vibrating or rattling noise.
Care and Maintenance Occurrence Possible Cause Solution Odors in Refrigerator Clean interior with sponge,warm water and baking soda. Interior needs to be cleaned. Food with strong odor is in the Some containers and produce odors. refrigerator. wrapping materials Cover food Use completely. different container wrapping materials. a or brand of Opening/Closing of Doors/Drawers Door(s) will not close. Food Door(s) will not close. Door was closed too hard, door to open slightly.
Care and Maintenance Occurrence Possible Cause Solution Ice has melted and frozen around auger due to infrequent use, temperature fluctuations and/or power Dispenser will not dispense ice. outrages. Remove ice storage bin, and thaw and the contents. Clean bin, wipe dry and replace in proper position. When new ice is made, dispenser should operate. Ice cubes are jammed between the ice maker arm and back of the bin. Ice dispenser is jammed. Ice cubes are frozen together.
MEMO 29
MEMO 30
Cautions Before Touch-Screen 1 Using the Touch-Screen... When ? Don't scratch the screen with sort of sharp tool. It can cause Using 3 knife, or any serious damage Screen If Reboot Function. program doesn't operate properly, the open refrigerator door and touch the Reset button on the top. ? a Program to the screen. screen MANAGEMENT Contents saved ? Schedule) will RESET (e.g. not be lost when re-starting the screen program. ? When writing, use the stylus.
Contents 7 TV 5~7 Music 8~11 To achieve greater power saving, open the refrigerator door and switch off the power button when you leave home or incase you do not use the screen for a long time. Internet 12~21 This power On/Off switch is for the screen, not for the refrigerator. Even if you turn off this switch, the refrigerator does not turn off.
Main Screen 10 123 456789 11 1 2 TV You can watch television via You can listen to the music saved in the music box. cable, antenna, VCR, etc. 4 You 7 5 Album can take a picture and use it not using the screen. as a screen saver memo 8 There are all types of cooking information searchable by course, ingredient, nutritional and caloric information is also available. 10 Weather Information You can get weather information of your area.
TV --Watching TV Channel number is displayed for about 5 seconds. 2 For USA version 1 only Main Touch this button and the screen changes to the Main Menu. - You may touch the MAIN button of the remote control. To Watch Television First, touch the TV button on the touch screen. To watch TV, first record/set the broadcasting channels in your area through auto searching Wait for auto program to complete the channel search cycle before choosing a channel.
TV-Watching TV 4 To Memorize 1 3 2 For USA version only or Delete Specific Channel... 1 Select the desired channel by touching the Channel number button from Ch. Control window. 2 To memorize the selected channel, Touch the Add button. 3 To delete the selected channel, touch the Delete button. To Adjust Volume 4 Touch the Volume button Then adjust It will be convenient to the remote control. on * For USA version only Refer to Appendix TV Parental Control. .
TV-Closed Captions 2 4 3 1 To Reset the Screen to Default To Control the Screen......... 1 2 Touch the Screen Control button menu bar of the TV Use the status the screen. buttons to adjust the screen according to your desire. You can control and tint. 4 on 3 Touch the Default button. 4 Touch the Save button. Setting brightness, contrast, color, Touch the Save button to obtain your desired screen settings. Following points does not indicate product failure.
Music -- Music Box Copyright and additional rights according to the law of digital sound source are held by the manufacturer. Duplicating and distributing digital music could leave the user open to prosecution. 2 3 1 Main Touch the button to return to the Main screen. 4 5 Name To Listen to the Music... of Each Component Play Music 1~5 1 2 3 4 5 Songs selected from the song list will appear in sequence. Touch the Music box. Button Touch to listen to the currently selected song.
Music -- Music Box 1 3 4 2 To Copy Files 1 - Copy important files into File Management which could then be Sample songs supplied with product may be changed. Name File Copy Touch to Button Management. Touch the File 3 Select Yes to copy the selected file into the File Management. 4 Check Copy button. the copied data from the File Management of the Digital Diary. Delete Button Touch to delete save songs from the entire song list.
Music -- Music Box 1 4 5 2 3 To Modify the 1 Select one Title of Music List form the music lists. 2 Touch the 3 Touch the Text button. - Modify button. For method to use the 17. 10 4 Modify 5 Touch the OK button. the title.
Music --Radio 2 1 3 Main Touch this button to return to the Main screen. To Listen to Radio..... 1 Touch the Radio button. 2 Select 3 Touch the a - radio channel to listen. - Play button. Radio uses streaming service of each broadcasting company. To listen to radio, Internet connection must be live. The streaming speed depends on the broadcasting service provided by the internet radio company.
Internet 3456789 10 1 11 12 1 Internet Address Window Input 2 Input the Internet address keyboard. with the 4 7 Back Button 5 Touch to open screen. window. link. Stop move to the next a new Internet Reload Button Touch to refresh the current page. 9 Button Touch to stop the the current page. page. 6 Forward Button Touch to Touch to return to the home New Window Button Touch to return to the Main previous link.
Internet Entering By Directly Inputting an Internet address 2 1 Touch the Text button. The keyboard is activated. 2 Touch the Address 3 Enter the desired Internet address either Input window. by using keyboard or writing character recognition function using stylus. Ex) http://www.lge.com 1 Make sure the cursor blinks in the Address Input window. - For keyboard operations, see page 17. 4 Touch the Enter button to connect to the 5 Touch the Close button desired site.
Internet -Bookmark 1 2 3 5 4 6 Save in Bookmark 1 Connect to the page you want to 2 Touch the Favorites button. 3 Select 4 Touch the Add button. one Delete Address in Bookmark. You of the groups. easily manage the Bookmark list by using these Groups. can Check the name Close Button Touch to close Internet window Select 6 Touch the Delete button an Internet site from the Bookmarks.
Internet -Bookmark 3 1 4 2 5 Connecting By Using 1 2 Select an a Bookmark Icon Icon. Select the site which you want to view. Connecting By Using a Bookmark 3 Touch the Favorites button. 4 Select the site which you want to view. 5 Touch the Go button to connect to the site you selected.
Internet -- Downloading Method You cannot save or open every file type downloaded. We suggest downloading only files usable by the system such as jpg, mp3, et al. 2 1 4 To Download Files.... 1 3 2 Touch the file you wish to download. Select - 4 button. The button may not appear in some cases such as downloading mp3 files. 3 4 5 Touch the Text button. - For keyboard operations, see page 17. 6 5 6 7 7 16 Select the location. Internet DIGITAL Refrigerator Input the title.
Internet -- Use of Keyboard Keyboard appears if you press the Text button on any menu. English Keyboard To input capitals, touch the key and then touch desired letter. Make the cursor blinks by each input window when the text. sure touching inputting Text cannot be entered when the cursor does not blink in the input window.
Internet 1 -- Use of Keyboard 2 11 10 9 8 3 7 4 5 5 6 Name of 1. Keyboard 6. Keyboard Touch to 2. 10 use 4. a space between 7. Enter use the writing recognition 3. Tab Touch to change the line or during entry of contents. 8. Back Touch to Bar Touch to insert characters. keyboard. Writing Touch to function. Space move the cursor to next window. Caps Lock Touch to type in all enter OK Space Touch to move the delete characters. cursor backward 9.
Internet Touch the Writing -- Use of Keyboard button to switch to the writing entry mode. The Enter window consists of English Entry, Numeric Entry, Special Character Entry and boxes. Method to Input English Characters. You must write the characters in the English Writing input capital letters extend your drawing above the separation line else for Entry Box one by one. To lowercase draw below the line.
Internet -- Use of Keyboard Method to Input Numbers You must write characters one numeric Gesture input one in the Entry The writing recognition function may not recognize every character. This is due to peculiarities in each person's penmanship and is not an indication of product failure. shows method to write Appendix characters. Recognition can be done even if the user doesn't follow the drawing procedure described in the table. But it is ? Gestures are used to edit text already input.
Internet Special -- Use of Keyboard Character Input You must write characters one character Description of Other input by one in the special box. Keys 123456 1. Back 4. Tab Space Touch to move the delete a character. backward cursor or Touch to window. move the cursor to the next 5. Del 2. Enter Touch to change the line It can be used to enter OK during entry of . Touch to delete the previous character. contents. 3. Space 6. Close Bar Touch to insert characters.
Album - - You can set pictures taken in Album as screen saver in the Setting of the Management. Once you view yourself on the picture, the view would be a mirror one, but the photo you get would be that of a real image. Main Touch this button to return to the Main screen. 1 3 To Take Picture... a First, adjust the angle of the monitor be image can Move the seen on subject so the the screen. into the desired pose. 1 2 2 Press the Camera On button.
Album 1 2 To Delete the Picture.... 1 Select the picture that Touch the desired is to be deleted. picture and its frame will turn blue. 2 Touch the Delete button. Name of Each Component Camera On Button Camera Off Button Touch to open the Taking Picture Touch to close the Picture window. Taking window. Taking Picture Button Touch to take a Modify title of picture. Button Touch to modify the picture. After 3 seconds, picture is taken.
Album 1 Copy important files into File Management which could then be sent as attachments via e-mail. 2 To Copy Picture File into File Management... 3 4 24 Internet DIGITAL Refrigerator 1 Select files to copy into File 2 Touch the File copy button. 3 Select Yes to copy selected files to File Management. 4 Check of the copied data from Digital Diary. Management.
Memo Memo List Status on depending color of button Message Gray checked Message Blue Sky active not Blue Message checked 2 Main Touch this button to return to the Main screen. 1 To Leave a Memo...... 1. If 1 a new memo is saved, a notice window appears on the main screen to show that there is Touch the New button. a new memo. The Memo 2 type selection window appears. Select the type of There are four memo desiring to leave. types: Text, Draw, Audio, and Video. 2.
Memo 1 2 3 List Icon To Delete 1 a Memo............ Select the memo Contents of memo to delete. Display Indicating Memo Type Text Memo appear. Drawing 2 Touch the Delete button. 3 Touch Yes to delete Memo Audio Memo the selected memo.
Memo 1 4 5 2 3 To Modify Memo Name...... 1 Select the 2 Touch the 3 memo to modify. Modify button. You can input text only when the cursor blinks on the Title Enter window. Touch the Enter window if there is Touch the Text button. - For keyboard operations, 4 Modify 5 Touch the Yes button. no blinking. see page 17. the title.
Memo 4 1 3 2 To Copy Memo Files to Management... the File 1 28 Select the files to copy to the File Management. 2 Touch the File copy button. 3 Select Yes to copy selected files to the File 4 Check Manage. copied data from the File Management of the Digital Diary. Internet DIGITAL Refrigerator Copy important files into File Management which could then be sent as attachments via e-mail.
Memo -- Text memo You can leave a memo only when the cursor blinks on the Text Memo window. Touch the Text Memo window if there is 1 no 4 blinking. 5 2 3 To Leave Text Memo.......... 1 1. If is saved, a notice window appears the main screen to show that there is a new 2 a memo on memo. 3 4 5 2. You the can check a saved memo by pressing Touch the Text button the Memo on Type window.
Memo -- Draw memo 1 2 3 To Leave a 4 Name Draw Memo.......... of Each Component Save Button 1 2 Write Button Touch the Draw button on the Memo Type window. You can Touch to write Draw write a memo Use the icons below adjust the color and by on hand the or the to line thickness. Cancel Erase Button Button Touch to Touch to the 3 4 30 part you hand Input the title using the keyboard and then touch the OK button.
Memo -- Audio memo 1 2 4 3 To Leave Audio Memo.......... 1 2 3 Touch the Audio button on the Memo Type window. Touch the Record button and record audio. If recording is finished, touch the Stop button. 5 You can check recorded memo by pressing Play button. Adjust volume by touching the Volume button on the menu bar. 4 Touch the Save button. 5 Write the title using the keyboard and then touch the OK button. - For keyboard operations, see page 17.
Memo -- Video memo 1 2 4 3 To Leave Video Memo.......... 1 Touch the Video button on the Memo Type window. 2 Take 3 Touch the a pose and then touch the Record button. Stop button when recording is finished. You can check recorded memo by touching Play button. Adjust volume by touching the Volume button 4 5 the menu bar. Touch the Save button. Write the title using the keyboard and then touch the OK button.
Digital Diary 1 2 3 Digital Diary 1 Is ..................... Schedule You can manage all types of appointments, anniversaries, birthdays, etc. 2 Phone Number You can input phone File First set time when installing the refrigerator. You can set the time in the Setting area of the Management menu from the main menu. numbers for easy retrieval. 3 - - Current date is displayed in a yellow memo box.
Digital Diary -- Schedule 1 2 Input 1 2 3 Schedule Select the year and the month which you want to register. View Schedule Select the date. schedule information Input keyboard or the using the 1 stylus. 2 34 4 Select 7 Touch the Save button. an Internet DIGITAL Select the year and the month for which you want to check your schedule. Icon. Refrigerator Select the date. Icon displayed on that date corresponds to its schedule.
Digital Diary -- Schedule Anniversary Selection. Touch the anniversary icon. 4 3 6587 Notify To Edit the Content 5 Touch the Erase button. Erase the part you using hand or the stylus. want to correct 6 Touch the Write button. Write 7 Touch the Save button. using hand or the new Schedule Notice window will prompt on the main notifying an event scheduled for the screen current date. contents stylus. You can check schedule by touching the button.
Digital Diary -- Phone Number 5 6 1 2 - Phone numbers are arranged by ascending alphabetical order. name 3 To 4 Input Touch the New button. 2 Input name and phone keyboard. - Touch the relevant page of the retrieve. 6 Retrieve by using numbers exist. name to when several of phone New Phone Number.... 1 To Retrieve Phone Numbers........... 5 a For number keyboard operations, 3 Touch the Save button. 4 Touch the Enter button. Internet DIGITAL Refrigerator page 17.
Digital Diary -- File Management 1 5 3 6 2 4 To Check the Relevant Files............ 1 Select the files to check. 2 Touch the File 3 Select Yes to You can You cannot move or execute data except for avi, mpg, txt, bmp, gif, jpg, or mp3 files. Copy button. move selected data. check files by using the appropriate menu. To Modify 1 Movement on position depending file type.
Cook 1 2 -- Cookbook - The recipes in the cookbook are specific to country's eating habit. every 3 Main Touch this button to return to the Main screen. See 1 Cooking Information Select the method to classify the recipe. 2 classification item. 3 the selected Select desired recipe from each and recipe for appears if you touch Ingredients, preparation, menu it. You can see using the 38 Internet DIGITAL Refrigerator the rest of the content buttons.
Cook -- Cookbook 1 2 To Retrieve - Retrieve 1 2 To Retrieve Recipe by Recipe Touch the Find a Name Recipe button. - Retrieve 3 For a recipe name Input ingredients of recipe to You can keyboard operations, Touch the Search button. be input ingredient 2 to search. see Recipe by Ingredient if you Input - 4 4 3 page 17. - 4 For search. precise in your search for both ingredient 1 and more fields. keyboard operations, see page 17. Touch the Search button.
Cook -- Nutrition Info. 2 1 3 Main Touch this button to return to the Main screen. See Nutrition Information 1 Touch the Nutrition Information button. 2 Select the desired information. 3 You can check useful nutrition information by selecting the desired classification.
Cook -- Nutrition Info.
Stored Food Days stored indicates period from the date recording/modifying the food name to the current time. Main 1 Touch this button to return to the Main screen. To Record Foods Stored....... 1 2 3 Touch the circle the refrigerator Touch the New button. Use keyboard to record the name of food item stored. - 4 on where you wish to record food item. your diagram For keyboard operations, Set the storage the see page 17. period by touching .
Stored Food Information of Storage Period Passed When food lists are empty When the storage has not period expired When the storage 1 period expires Main Touch this button to return to the Main screen. To Modify Contents......... 1 2 3 Touch the circle at the desired position. 2 Select the food 3 Touch the 4 Modify contents using the keyboard. - 4 5 For name Modify to modify. button. keyboard operations, see page 17. Touch the OK button.
Stored Food To Delete Contents 1 1 ......... Touch the circle at the desired position. 2 Select the food 3 Touch the Delete button. 4 Touch Yes to delete the selected item. name to delete. 2 - Notice window appears on the main screen to indicate that storage period has expired for some food item. 3 - You can check the stored food touching the 4 44 Internet DIGITAL Refrigerator expirations by button.
Management Setting -- To 2 1 Change the Background Screen...... 1 Touch the Setting button. 2 Touch the Background screen. 3Selectanimagetosetitasa background 3 screen. 5 4 Touch Yes. The frame of the background When Not Automatic 5 image set as a screen turns to blue. Using the Background Change Function Change the setting of the background automatic change (special day) to Not Used.
Management Setting -- 2 3 1 4 To Enter Customer Information.... 5 1 2 3 Touch the 6 Touch the Customer info. button. Input Name, Address, Phone number and E-mail Address. - 46 Setting button. For keyboard operations, 4 Touch the Save button. 5 Input the DreamLG password. 6 Touch the Save button. Internet DIGITAL Refrigerator see page 17.
Management Setting -- 2 5 1 4 3 6 To Setup 1 The Internet Touch the ..... Setting button. 1. To use Internet, you need a unique address. You must assign an IP address, just as each phone is assigned its own number. 2 Touch the Internet button. 3 Select whether you will use a fixed IP address or a floating IP address. 4 Select whether you want to enable DNS. 5 2. There Input information such as domain suffix.
Management Setting -- 2 1 3 4 5 6 To setup the internet 1 2 Touch the 3 Touch the Modem connection 4 Check the button. 5 number. 6 Setting button. 7 Touch the Internet button. Setting button. Input user on name, the Enable Modem password, and main Connecting button will appear on the screen. to the internet 7 Touch the 8 Touch the Connect button. button on the internet 7 Touch the 9 Touch the Cancel button. button on the main screen. the main screen.
Management Setting -- 4 2 1 3 To Adjust Touch 1 Touch the Screen....... Setting button. 2 Touch the Touch Control button. 3 Touch the Control button. 4 Touch the first point 5 of the touch screen. Use the stylus for greater accuracy. 6 5 Touch the second 6 Touch Yes if you are satisfied with the touch screen adjustment. point of the touch screen.
Management Setting -- 2 4 3 1 5 6 To Set Current Time......... 1 To Set Screen Saver Time........ Setting button. 1 2 Touch the Others button. 2 3 Set the date for the Touch the 4 6 year using Day, Month, and 5 buttons. Select Never if 6 Touch the Save button. pictures as your screen case no saver, these 50 First, Internet DIGITAL the activation time for desiring pictures will Touch the Save button. then appear continuously when mode activates.
Management Setting -- 2 1 3 To Set 1 4 Picture As Touch the a Screen Saver... Setting button. 2 Touch the Others button. 3 Touch the Selection button. 4 5 a Select all the for your pictures you wish to set screen saver. The frame will turn blue. 6 5 You 6 Touch the Save button. preview pictures of the screen by touching Preview button.
Management Setting -- 2 1 3 4 5 Notice function of main Sound Effects In settings you have an option to use the notice window on the main screen notify you about a new memo, scheduled event, food storage to expiration date, or 1 2 3 5 52 2 Setting button. 4 Touch the Others button. Select whether you will function. Touch the Save button. Internet DIGITAL Refrigerator 1 Touch the on or Setting button. malfunction. See pages 25, 35, and 44.
Management Setting -- 2 1 4 3 5 6 Confirmation Before Deletion Push Service In In settings you have an option to see weather information on the main alarm screen. 1 Touch the Touch the Others button. 3 Select whether you will 4 Select your 6 Touch the Save button. 1 Setting button. 2 area. use 5 6 have option to display of an message while deleting files. or Touch the 2 this function. settings you enable an disable the Setting button. Touch the Others button.
Management Self-Diagnosis -- When you a can failure is found through self-diagnosis, automatically report it to the service center via Internet. To Perform 1 2 1 Self-Diagnosis....... Touch the Self-diagnosis button. 1 Figure 1. Internet report successful. In Case of Defects That Can Be Detected 1 2 Through Touch the Self- diagnosis Self-Diagnosis button. Touch the Automatic Malfunction Report Service button.
Management Self-Diagnosis -- 2 1 Figure 1. Internet Figure 2. Internet report successful report failed. In Case of Defects That Cannot Be Detected 1 2 Through Touch the Self- diagnosis Self-Diagnosis button. 1. If Internet Touch the Automatic Malfunction Report Service button. report succeeded, you will message shown in 2. If it in failed, you will Figure see see the 1. the message shown Figure 2.
Appendix -- TV Closed Captions (For USA version only) Caption Tips Closed captioning is a process which converts the audio portion of a television program into written words which then appears on the television screen in a form similar to subtitles. Closed captions allow viewers to read the dialogue and narration of television programs. Poor conditions are encountered: reception IGNITION : Picture may flutter, drift, suffer from black spots or horizontal streaking.
Appendix -- Parental Control overview (For USA version only) For Movie Movie - Parental Control be used to block ratings and other viewing can specific channels, In Theaters Ratings : Unblocked G (General audience) guidance suggested) -PG-13(13years) R (Restricted) -NC-17(18years) X (Adult) - - Previously Shown - sources. PG (Parental - - The password will be required to gain access to Parental control if the Lock System is turned on.
Appendix -- Parental Control overview (For USA version only) Set Blocking 1 2 1 Touch the Lock button. Touch the Text button. - 3 For keyboard operations, Input - - 4 Up the Factory preset password : 1111. password must be entered in range of one to eight alphanumeric characters. 5 The MPAA or the 7 58 Internet DIGITAL Refrigerator Use the using either Age ( TV guidelines) ratings. buttons to select the types of ratings to block. 6 The TV 7 Touch the Save button. options.
Appendix -- Parental Control overview (For USA version only) Setting Password 5 1 2 Touch the Touch the Text button. - 3 6 4 For keyboard operations, Enter the - 1 Change button. new see page 17. password. Password must be entered in range of eight alphanumeric characters. one to Touch the OK button. 2 3 4 Setting 5 6 Lock On/Off Select On or Off. Touch the Save button.
Appendix Writing 60 Internet DIGITAL Refrigerator -- Method Method of Writing Characters Writing Method
Appendix Writing Method -- Method of Writing Characters Writing Method Internet DIGITAL Refrigeratora 61
Appendix -- Method of Writing Characters Writing 62 Internet DIGITAL Refrigerator Method
Appendix Writing -- Method Method of Writing Characters Writing Method Internet DIGITAL Refrigeratora 63
P/No.