Cautions Before Touch-Screen 1 Using the Touch-Screen... When ? Don't scratch the screen with sort of sharp tool. It can cause Using 3 knife, or any serious damage Screen If Function. program doesn't operate properly, the open refrigerator door and touch the Reset button on the top. ? a Program Reboot to the screen. screen MANAGEMENT Contents saved ? Schedule) will RESET (e.g. not be lost when re-starting the screen program. ? When writing, use the stylus.
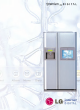
Contents 7 TV 5~7 Music 8~11 Internet 12~21 Album 22~24 Memo 25~32 Digital Diary 33~37 Power On/Off Function of Screen MANAGEMENT ? ? RESET P OWER To achieve greater power saving, open the refrigerator door and switch off the power button when you leave home or incase you do not use the screen for a long time. This power On/Off switch is for the screen, not for the refrigerator. Even if you turn off this switch, the refrigerator does not turn off. ? What is http://www.dreamlg.
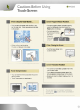
Main Screen 10 123 456789 11 1 2 TV You can watch television via You can listen to the music saved in the music box. cable, antenna, VCR, etc. 4 You 7 5 Album can take a picture and use it not using the screen. as a screen saver memo 8 There are all types of cooking information searchable by course, ingredient, nutritional and caloric information is also available. 10 Weather Information You can get weather information of your area.
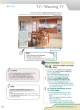
TV -- Channel number is Watching TV displayed for about 5 seconds. 2 1 Main Touch this button and the screen changes to the Main Menu. - You may touch the MAIN button of the remote control. To Watch Television First, touch the TV button on the touch screen. To watch TV, first record/set the broadcasting channels in your area through auto searching Wait for auto program to complete the channel search cycle before choosing a channel.
TV - Watching TV 4 To Memorize 1 2 Delete Specific Channel... 1 Select the desired channel by touching the Channel number button from Ch. Control window. 2 To memorize the selected channel, Touch the Add button. 3 To delete the selected channel, touch the Delete button. To 3 or Adjust Volume 4 Touch the Volume button Then adjust It will be convenient to the remote control. on 6 Internet DIGITAL Refrigerator on volume with the menu bar. .
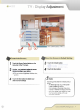
TV Display Adjustment - 2 4 3 1 To Reset the Screen to Default To Control the Screen... 1 2 Touch the Screen Control button menu bar of the TV Use the the screen. buttons to adjust the screen status according to your desire. You can control and tint. 4 on 3 Touch the Default button. 4 Touch the Save button. Setting brightness, contrast, color, Touch the Save button to obtain your desired screen settings. Following points does not indicate product failure.
Music -- Music Box Copyright and additional rights according to the law of digital sound source are held by the manufacturer. Duplicating and distributing digital music could leave the user open to prosecution. 2 3 1 Main Touch the button to return to the Main screen. 4 5 Name To Listen to the Music... of Each Component Play Button Music 1~5 1 2 3 4 5 Songs selected from the song list will appear in sequence. Touch the Music box. Touch to listen to the currently selected song.
Music -- Music Box 1 4 5 2 3 To Modify the 1 Select one Title of Music List form the music lists. 2 Touch the 3 Touch the Text button. - Modify button. For method to use the keyboard, see page 17. 4 Modify the title. 5 Touch the OK button.
Music -- Music Box 1 3 4 2 To Copy Files 1 - Copy important files into File Management which could then be Sample songs supplied with product may be changed. Name File Touch to Select Yes to copy the selected file into the File Management. 4 Check copied data from the File Management of the Digital Diary. songs from the entire song list. Modify Button - Touch to edit song title and artist's name. Touch the Text button on the menu bar.
Music -- Radio 2 1 3 Main Touch this button to return to the Main screen. To Listen to Radio... 1 Touch the Radio button. 2 Select 3 Touch the a - radio channel to listen. - Play button. Radio uses streaming service of each broadcasting company. To listen to radio, Internet connection must be live. The streaming speed depends on the broadcasting service provided by the internet radio company.
Internet 3456789 10 1 11 12 1 Internet Address Input Window 2 Input the Internet address keyboard. with the 4 7 Back Button 5 Touch to open screen. window. link. move to the next a new Internet Reload Button Touch to refresh the current page. 9 Stop Button Touch to stop the the current page. page. 6 Forward Button Touch to Touch to return to the home New Window Button Touch to return to the Main previous link.
Internet Entering By Directly Inputting an Internet address 2 1 Touch the Text button. The keyboard is activated. 2 Touch the Address Input window. 3 Enter the desired Internet address either by using keyboard or writing character recognition function using stylus. Ex) http://www.lge.com 1 Make sure the cursor blinks in the Address Input window. - For keyboard operations, see page 17. 4 Touch the Enter button to connect to the 5 Touch the Close button on the desired site.
Internet - Bookmark 1 2 3 5 4 6 Save in Bookmark 1 Connect to the page you want to save as 2 Touch the Favorites button. 3 Select 4 Touch the Add button. You one of the groups. easily manage the Bookmark list by using these Groups. can Check the name Close Button Touch to close Internet window Select 6 Touch the Delete button an Internet site from the Bookmarks.
Internet - Bookmark 3 1 4 2 5 Connecting By Using 1 2 Select an a Bookmark Icon Icon. Select the site which you want to view. Connecting By Using a Bookmark 3 Touch the Favorites button. 4 Select the site which you want to view. 5 Touch the Go button to connect to the site you selected.
Internet -- Downloading Method You cannot save or open every file type downloaded. We suggest downloading only files usable by the system such as jpg, mp3, et al. 2 1 4 To Download Files... 1 3 2 Touch the file you wish to download. Select - 4 button. The button may not appear in some cases such as downloading mp3 files. 3 4 5 Touch the Text button. - For keyboard operations, see page 17. 6 5 6 7 7 16 Select the location. Internet DIGITAL Refrigerator Input the title.
Internet Keyboard can be -- Use of Keyboard changed according to the country. Keyboard appears if you press the Text button on any menu. English Keyboard To input capitals, touch the key and then touch desired letter. Make the cursor blinks by each input window when the text. sure touching inputting Text cannot be entered when the cursor does not blink in the input window.
Internet Keyboard can be -- Use of Keyboard changed according to the country. 1 2 11 10 9 8 3 7 4 5 5 6 Name of 1. Keyboard 6. Keyboard Touch to 2. 10 use a space between 7. Enter use the writing recognition 3. Tab Touch to change the line or during entry of contents. enter OK 8. Back Space Touch to 4. Bar Touch to insert characters. keyboard. Writing Touch to function. Space move the cursor to next window.
Internet Touch the Writing -- Use of Keyboard button to switch to the writing entry mode. The Enter window consists of English Entry, Numeric Entry, Special Character Entry and boxes. Method to Input English Characters. You must write the characters in the English Writing Entry Box one by one. To input capital letters extend your drawing above the separation line else for lowercase draw below the line. You can input characters consecutively by using both Writing Input windows alternatively.
Internet -- Use of Keyboard Method to Input Numbers You must write characters one by one in the numeric input box. Gesture Entry ? Gestures are used to edit text already input. Use the gestures in Table 1 to edit text. A black point is a starting point of the stroke in the writing table as described in Table 1. ? The writing recognition function may not recognize every character. This is due to peculiarities in each person's penmanship and is not an indication of product failure.
Internet Special -- Use of Keyboard Character Input You must write characters one by one in the special character Description of Other input box. Keys 123456 1. Back 4. Tab Space Touch to move the delete a character. backward cursor or Touch to window. move the cursor to the next 5. Del 2. Enter Touch to change the line It can be used to enter OK during entry of . Touch to delete the previous character. contents. 3. Space 6. Close Bar Touch to insert characters.
Album - - You can set pictures taken in Album as screen saver in the Setting of the Management. Once you view yourself on the picture, the view would be a mirror one, but the photo you get would be that of a real image. Main Touch this button to return to the Main screen. 1 3 To Take a Picture... First, adjust the angle of the monitor so the image can be seen on the screen. Move the subject into the desired pose. 1 2 2 Press the Camera On button.
Album 1 2 To Delete the Picture... 1 Select the picture that Touch the desired is to be deleted. picture and its frame will turn blue. 2 Touch the Delete button. Name of Each Component Camera On Button Camera Off Button Touch to open the Taking Picture Touch to close the Taking Picture window. window. Taking Picture Button Modify Button Touch to take Touch to a title of picture. modify the picture. After 3 seconds, picture is taken.
Album 1 Copy important files into File Management which could then be sent as attachments via e-mail. 2 To Copy Picture File into File Management... 3 4 24 Internet DIGITAL 1 Select files to copy into File 2 Touch the File copy button. 3 Select Yes to copy selected files to 4 Refrigerator File Management. Management. Check copied data from the File of the Digital Diary.
Memo Memo List Status on depending color of button Message Gray checked Message Blue Sky active not Blue Message checked 2 Main Touch this button to return to the Main screen. 1 To Leave a Memo... 1. If 1 2 a new memo is saved, a notice window appears on the main screen to show that there is Touch the New button. a new memo. The Memo type selection window appears. Select the type of There are four memo desiring to leave. types: Text, Draw, Audio, and Video. 2.
Memo 1 2 3 List Icon To Delete 1 a Memo... Select the memo to delete. Contents of memo Display Indicating Memo Type Text Memo appear. Drawing Memo 2 Touch the Delete button. 3 Touch Yes to delete Audio Memo the selected memo.
Memo 1 4 5 2 3 To Modify 1 2 3 Memo Name... Select the memo to Touch the modify. Modify button. You can input text only when the cursor blinks on the Title Enter window. Touch the Enter window if there is Touch the Text button. - For keyboard operations, 4 Modify the title. 5 Touch the Yes button. no blinking. see page 17.
Memo 4 1 3 2 To Copy Memo Files to Management... the File 1 28 Select the files to copy to the File Management. 2 Touch the File copy button. 3 Select Yes to copy selected files to the File 4 Check copied data from the File Management of the Digital Diary. Manage. Internet DIGITAL Refrigerator Copy important files into File Management which could then be sent as attachments via e-mail.
Memo -- Text memo You can leave a memo only when the cursor blinks on the Text Memo window. Touch the Text Memo window if there is 1 no 4 blinking. 5 2 3 To Leave Text Memo... 1 1. If is saved, a notice window appears the main screen to show that there is a new 2 a memo on memo. 3 5 the can check a saved memo by pressing on the Memo Type You can leave a write a memo memo with the keyboard or using stylus and the handwriting recognition feature. 4 2.
Memo -- Draw memo 1 2 3 To Leave 1 2 a Name Draw Memo... Touch the Draw button on the Memo Type window. You 4 can write a memo Use the icons below adjust Write Button Save Button Touch to write Touch to Draw a memo. memo. 4 on the memo area to the color and line thickness. Touch the Save button. Erase Button Cancel Touch to Button erase 30 part you want to correct using Touch to hand input. or the stylus.
Memo -- Audio memo 1 2 3 4 To Leave Audio Memo... 1 Touch the Audio button on the Memo Type window. 2 Touch the Record button and record audio. 3 If recording is finished, touch the Stop button. 5 You can check recorded memo by pressing Play button. Adjust volume by touching the Volume button on the menu bar. 4 Touch the Save button. 5 Write the title using the keyboard and then touch the OK button. - For keyboard operations, see page 17.
Memo -- Video memo 1 2 4 3 To Leave Video Memo... 1 Touch the Video button on the Memo Type window. 2 Take a pose and then touch the Record button. 3 Touch the Stop button when recording is finished. You can check recorded memo by touching Play button. Adjust volume by touching the Volume button 4 5 the menu bar. Touch the Save button. Write the title using the keyboard and then touch the OK button.
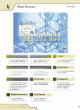
Digital Diary 1 2 3 Digital Diary 1 Is... Schedule You can manage all types of appointments, anniversaries, birthdays, etc. 2 You can input phone numbers for File First set time when installing the refrigerator. You can set the time in the Setting area of the Management menu from the main menu. Phone Number easy retrieval. 3 - - Current date is displayed in a yellow memo box.
Digital Diary -- Schedule 1 2 Input 1 2 3 Schedule Select the year and the month which you want to register. View Schedule Select the date. schedule information Input keyboard or the stylus. using the 1 2 34 4 Select 7 Touch the Save button. an Internet DIGITAL Icon. Refrigerator Select the year and the month for which you want to check your schedule. Select the date. Icon displayed on that date corresponds to its schedule.
Digital Diary -- Schedule Anniversary Selection. Touch the anniversary icon. 4 3 6587 Notify To Edit the Content 5 Touch the Erase button. Erase the part you using hand or the stylus. want to correct 6 Touch the Write button. Write 7 Touch the Save button. using hand or new Schedule Notice window will prompt on the main notifying an event scheduled for the screen current date. contents the stylus. You can check schedule by touching the button.
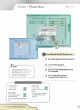
Digital Diary -- Phone Number 5 6 1 2 - Phone numbers are arranged by ascending alphabetical order. name 3 To Input 1 4 2 To Retrieve Phone Numbers... Touch the relevant page of the retrieve. 6 Retrieve by using numbers exist. name to when several of phone New Phone Number... Touch the New button. Input name and phone number using the keyboard. - 5 a For keyboard operations, 3 Touch the Save button. 4 Touch the Enter button. Internet DIGITAL Refrigerator page 17.
Digital Diary -- File Management 1 5 3 6 2 4 To Check the Relevant Files... 1 Select the files to check. 2 Touch the File 3 Select Yes to You can You cannot move or execute data except for avi, mpg, txt, bmp, gif, jpg, or mp3 files. Copy button. move selected data. check files by using the appropriate menu. To Modify 1 Movement on position depending file type. avi, mpg, txt Memo Select files to Touch the 5 Modify the file name using the keyboard.
Cook 1 2 -- Cookbook - The recipes in the cookbook are specific to country's eating habit. every 3 Main Touch this button to return to the Main screen. See Cooking Information 1 Select the method to classify the 2 Select desired recipe from each classification item. 3 the selected recipe. and recipe for appears if you touch Ingredients, preparation, menu it. You can see using the 38 Internet DIGITAL Refrigerator the rest of the content buttons.
Cook -- Cookbook 1 2 To Retrieve - Retrieve 1 2 by Recipe a Name Recipe button. - Retrieve 3 Input ingredients of recipe to search. You can keyboard operations, Touch the Search button. see be input ingredient 2 Input a recipe name to search. For Recipe by Ingredient if you - 4 To Retrieve Recipe Touch the Find 4 3 page 17. - 4 For more precise in your search ingredient 1 and for both fields. keyboard operations, see page 17. Touch the Search button.
Cook -- Nutrition Info. 2 1 3 Main Touch this button to return to the Main screen. See Nutrition Information 1 Touch the Nutrition Information button. 2 Select the desired information. 3 You can check useful nutrition information by selecting the desired classification.
Cook -- Nutrition Info.
Stored Food Days stored indicates period from the date recording/modifying the food name to the current time. Main 1 Touch this button to return to the Main screen. To Record Foods Stored... 1 Touch the circle on the refrigerator diagram where you wish to record your food item. 2 3 Touch the New button. Use - 4 keyboard to record the name of food item stored. For keyboard operations, Set the storage the see page 17. period by touching .
Stored Food Information of Storage Period Passed When food lists are empty When the storage has not period expired When the storage 1 period expires Main Touch this button to return to the Main screen. To Modify Contents... 1 2 3 Touch the circle at the desired position. 2 Select the food 3 Touch the 4 Modify contents using the keyboard. - 4 5 For name to modify. Modify button. keyboard operations, see page 17. Touch the OK button.
Stored Food To Delete Contents... 1 1 Touch the circle at the desired position. 2 Select the food 3 Touch the Delete button. 4 Touch Yes to delete the selected item. name to delete. 2 - Notice window appears on the main screen to indicate that storage period has expired for some food item. 3 - You can check the stored food touching the 4 44 Internet DIGITAL Refrigerator expirations by button.
Management Setting -- To 2 Change the Background 1 1 2 Screen... Touch the Setting button. Touch the Background screen. 3Selectanimagetosetitasa background 3 screen. 5 4 Touch Yes. The frame of the background When Not Automatic 5 image set as a screen turns to blue. Using the Background Change Function Change the setting of the background (special day) automatic change to Not Used.
Management Setting -- 2 3 1 4 To Enter Customer Information... 5 1 2 3 Touch the Setting button. Touch the Customer info button. Input Name, Address, Phone number and E-mail Address. - 46 6 For keyboard operations, 4 Touch the Save button. 5 Input the DreamLG password. 6 Touch the Save button. Internet DIGITAL Refrigerator see page 17.
Management Setting -- 2 5 1 4 3 6 To Setup 1 The Internet... Touch the Setting button. 2 Touch the Internet button. 3 Select whether you will use a fixed IP address or a floating IP address. 4 Select whether you want to enable DNS. 5 Input information such as IP address, gateway, subnet, DNS, host name, and use Internet, you need a unique address. You must assign an IP address, just as each phone is assigned its own number. 2. There domain suffix. 6 1. To Touch the Save button.
Management Setting -- 2 1 3 4 5 6 To setup the internet 1 2 Touch the Setting button. 3 Touch the Modem connection Setting 4 Check the button. 5 Input 6 Touch the Save button. 7 Touch the Internet button. button. user on name, the Enable Modem password, and 8 phone Connecting Disconnecting from button will appear The main on the screen. to the internet 7 Touch the 8 Touch the Connect button. button on the internet 7 Touch the 9 Touch the Cancel button.
Management Setting -- 4 2 1 3 To Adjust Touch 1 Screen... Touch the Setting button. 2 Touch the Touch Control button. 3 Touch the Control button. 4 Touch the first 5 point of the touch screen. Use the stylus for greater accuracy. 6 5 Touch the second 6 Touch Yes if you are satisfied with the touch screen adjustment. point of the touch screen.
Management Setting -- 2 4 3 1 5 6 To Set Screen Saver Time... To Set Current Time... 1 Touch the Setting button. 1 Touch the Setting button. 2 Touch the Others button. 2 Touch the Others button. 3 Set the date for the Day, Month, year using the buttons. 4 Set the time for Hour, Minute and AM/PM using the buttons. 6 Touch the Save button. 1. If you set pictures as your screen screen saver 2. In case no turns off. 3.
Management Setting -- 2 1 3 To Set 4 5 a Picture As a Screen Saver... 1 Touch the Setting button. 2 Touch the Others button. 3 Touch the Selection button. 4 Select all the pictures you wish to set for your screen saver. The frame will turn blue. 6 5 You 6 Touch the Save button. preview pictures of the screen by touching Preview button.
Management Setting -- 2 1 3 4 5 Notice function of main Sound Effects In settings you have an option to use the notice window on the main screen notify you about a new memo, scheduled event, food storage to expiration date, or 1 Touch the Setting button. 2 Touch the Others button. 3 Select whether you will function. 5 Touch the Save button. Internet DIGITAL Refrigerator 1 Touch the Setting button. 2 Touch the Others button. 4 Select whether you will function.
Management Setting -- 2 1 4 3 5 6 Confirmation Before Deletion Push Service In In settings you have an option to see weather information on the main alarm screen. 1 Touch the Setting button. 2 Touch the Others button. 3 Select whether you will 4 Select your 6 Touch the Save button. area. use this function. settings you have option to display of an message while deleting files. enable or an disable the 1 Touch the Setting button. 2 Touch the Others button.
Management Self-Diagnosis -- When failure is found through self-diagnosis, automatically report it to the service center via Internet. you a can To Perform 1 2 1 Self-Diagnosis....... Touch the Self-diagnosis button. 1 Figure 1. Internet report successful. Figure 2. Internet report failed. In Case of Defects That Can Be Detected 1 2 Through Self- diagnosis Touch the Self-Diagnosis button. Touch the Automatic Malfunction Report Service button.
Management Self-Diagnosis -- 2 1 Figure 1. Internet report successful Figure 2. Internet report failed. In Case of Defects That Cannot Be Detected 1 2 Through Self- diagnosis Touch the Self-Diagnosis button. 1. If Internet Touch the Automatic Malfunction Report Service button. report succeeded, you will message shown in 2. If it in failed, you will Figure see see the 1. the message shown Figure 2.
Appendix Writing 56 Internet DIGITAL Refrigerator -- Method of Writing Characters Method Writing Method
Appendix Writing -- Method of Writing Characters Method Writing Method Internet DIGITAL Refrigeratora 57
Appendix -- Method of Writing Characters Writing 58 Internet DIGITAL Refrigerator Method
Appendix Writing -- Method of Writing Characters Method Writing Method Internet DIGITAL Refrigeratora 59
Memo 60 Internet DIGITAL Refrigerator
Memo Internet DIGITAL Refrigeratora 61
Memo 62 Internet DIGITAL Refrigerator
Memo Internet DIGITAL Refrigeratora 63
P/No.