User’s Guide Specification 담 당 MJ JEON 11.01.04 1. Model Description MODEL 32LV2510-TB BRAND LG Part No. SUFFIX 2. AU 관 리 자 EH Hong 11.01.04 JO Kim 11.01.04 MFL62864970 (1101-REV01) Product Name 32LV2510 Printing Specification 1. Trim Size (Format) : 185mm x 260 mm 2. Printing Colors • Cover : 1 COLOR (BLACK) • Inside : 1 COLOR (BLACK) 3. Stock (Paper) • Cover : Uncoated paper , 백상지 60 g/㎡ • Inside : Uncoated paper , 백상지 60 g/㎡ 4. Printing Method : Off-set 5. Bindery : Saddle stitch 6.
P/NO. MFL62864970 Total pages : 32 pages Pagination sheet Front Cover (EN) P/NO.
OWNER’S MANUAL LCD TV / LED LCD TV Please read this manual carefully before operating the set and retain it for future reference. P/NO : MFL62864970 (1101-REV01) Printed in Korea www.lg.
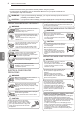
2 SAFETY INSTRUCTIONS Please read these safety precautions carefully before using the product. yy In this manual, the illustration may be somewhat different from your product because it is yy just example to help the instruction. warning yyIf you ignore the warning message, you may be seriously injured or there is a possibility of accident or death. caution yyIf you ignore the caution message, you may be slightly injured or the product may be damaged.
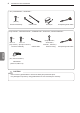
ASSEMBLING AND PREPARING 3 ASSEMBLING AND PREPARING Unpacking Check your product box for the following items. If there are any missing accessories, contact the local dealer where you purchased your product. The illustrations in this manual may differ from the actual product and item. Owner’s manual Polishing cloth1 (This item is not included for all models.) Ferrite core (Depending on model) (This item is not included for all models.) 1 Gently wipe the spots on the cabinet with the polishing cloth.
4 ASSEMBLING AND PREPARING Only 19/22/26LV25**, 22/26LV55** x2 or (M4x16) Screw for assembly Cable holder DC Adapter Composite gender cable Only 32LV25**, 32/37/42/47/LV35**, 22/26/32LV30**, 32/42LV34**, 32/42/47/55LW45** x8 x8 M4 x 14 M4 x 12 (Only 32LV25**, 32/37LV35**, 32LV30**, 32LV34**) (Only 32LV25**) (Except for 32LV25**) Screw for assembly Cable holder Screw for fixing Composite gender cable ENGLISH ENG (Only 32/42/47/55LW45**) 3D Glasses (AG-P110, AG-F110) Caution Do not use
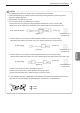
ASSEMBLING AND PREPARING 5 NOTE The items supplied with your product may vary depending on the model. yy Product specifications or contents of this manual may be changed without prior notice due to yy upgrade of product functions. Image shown may differ from your TV. yy How to use the ferrite core (Depending on model) yy 1 Use the ferrite core to reduce the electromagnetic interference in the PC audio cable. Wind the PC audio cable on the ferrite core thrice. Place the ferrite core close to the TV.
6 ASSEMBLING AND PREPARING Separate purchase Separate purchase items can be changed or modified for quality improvement without any notification. Contact your dealer for buying these items. These devices only work with compatible LG LED LCD TV or LCD TV. 3D Glasses (AG-S230, AG-S250, AG-S270 : Only 3D Models) ENGLISH ENG Parts and buttons NOTE yy TV can be placed in standby mode in order to reduce the power consumption.
ASSEMBLING AND PREPARING 7 Image shown may differ from your TV.
8 ASSEMBLING AND PREPARING Image shown may differ from your TV. yy Only 26/32LK33**, 32/42LK43** Screen (Only (Only 26/32LK33**) 32/42LK43**) USB IN USB input P HDMI IN IN 3 P OK AV (Audio and Video) IN H/P HOME HOME INPUT VIDEO L/MONO AUDIO R Headphone Socket R OK AV IN 2 INPUT Speakers Remote control ENGLISH ENG Power Indicator (Can be adjusted using the Power Indicator in the OPTION menu.
ASSEMBLING AND PREPARING 9 Image shown may differ from your TV.
10 ASSEMBLING AND PREPARING Image shown may differ from your TV. yy Only 32/37/42LK45** AV (Audio and Video) IN IN 3 R HDMI IN Headphone Socket Remote control and intelligent1 sensors Power Indicator (Can be adjusted using the Power Indicator in the OPTION menu.
ASSEMBLING AND PREPARING 11 Image shown may differ from your TV. yy Only 19/22/26LV25** USB input USB IN Screen Remote control and intelligent1 sensors Headphone Socket AV (Audio and Video) IN Power Indicator (Can be adjusted using the Power Indicator in the OPTION menu.
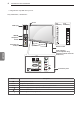
12 ASSEMBLING AND PREPARING Image shown may differ from your TV. yy Only 32LV25**, 32/37/42/47LV35**, 22/26/32LV30**, 32/42LV34**, 32/42/47/55LW45** USB input USB IN Screen HDMI IN IN 3 Remote control and intelligent1 sensors Power Indicator (Can be adjusted using the Power Indicator in the OPTION menu.
ASSEMBLING AND PREPARING 13 Image shown may differ from your TV. yy Only 22/26LV55** USB input USB IN Screen Remote control and intelligent1 sensors Headphone Socket AV (Audio and Video) IN Power Indicator (Can be adjusted using the Power Indicator in the OPTION menu.
14 ASSEMBLING AND PREPARING Additional information Viewing the owner’s manual The owner’s manual in PDF file format is supplied on the enclosed CD. Install the Adobe Acrobat Reader to view the owner’s manual on your PC. 1 Insert the supplied CD. The web page appears automatically. 2 Click Owner’s Manual on the web page. 3 View the owner’s manual. NOTE If the web page does not appear automatically, access My computer and then click LG and index.htm to view the owner’s manual.
ASSEMBLING AND PREPARING 15 Setting up the TV Only 26/32LK33**, 32/42LK43**, 42/47/55LK53** Image shown may differ from your TV. yy Put your TV on a pedestal stand and mount the TV on a table or wall. 1 Lay the TV with the screen side down on a flat Attaching the stand Only 22LK33** 1 Lay the TV with the screen side down on a flat surface. Caution Lay a foam mat or soft protective cloth yy on the surface to protect the screen from damage. surface.
16 ASSEMBLING AND PREPARING Only 32/37/42LK45** Only 19/22/26LV25**, 22/26LV55** 1 Lay the TV with the screen side down on a flat surface. Caution 1 Lay the TV with the screen side down on a flat surface. Caution Lay a foam mat or soft protective cloth yy on the surface to protect the screen from damage. Lay a foam mat or soft protective cloth yy on the surface to protect the screen from damage.
ASSEMBLING AND PREPARING Only 32LV25** 1 Lay the TV with the screen side down on a flat surface. Caution 17 Only 32/37/42/47LV35**, 22/26/32LV30**, 32/42LV34**, 32/42/47/55LW45** 1 Lay the TV with the screen side down on a flat surface. Caution Lay a foam mat or soft protective cloth yy on the surface to protect the screen from damage. 2 Assemble the parts of the Stand Body with the Stand Base of the TV. Lay a foam mat or soft protective cloth yy on the surface to protect the screen from damage.
18 ASSEMBLING AND PREPARING Not using the Desk Type Stand Image shown may differ from your TV. yy Only 26/32LK33**, 32/42LK43**, 32/37/42LK45**, 42/47/55LK53** 1 Push the supplied protection cover into the opening at the bottom of the TV until clicking sound. Mounting on a table Image shown may differ from your TV. yy 1 Lift and tilt the TV into its upright position on a table. - Leave a 10 cm (minimum) space from the wall for proper ventilation.
ASSEMBLING AND PREPARING Securing the TV to a table Image shown may differ from your TV. yy This feature is not available for all models. yy 19 Securing the TV to a wall Image shown may differ from your TV. yy This feature is not available for all models. yy Only 26/32LK33**, 32/42LK43**, 42LK53**,32/37/42LK45**, 32LV25**, 32/37LV35**, 32LV30**, 32LV34*) Fix the TV to a table to prevent from tilting forward, damage, and potential injury.
20 ASSEMBLING AND PREPARING Using the Kensington security system Image shown may differ from your TV. yy This feature is not available for all models. yy The Kensington security system connector is located at the rear of the TV. For more information of installation and using, refer to the manual provided with the Kensington security system or visit http://www.kensington.com. Connect the Kensington security system cable between the TV and a table.
ASSEMBLING AND PREPARING NOTE Use the screws that are listed on the yy VESA standard screw specifications. The wall mount kit includes an installation yy manual and necessary parts. The length of screws may differ yy depending on the wall mount. Make sure to use the proper length. For more information, refer to the manual yy supplied with the wall mount bracket. 21 Only 26/32LK33**, 32/42LK43**, 32/37/42LK45**, 42/47/55LK53** 1 Gather and bind the cables with the cable management clip.
22 ASSEMBLING AND PREPARING Positioning your display Image shown may differ from your TV. yy Only 22LK33** Adjust the position of the panel in various ways for maximum comfort. • Tilt range 12 0 0 3 ENGLISH ENG Connection of TV Image shown may differ from your TV. yy Only 19/22/26LV25**, 22/26LV55** DC Adapter 1 Connect the antenna cable to the antenna input port on the TV. 2 Connect the DC adapter plug to the power input jack on the TV.
REMOTE CONTROL 23 REMOTE CONTROL The descriptions in this manual are based on the buttons on the remote control. Please read this manual carefully and use the TV correctly. To replace batteries, open the battery cover, replace batteries (1.5 V AAA) matching and ends to the label inside the compartment, and close the battery cover. Be sure to point the remote control toward the remote control sensor on the TV. To remove the batteries, perform the installation actions in reverse.
24 WATCHING TV WATCHING TV Connecting an antenna Connect an antenna to watch TV while referring to the following. To prevent damage do not connect to the mains outlet until all connections are made between the devices. Connect the TV to a wall antenna socket with an RF cable (75 Ω). your TV settings according to your preferences. Language Mode Setting Power Indicator Country Time Zone NOTE Auto Tuning ENGLISH ENG Use a signal splitter to use more than 2 yy TVs.
MAKING CONNECTIONS 25 MAKING CONNECTIONS Connect various external devices to the TV and switch input modes to select an external device. For more information on external device’s connection, refer to the manual provided with each device. Available external devices are: HD receivers, DVD players, VCRs, audio systems, USB storage devices, PC, gaming devices, and other external devices. NOTE The external device connection may differ from the model.
26 3D IMAGING 3D Imaging (Only 32/42/47/55LW45**) 32/42/47/55LW45*) 3D Technology This TV can display in 3D via 3D broadcasting or when the TV is connected to a compatible device, such as a Blu-ray 3D Player. You need such a device to watch the TV in 3D. The 3D TV displays two separate pictures formatted for each eye. The viewer needs to wear 3D glasses in order to see these images in 3D format.
3D IMAGING NOTE When Using 3D Glasses CAUTION yy 3D glasses are sold separately. Refer to the 3D glasses manual for operating instructions. yy Do not use the 3D glasses to replace your corrective glasses, sunglasses or protective goggles. yy Do not store the 3D glasses in hot or cold locations. yy Do not drop objects onto the 3D glasses. Do not drop or bend the glasses. yy Since the lenses of the 3D glasses are easily scratched, make sure to clean only with a soft cloth.
28 3D IMAGING Watching 3D images Image shown may differ from your TV. yy Using 3D quick menu option 1 Press 3D SETTING. 2 Use the following options while viewing 3D View 3D mode for 3D images imaging. 1 Play the 3D video or select 3D channel. (2D to 3D mode is available with all contents) 2 Press 3D and select same type in your displayed picture on the screen.
3D IMAGING 29 CAUTION yy Some menus may not work while watching the TV in 3D. yyIf used 3D effect on the 2D source, 3D may not work. yy The 3D imaging mode is disabled automatically when switching DTV channe ls, input source. yy The screen may not be displayed properly if you view 2D DTV images in 3D imaging mode. yy 3D effect can be seen when 3D Mode is selected appropriately for the 3D input signal supplied to the TV. yy For *mpo files (3D camera files), the 3D imaging mode is enabled automatically.
30 TROUBLESHOOTING TROUBLESHOOTING General Problem Resolution Cannot control the TV with the remote control. yyCheck the remote control sensor on the product and try again. yyCheck if there is any obstacle between the product and the remote control. to ). yyCheck if the batteries are still working and properly installed ( to , yyCheck if the appropriate input mode such as TV or VCR is set for using the remote control. No image display and no sound is produced. yyCheck if the product is turned on.
OPEN SOURCE LICENSE 31 Open source software notice To obtain the source code under GPL, LGPL, MPL and other open source licenses, that is contained in this product, please visit http://opensource.lge.com. In addition to the source code, all referred license terms, warranty disclaimers and copyright notices are available for download.
An extended Owner’s Manual that contains information on the advanced features of these LG TV sets is located on the CD- ROM provided in an electronic version. To read these files, you will need to use a Personal Computer (PC) equipped with a CDROM drive. Re co rd t h e m o d e l n u m b e r a n d s e r i a l number of the TV. Refer to the label on the back cover and quote this information to your dealer when requiring any service. (Only DTV) Model : Serial No.