OPERATION 21 CAUTION WHAT TO DO IF YOU SMELL GAS Gas Surface Burners Before Use Read all instructions before using. Make sure that all burners are properly placed. % Open windows. % Do not try to light any appliance. % Do not touch any electrical switch. % Do not use any phone in your building. % Immediately call your gas supplier from a neighbor’s phone. Follow the gas supplier’s instructions. % If you cannot reach your gas supplier, call the fire department.
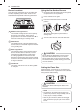
2 OPERATION Burner Locations Using the Gas Surface Burners Your gas range cooktop has four or five sealed gas burners, depending on the model. These can be assembled and separated. Follow the guide below. 1 Be sure that all of the surface burners and grates are placed in the correct positions. 2 Place cookware on the grate. 3 Push the control knob and turn to the Lite position. 4 1 2 3 1 Medium and Large Burners The medium and large burners are the primary burners for most cooking.
OPERATION 23 Using a Wok In case of a power failure, you can light the gas surface burners on your range with a match. If using a wok, use a 14-inch or smaller flat-bottomed wok. Make sure that the wok bottom sits flat on the grate. Surface burners in use when an electrical power failure occurs will continue to operate normally. 1 Hold a lit match to the burner, then push in the control knob. 2 Turn the control knob to the Lo position. CAUTION Use extreme caution when lighting burners with a match.
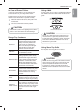
24 OPERATION Preheat the griddle according to the guide below and adjust for the desired setting. Using the Griddle Preheat Conditions Cook Setting - 5 (MED) Pancakes HI 5 min. HI Hamburgers HI 5 min. HI Fried Eggs HI 5 min. HI Bacon HI 5 min. HI Breakfast Sausage Links HI 5 min. HI Hot Sandwiches HI 5 min.
OPERATION 25 Do not block, touch or place items around the oven vent during cooking. Before Use Your oven is vented through ducts at the center above the burner grate. Do not block the oven vent when cooking to allow for proper air flow. Do not touch vent openings or nearby surfaces during any cooking operation. Read all instructions before using. Make sure the electrical power cord and the gas valve are properly connected. Confirm the correct usage of the range for the type of food you will cook.
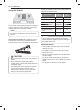
26 OPERATION Control Panel Overview 1 /RZH U 8SSH U U /RZH /R ZH U 5HPRWH 6WDUW FRPP RQ 2 3 4 5 6 7 1 Smart DiagnosisTM Use during the Smart Diagnosis feature. 2 Cook Time / Clock % Press the button to set the desired amount of time for food to cook. The oven shuts off when the set cooking time runs out. % Press and hold button for three seconds to set the time of day. 3 Start Time / Setting % Press the button to set the delayed timed cook. The oven starts at the set time.
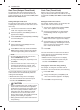
OPERATION 27 Clock The clock must be set to the correct time of day in order for the automatic oven timing functions to work properly. 1 Press and hold Cook Time for three seconds. CLO shows in the display. 2 Press plus(+) or minus(-) to select the desired time. Plus(+) to increase the time and minus(-) to decrease the time. Minimum & Maximum Default Settings All of the features listed have a minimum and a maximum time or temperature setting that can be entered into the control.
28 OPERATION Timer On/Off Settings The Lower Timer On/Off serves as an extra timer in the kitchen that beeps when the set time has run out. It does not start or stop cooking. Press and hold Start Time for three seconds. Then press the Start Time key repeatedly to toggle through and change oven settings. The Timer On/Off feature can be used during any of the oven control functions.
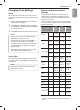
OPERATION 29 Adjusting the Beeper Volume Your new oven may cook differently from the one it replaced. Use your new oven for a few weeks to become more familiar with it before changing the temperature settings. If after familiarizing yourself with the new oven, you still think that it is too hot or too cold, you can adjust the oven thermostat yourself. 1 Press and hold Start Time for three seconds. Then press Start Time repeatedly until BEEP appears in the display.
30 OPERATION Start Time (Delayed Timed Cook) Cook Time (Timed Cook) The automatic timer of the Delayed Timed Cook function turns the oven on and off at the time you select. This feature can be used with the Bake, Conv. Bake and Conv. Roast modes. Set the oven to cook for a specific length of time using the Timed Cook feature. This feature can only be used with the Bake, Conv. Bake and Conv. Roast modes.
OPERATION 31 CAUTION % Adjust the oven racks before turning the oven on to prevent burns. % Do not cover the racks with aluminum foil, or any other material, or place anything on the bottom of the oven. Doing so will result in poor baking performance and may damage the oven bottom. % Only arrange oven racks when the oven is cool. Recommended Baking and Roasting Guide % Center pans on racks for best baking results.
32 OPERATION Bake Baking Chart Bake is used to prepare foods such as pastries, breads and casseroles. The oven can be programmed to bake at any temperature from 170 °F (80 °C) to 550 °F (285 °C). The default temperature is 350 °F (175 °C). This chart is only for reference and can be used for both the upper and lower ovens. Adjust the cook time according to your recipe. Setting the Bake Function (example, 375 °F) 1 Turn the oven mode knob to select Bake.
OPERATION 33 Convection Baking Chart The convection system uses a fan to circulate heat evenly within the oven. This improves heat distribution and allows for even cooking and excellent results, especially when using multiple racks. Convection cooking can also shorten cooking times. If auto conversion is disabled, reduce standard recipe temperature by 25 °F (14 °C) for Convection Bake. Temperatures have been adjusted in this chart.
34 OPERATION Cookware for Convection Cooking Convection Roast Any cookware safe for use in a conventional oven will work in a convection oven. But for best results, keep the following in mind. The Convection Roast feature is designed to give optimum roasting performance. Convection Roast combines cooking with the convection fan to roast meats and poultry. The heated air circulates around the food from all sides, sealing in juices and flavors.
OPERATION 35 Setting the Oven to Broil This oven is designed for closed-door broiling. Broil uses an intense heat radiation from the upper gas burner. 1 Turn the oven mode knob to select Broil. Press plus(+) or minus(-) to select Hi or Lo. 2 Press Start. 3 Allow the broiler to preheat for five minutes. 4 Place food in the oven. 5 Close the oven door. The oven door must be closed during broiling. The Broil function works best when broiling thin, tender cuts of meat (1" or less), poultry or fish.
36 OPERATION Recommended Broiling Guide The size, weight, thickness, starting temperature, and your preference of doneness will affect broiling times. This guide is based on meats at refrigerator temperature. For best results when broiling, use a pan designed for broiling. Upper oven Food Ground Beef Well done Quantity and/or Thickness Rack First Side Position (minutes) 1 lb. (4 patties) 1/2 to 3/4" thick 2 5-7 3-5 Beef Steaks Rare 1" thick 2 4-6 2-3 Medium 1 to 1 / lbs.
OPERATION 37 Warm This function automatically sets the oven temperature to cook either frozen pizza with regular or rising crust, or freshly made pizza. Simply choose the type of pizza (see chart) and set the desired cook time. This function will maintain an oven temperature of 170 °F. The Warm function will keep cooked food warm for serving up to three hours after cooking has finished. The Warm function may be used without any other cooking operations.
38 OPERATION Meat Probe Changing the Probe Temperature while Cooking The meat probe accurately measures the internal temperature of meat, poultry and casseroles. It should not be used during broiling, self clean, warming or proofing. Always unplug and remove the meat probe from the oven when removing food. Before using, insert the probe into the center of the thickest part of the meat or into the inner thigh or breast of poultry, away from fat or bones.
OPERATION 39 Setting Remote Start If the appliance is registered on a home Wi-Fi network, this function starts preheating and then holds the temperature for up to an hour (including preheating time). If the appliance is not registered on the network, “OFF” appears in the display. Follow the instructions on page 40 to register the appliance on the network. 1 Open the oven door to make sure the oven is empty and ready for pre-heating. Close the oven door.
40 SMART FUNCTIONS SMART FUNCTIONS Using the Wi-Fi Function Application Installation Communicate with the appliance from a smart phone using the convenient smart features. Search for the LG Smart ThinQ application from the Google Play Store or Apple App Store on a smart phone. Follow instructions to download and install the application. Product Registration 1 Run the LG Smart ThinQ application on a smart phone. 2 Create an account and sign in. 3 Select Register. 4 Select Oven.
SMART FUNCTIONS 41 To obtain the source code under GPL, LGPL, MPL, and other open source licenses, that is contained in this product, please visit http://opensource.lge.com. In addition to the source code, all referred license terms, warranty disclaimers and copyright notices are available for download. IEEE 802.11 b : 17.56 dBm This equipment has been tested and found to comply with the limits for a Class B digital device, pursuant to Part 15 of the FCC Rules.
42 MAINTENANCE MAINTENANCE CAUTION % Do not clean this appliance with bleach. % To prevent burns, wait until the cooktop has cooled down before touching any of its parts. % Always wear gloves when cleaning the cooktop. Removing and Replacing the Gas Surface Burners Grates and burner head / cap can be removed for care and cleaning. Cleaning Burner Heads/Caps For even and unhampered flame, the slits in the burner heads must be kept clean at all times.
MAINTENANCE 43 The range consists of three separate professionalstyle grates. For maximum stability, these grates should only be used when in their proper position. The two side grates can be interchanged from left to right and front to back. The center grate can be interchanged from front to back. Side grate Center grate Side grate Cleaning the Cooktop Surface CAUTION % To avoid burns, do not clean the cooktop surface until it has cooled. % Do not lift the cooktop surface.
44 MAINTENANCE Front Manifold Panel and Knobs It is best to clean the manifold panel after each use of the range. For cleaning, use a damp cloth and mild soapy water or a 50/50 solution of vinegar and water. Rinse with clean water and polish dry with a soft cloth. The control knobs may be removed for easy cleaning. 1 2 To clean the knobs, make sure that they are in the Off position and pull them straight off the stems. Be careful not to lose the knob springs.
MAINTENANCE 45 Do not use harsh cleaners or harsh abrasive cleaning materials on the outside of the oven door. Doing so can cause damage. Don’t hand clean oven door gasket Do hand clean door Door Care Instructions Most oven doors contain glass that can break. CAUTION % Do not close the oven door until all the oven racks are fully in place. % Do not hit the glass with pots, pans, or any other object.
46 MAINTENANCE When to Use EasyClean® Suggested Cleaning Method Example of Oven Soiling Soil Pattern Types of Soils Common Food Items That Can Soil Your Oven Small drops or spots Cheese or other ingredients Pizza Steaks, broiled EasyClean® Light splatter Fish, broiled Fat/grease Meat roasted at low temperatures Medium to heavy splatter Self Clean* Fat/grease Meat roasted at high temperatures Filling or sugar based soils Pies Cream or tomato sauce Casseroles Drops or spots * The Self Cle
MAINTENANCE 47 Spray or pour the remaining 1 cup (8 oz or 250 ml) of water onto the bottom center of the oven cavity. The indentation on the oven bottom should be fully covered to submerge all soils. Add water if necessary. 9 Clean the oven cavity immediately after the EasyClean® cycle by scrubbing with a wet, non-scratch scouring sponge or pad. (The scouring side will not scratch the finish.
48 MAINTENANCE Self Clean The Self Clean cycle uses extremely hot temperatures to clean the oven cavity. While running the Self Clean cycle, you may notice smoking or an odor. This is normal; especially if the oven is heavily soiled. During the Self Clean cycle, the cooktop elements and warming drawer cannot be used. NOTE % Remove oven racks and accessories before starting the Self Clean cycle. During Self Clean, the kitchen should be well ventilated to minimize the odors from cleaning.
MAINTENANCE 49 The Self Clean function has cycle times of 2, 3, or 4 hours. Self Clean Soil Guide Soil Level Setting Self Clean with a Delayed Start 1 Remove all racks and accessories from the oven. 2 Turn the oven mode knob to select Self Clean. The oven defaults to the recommended threehour self clean for a moderately soiled oven. Press plus(+) or minus(-) repeatedly to cycle through self-clean times in the upper or lower oven. Both ovens cannot use the self-clean function at the same time.
50 MAINTENANCE After the Self Clean Cycle % The oven door remains locked until the oven temperature has cooled. % You may notice some white ash in the oven. Wipe it off with a damp cloth or a soap-filled steel wool pad after the oven cools. If the oven is not clean after one self-clean cycle, repeat the cycle. % If oven racks were left in the oven and do not slide smoothly after a self-clean cycle, wipe racks and rack supports with a small amount of vegetable oil to make them glide more easily.
MAINTENANCE 51 about 30° CAUTION % Be careful when removing and lifting the door. % Do not lift the door by the handle. The door is very heavy. Replacing the Door Upper Oven 1 Be sure both hinges are in a 30 degree position. Removing the Door 2 Slide the door back onto the hinges until you hear a solid click and the release buttons have engaged. 3 Fully open the door. 4 Push the hinge locks down onto the door frame. 5 Close the oven door. 1 Fully open the door.
52 MAINTENANCE Lower Oven Replacing the Door Removing the Door 1 Firmly grasp both sides of the door at the top. 2 With the door at the same angle as the removal position, seat the indentation of the hinge arms into the bottom edge of the hinge slots. The notch in the hinge arms must be fully seated into the bottom edge of the slots. 1 Fully open the door. 2 Unlock the hinge locks, rotating them as far toward the open door frame as they will go.
TROUBLESHOOTING 53 FAQs What types of cookware are recommended for use with the cooktop? % The pans must have a flat bottom and straight sides. Can I use aluminum foil to catch drippings in my oven cavity? Never use aluminum foil to line the bottom or sides of the oven or the warming drawer. The foil will melt and stick to the bottom surface of the oven, and will not be removable. Use a sheet pan placed on a lower oven rack to catch drippings instead.
54 TROUBLESHOOTING My range is still dirty after running the EasyClean® cycle. What else should I do? Is it safe for my convection fan, broil burner or heater element to get wet during EasyClean®? The EasyClean® cycle only helps to loosen light soils in your oven range to assist in hand-cleaning of your oven. It does not automatically remove all soils after the cycle. Some scrubbing of your oven range is required after running the EasyClean® cycle. Yes.
TROUBLESHOOTING 55 Before you call for service, review this list. It may save you time and expense. The list includes common occurrences that are not the result of defective workmanship or materials in this appliance. Symptoms Possible Cause / Solution % Make sure that the electrical plug is inserted into a live, properly grounded outlet. Top burners do not light or do not burn evenly. Burner flames are very large or yellow. Surface burners light but the oven does not.