
Installation Guide


17INSTALLATION
ENGLISH
NOTE
ator valve is open when
shipped. If the range does not work properly
after installation, make sure the regulator valve
is still open.
3
Connect a flexible metal appliance connector
to the adapter on the range. Position the
range to permit connection at the shut-off
valve.
4
When all connections have been made, be
sure all range controls are in the OFF position
and the pressure regulator valve is open
before turning on the main gas supply valve.
create a hazard. Gas leaks may not be
detected by smell alone.
5
Check all gas connection joints and fittings for
leaks with a non-corrosive leak detection fluid,
then wipe off.
and install a UL approved gas detector.
Install and use in accordance with the
installation instructions.
WARNING
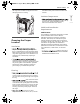
Flexible Connector Hookup
Have the installer show you the location of the
range gas shut-off valve and how to shut it off if
necessary.
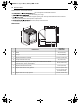
a
Pressure regulator
b
1/2" Adapter
c
1/2" Adapter
d
Gas Flow into Range
e
Flex connector (6 ft. max.)
f
Gas shut-off valve
g
1/2" Adapter
h
1/2" or 3/4" Gas pipe
Pressure Regulator Position
a
Pressure Regulator
Adjusting Air Shutters (for LP
Conversions)
The range comes from the factory with the air
shutters adjusted for proper air flow for natural
gas. If converted to LP, follow the instructions
provided in the conversion kit to properly adjust
the air shutters. LP conversion must be performed
by a qualified technician.
Connecting Electricity
Electrical Requirements
120 Volt, 60 Hz, properly grounded dedicated
circuit protected by a 15 or 20 Amp circuit breaker,
or slow blow fuse.
If an external electrical source is utilized, the
appliance, when installed, must be electrically
grounded in accordance with local codes or, in the
absence of local codes, with the National Electrical
Code, NFPA70 or the Canadian Electric Code, CSA
C22.1-02.
Grounding
WARNING
properly grounded.