
Installation Guide


19INSTALLATION
ENGLISH
Checking Ignition of the Surface
Burners
Electric Ignition
Select a surface burner knob and simultaneously
push in and turn to the Lite position. You will hear
a clicking sound indicating proper operation of the
spark module.
Once the air has been purged from the supply
lines the burner should ignite within 4 seconds.
After the burner ignites, rotate the knob out of the
Lite position. Try each burner in succession until
all burners have been checked.
Quality of Flames
The combustion quality of the burner flames
needs to be confirmed visually.
Yellow flames
Call for service.
Yellow tips on outer cones
This is normal for LP gas.
Soft blue flames
This is normal for natural gas.
NOTE
tipping on outer cones
is normal.
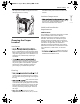
Adjusting the Surface Burner to the
Low Flame (Simmer) Setting
1
Light all surface burners.
2
Turn the knob on the burner being adjusted
to Lo.
3
Remove the knob and knob ring.
4
Insert a small, flat-blade screwdriver into the
opening marked below.
a
Dual burner simmer
b
Burner simmer excluding dual burner
5
Turn the screw to adjust.
turning the screw to adjust with the other.
6
Replace the knob.
7
Test the flame stability.
Hi to Lo quickly.
If the flame goes out, increase the flame
size and test again.
Lo setting,
open and close the oven door quickly. If the
flame is extinguished by the air currents
created by the door movement, increase
the flame height and test again.
8
Repeat steps 1~7 for each surface burner.
NOTE
(Simmer) setting at the lower limit. It cannot be
set any lower.
Optional Rear Filler
Installing the Rear Filler
If the counter does not bridge the opening at the
rear wall, the rear filler kit which is provided with
the slide in range will be needed.
NOTE
greater than 25 3/8 "
there will be a gap between the filler kit and the
back wall.