
User manual
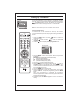

Location and function of controls
6
21FU3 series
6
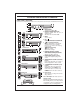
1. MAIN POWER
switches the set On or Off.
2. POWER/STANDBY INDICATOR
illuminates brightly when the set is in
standby mode.
dims when the set is switched On.
3. MENU
selects a menu.
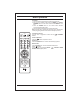
4. OK /
accepts your selection of current mode
or to select AV/Component / RF mode.
5 (Programme Up/Down)
selects a programme or a menu item.
switches the set on from standby.
If X-Sort is on, switch to the next prog.
in same group.
(Volume Down/Up)
adjusts the volume.
adjusts menu settings.
6. REMOTE CONTROL SENSOR
Note : Only use the supplied remote
control handset. (When you use other,
they'll be not able to function).
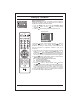
7. HEADPHONE SOCKET (option)
Connect the headphone plug to this
socket.
8. AUDIO/VIDEO IN SOCKETS (AV2/AV3)
(option)
Connect the audio/video out sockets of
External equipment to these sockets.
9. S-VIDEO/AUDIO IN SOCKETS (S-AV)
(option)
Connect the video out socket of an S
VIDEO VCR to the S-VIDEO socket.
Connect the audio out sockets of the
S-VIDEO VCR to the audio sockets as
in AV3.
10. EYE (option)
adjusts picture according to the Surroun-
ding conditions.
Note : Do not place any heavy objects on
the TV set.
FRONT PANEL / SIDE PANEL
Shown below is a simplified representation of front or side panel, here shown may be somewhat different from your set.
3
MENU
OK/
ON/OFF
1
4
LVIDEO
AUDIO
R
AV2
8
7
21FE4 series
5 2
10
PR
6
VOL
S VIDEO
L/MONOVIDEO
AUDIO
R
8
7
AV3
9
MENU
ON/OFF
1
3
4
21FD5 series
5 2
106
PR
VOL
S VIDEO
L/MONOVIDEO
AUDIO
R
AV3
8
9
7
2
6
1
1
2 6
7
8
2
6
10
21FU8 series
1
3
4
5
ON/OFF
MENU
OK/
VOL
PR
1 2 3 4 56
10
7
8
7
8
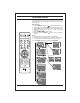
21FU1 series
OK/
3
4
5
3
4
5
3
4
5
7
8
21SA4 series
SWIVEL STAND
This feature is available with 21SA4 model only.
After installing the TV, you can adjust the TV
set manually to the left or right direction by
15 degrees to suit your viewing position.
OK/