LA.bk Page 1 Thursday, February 8, 2001 2:19 PM Optra E312 User’s Guide June 2000 www.lexmark.
LA.bk Page 1 Thursday, February 8, 2001 2:19 PM Edition: June 2000 The following paragraph does not apply to any country where such provisions are inconsistent with local law: LEXMARK INTERNATIONAL, INC. PROVIDES THIS PUBLICATION “AS IS” WITHOUT WARRANTY OF ANY KIND, EITHER EXPRESS OR IMPLIED, INCLUDING, BUT NOT LIMITED TO, THE IMPLIED WARRANTIES OF MERCHANTABILITY OR FITNESS FOR A PARTICULAR PURPOSE.
LA.
LA.bk Page iii Thursday, February 8, 2001 2:19 PM Table of contents About your printer . . . . . . . . . . . . . . . . . . . . . . . . . v Model specifications . . . . . . . . . . . . . . . . . . . . . . . . . . . . . . . . . . . . . . . . . . . . . vi Performance . . . . . . . . . . . . . . . . . . . . . . . . . . . . . . . . . . . . . . . . . . . . . . . . . . . . vii Print quality . . . . . . . . . . . . . . . . . . . . . . . . . . . . . . . . . . . . . . . . . . . . . . . . . . . . vii Ease of use . .
LA.bk Page iv Thursday, February 8, 2001 2:19 PM Loading paper, other media in the manual sheet feeder . . . . . . . . . . . . . . 33 Clearing paper jams . . . . . . . . . . . . . . . . . . . . . . . . . . . . . . . . . . . . . . . . . . . . . 34 4 Troubleshooting . . . . . . . . . . . . . . . . . . . . . . . . . . 37 Indicator lights . . . . . . . . . . . . . . . . . . . . . . . . . . . . . . . . . . . . . . . . . . . . . . . . . 39 5 Supplies . . . . . . . . . . . . . . . . . . . . . . . . . . . . .
LA.bk Page v Thursday, February 8, 2001 2:19 PM About your printer The Optra E312 printer combines the quality of a laser printer with a conveniently small footprint for a perfect fit. With its easy setup, you’ll be printing in no time.
LA.bk Page vi Thursday, February 8, 2001 2:19 PM Model specifications The information included on this CD applies to both the Lexmark™ Optra™ E312 and E312L printers. The differences between these two models are outlined in the following table. Note:Some sections in this printer manual may not apply to the E312L model.
LA.bk Page vii Thursday, February 8, 2001 2:19 PM Performance The Optra E312 printer prints up to 10 pages per minute for quick job turnaround. It comes with 4MB of memory, expandable to 68MB to print complex jobs quickly. You can also install an optional flash memory card to store forms, macros and downloaded fonts. PostScript Level 2 and PCL 6 emulation datastreams give you application flexibility.
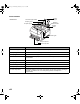
LA.bk Page viii Thursday, February 8, 2001 2:19 PM Printer Features Front View 2 Paper support 1 Automatic paper feeder 3 Paper guides 4 Manual sheet feeder 5 Paper support 6 Paper guides 7 Indicator lights 8 Paper output bin 9 Front output door Use the: When you want to: 1 Automatic paper feeder Load paper/other media (up to 150 sheets of paper or 10 sheets of other media). 2 Paper support Stack media in the automatic paper feeder.
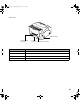
LA.bk Page ix Thursday, February 8, 2001 2:19 PM Rear view 13 Power switch 10 Printer cable connector Use the: 11 USB connector 12 Power cord connector When you want to: 10 Printer cable connector Connect your computer to the printer’s parallel port with a parallel interface cable. 11 USB connector Connect your computer to the printer’s USB port with a Universal Serial Bus cable. 12 Power cord connector Connect your printer to a properly grounded wall outlet with a power cord.
LA.bk Page x Thursday, February 8, 2001 2:19 PM Indicator lights The operator panel has 6 lights and 1 button. Different light sequences provide status, attendance and service information. Depending on the light sequence, briefly (approximately one second) pushing Press Button activates different printer functions, such as restarting the printer, printing data or displaying an error code. Press and hold Press Button for 3 seconds only when you want to reset the printer to the user defaults.
LA.bk Page xi Thursday, February 8, 2001 2:19 PM Other information sources Online documents In addition to this User’s Guide CD, Lexmark offers other sources of information about your printer or about Lexmark products and services. The Drivers, MarkVision and Utilities CD that was shipped with your printer contains several online documents. Refer to the booklet that came with the CD for launching instructions.
LA.
The basics 1 What’s in the box 1 Remove the printer and all accessories from the packaging carton. Save the carton and packing materials in case you need to repack the printer for service or storage.
Installing the print cartridge 2 Chapter 1: The basics 1 Use the finger tab to pull down the printer cover. 2 Unpack the print cartridge. 3 Holding the cartridge level, pull out the sealing tape.
4 Gently shake the cartridge to distribute the toner evenly. 5 Insert the print cartridge: a Slide the print cartridge down between the print cartridge slots. b Gently push down on the cartridge until it drops into place. 6 Close the printer cover.
LA.bk Page 4 Thursday, February 8, 2001 2:19 PM Troubleshooting Tips Problem: What to do: Characters appear light or blurred. • Make sure you removed the sealing tape from the print cartridge. • Replace the print cartridge. Printer seems to be printing, but pages are blank. • The print cartridge may be out of toner. Replace the cartridge. • The print cartridge may be defective. Replace the cartridge. • Make sure you removed the sealing tape from the print cartridge. Printer is on, but nothing prints.
Using a USB cable If you are connecting your printer to a PC with a USB (Universal Serial Bus) cable, we recommend Lexmark part number 12A2405 (2 m). If you use something other than this cable, you may not be able to use all of your printer’s functions. If you are using Windows 2000: 1 Make sure your computer and printer are turned off. 2 Connect the USB cable to the port on the back of your computer. 3 Connect the other end of the cable to the USB port on the back of your printer.
LA.bk Page 6 Thursday, February 8, 2001 2:19 PM 12 When you finish, exit the setup program and remove the CD from your computer. If you are using Windows 98: 1 Make sure your computer and printer are turned off. 2 Connect the USB cable to the port on the back of your computer. 3 Connect the other end of the cable to the USB port on the back of your printer. 4 Turn on your computer and your printer.
LA.bk Page 7 Thursday, February 8, 2001 2:19 PM 6 Follow the installation instructions in the printer drivers dialog box. 7 In the Print to the following port check box, select the USB port that contains the name of the printer you are currently installing as your default printer port. 8 When you finish, exit the setup program and remove the CD from your computer. 9 Restart your computer. Troubleshooting Tips Problem: What to do: Unexpected characters print or characters are missing.
LA.bk Page 8 Thursday, February 8, 2001 2:19 PM For Macintosh users: 1 Make sure the printer power is Off (O) and the printer power cord is unplugged from the electrical outlet. 2 Connect the end of the USB cable to the port on your computer. 3 Align and plug the other end of the USB cable into the port on the back of your printer as shown. 4 Plug the printer in. 5 Turn the printer on. 6 Launch the Drivers, MarkVision, and Utilities CD to install the necessary items.
LA.bk Page 9 Thursday, February 8, 2001 2:19 PM 15 In the PostScript Printer Description (PPD) File box, click Auto Setup. Wait for the information to process. The previous screen displays. Notice the new printer icon. Note: Both areas of the printer dialog box show the Optra E312 printer icon. 16 Click Create. A window appears for you to name the printer. 17 Type in the name of the printer or accept the default name. 18 Click Save. 19 Quit the Desktop Printer Utility application.
LA.bk Page 10 Thursday, February 8, 2001 2:19 PM Loading paper Automatic paper feeder Manual paper feeder You can load paper in the automatic paper feeder, which holds up to 150 sheets, or the manual feeder, which holds 1 sheet at a time. 1 To print from the automatic paper feeder, extend the paper support. 2 Before loading paper, flex the sheets back and forth to loosen them, then fan them. 3 If the paper has a preferred print side, insert the paper with the print side facing you.
LA.bk Page 11 Thursday, February 8, 2001 2:19 PM 4 Slide the paper guides against the edges of the paper. 5 Extend the paper support on the paper output bin. 6 Select the paper size from your software application. 7 Start your print job.
LA.bk Page 12 Thursday, February 8, 2001 2:19 PM Troubleshooting Tips Problem: What to do: Toner smudges appear on the front or back of the page. • Make sure the paper is straight and unwrinkled. Paper sticks together/printer feeds multiple sheets of paper. • Remove the paper from the paper feeder and fan the paper. • Make sure there isn’t too much paper in the paper feeder. The automatic paper feeder holds up to 150 sheets, depending on the thickness of the paper.
LA.bk Page 13 Thursday, February 8, 2001 2:19 PM 1 Turn the printer off. 2 Plug one end of the power cord into the power cord connector on the back of the printer and the other end into a properly grounded wall outlet. 3 Turn on the printer. As the printer powers up, each operator panel light turns on and off, starting with Press Button and ending with the Ready light. If this does not happen, see Printing problems.
LA.bk Page 14 Thursday, February 8, 2001 2:19 PM Installing memory To install a memory card or a flash memory card, go on to the next section. Otherwise, you are ready to set up your application software and install the appropriate printer driver. Refer to the booklet that came with the Drivers, MarkVision and Utilities CD for installation instructions. Go to Printer drivers for more information about the printer utilities and drivers. Your printer comes with 4MB of printer memory.
Note: Exposing the photoconductor to light may damage the print cartridge. After you remove the cartridge from the printer, cover it or store it in a clean, dark place. 4 With the printer facing you, place it on its left side. 5 Turn the printer around so the bottom of the printer is facing you. 6 Locate and remove the 3 screws on the metal shield.
LA.bk Page 16 Thursday, February 8, 2001 2:19 PM 16 Chapter 1: The basics 7 Grasp the corner of the shield and gently pull it out, then down. 8 Pull the shield away from the printer.
Installing a printer memory card To install an optional printer memory card, follow the instructions below. 1 Remove the printer memory card from its packaging. Avoid touching the connection points along the edge of the card. Notch Connection points 2 Locate the printer memory connector. 3 Hold the option card with the connection points facing toward the system board, with the notch pointing down and to the left. 4 Insert the card into the printer memory connector at a 45 degree angle.
LA.bk Page 18 Thursday, February 8, 2001 2:19 PM Installing a flash memory card 5 Gently push the card all the way in. 6 Push the card back with your thumbs until it snaps into place. To install an optional flash memory card: 1 Remove the printer memory card from its packaging. Avoid touching the connection points along the edge of the card. Notch Connection points 2 Option card connector 18 Chapter 1: The basics Locate the option card connector.
3 Hold the option card with the connection points facing toward the system board and the notch pointing down and to the left. 4 Insert the card into the option card connector at a 45 degree angle. 5 Gently push the card all the way in. 6 Push the card back with your thumbs until it snaps into place.
When you have finished installing the option card(s): 1 Fit the metal shield into the slots and reattach the screws. 2 Put the printer back to its original upright position. 3 Re-install the print cartridge. 4 Reconnect the computer cable and latch the metal clips. 5 Plug the power cord into the printer. 6 Turn the printer on. As the printer powers up and the operator panel lights begin cycling on and off, there is a pause while the new memory is tested, then the lights continue cycling.
LA.bk Page 21 Thursday, February 8, 2001 2:19 PM Printer drivers 2 Included with your printer is the Drivers, MarkVision and Utilities CD, a compact disc containing printer drivers and utilities for Windows 95, Windows 98, Windows 2000, Windows NT 4.0, Windows 3.1x, Macintosh and OS/2 operating systems. Refer to the CD booklet for information about launching the CD program for your operating system. When the CD program is running, press F1 for online Help at any time.
LA.bk Page 22 Thursday, February 8, 2001 2:19 PM Additional printer drivers may have been developed since this book was printed. Refer to the CD README for a complete list of all the drivers included on the CD. Automated fax system In the U.S. and Canada, you can get a list of available drivers by calling the Lexmark Automated Fax System. The system is available 24 hours a day, 7 days a week. Just call (606) 232-2380 from a touchtone phone and follow the voice prompts.
LA.bk Page 23 Thursday, February 8, 2001 2:19 PM MarkVision With its easy-to-use tabs, MarkVision provides a quick and easy way to view and change printer settings right from your computer.
LA.
LA.bk Page 25 Thursday, February 8, 2001 2:19 PM Paper handling 3 Automatic paper feeder Manual sheet feeder Your printer has two standard paper sources: an automatic paper feeder, which holds up to 150 sheets of plain paper and a single sheet manual feeder. Use the automatic paper feeder for the print jobs you do most often. Use the manual sheet feeder to feed a single page, transparency, envelope, label or index card.
LA.bk Page 26 Thursday, February 8, 2001 2:19 PM Paper types and sizes Selecting the right paper type reduces printing problems. For best print quality, use 20 lb (75 g/m2) xerographic paper. If the paper has a preferred print side, load it with the print side facing you. Media Size Weight Capacity Paper A4, A5, B5, letter, legal, executive 16 - 24 lb (60-90 g/m2) Automatic Paper Feeder: 150 sheets Minimum: 3.875 x 5.9 in.
LA.bk Page 27 Thursday, February 8, 2001 2:19 PM Paper Load A4, A5, B5, letterhead, legal and executive-size paper one at a time from the manual feeder or load up to 150 sheets in the automatic paper feeder. Preprinted papers such as letterhead must be able to withstand temperatures up to 200°C (392°F) without melting or releasing hazardous emissions. Load letterhead with the top of the page pointing down, facing you.
LA.bk Page 28 Thursday, February 8, 2001 2:19 PM Load envelopes in the center of the manual feeder or automatic paper feeder and slide the paper guides snugly against the sides of the envelopes. When printing on envelopes: • Try a sample of any envelopes you are considering using with the printer before buying large quantities. • Use envelopes made from 75 to 105 g/m2 (20 to 28 lb) bond paper.
LA.bk Page 29 Thursday, February 8, 2001 2:19 PM • Load envelopes vertically, flap side down so the stamp area is in the top left corner. • Adjust the left and right paper guides to fit the width of the envelopes. Labels For occasional label printing, use paper labels designed for laser printers. You can feed labels one at a time from the manual feeder, or you can load up to 10 labels in the automatic paper feeder.
For best results, open the single-sheet front output door so the card stock exits out the front. Loading paper, other media in the automatic feeder Use the automatic paper feeder, which is behind the manual feeder, to feed paper and special media such as transparencies, envelopes, labels and card stock. To avoid curling and potential jams when printing on special media, open the front output door to feed the media straight out the front of the printer.
3 If loading: • A4, A5, B5, legal or executive-size paper, insert the paper with the print side facing you • letterhead paper, insert letterhead with the top of the page pointing down, facing you • transparencies with a removable stripe, insert them so the stripe is pointing away from you and pointing down • envelopes, insert them vertically, flap side down so the stamp area is in the top left corner 4 Slide the paper guides flush against the edges of the media.
LA.bk Page 32 Thursday, February 8, 2001 2:19 PM 32 Chapter 3: Paper handling 5 Extend the paper support on the paper output bin or open the front output door if you’re printing on special media. 6 Select the automatic paper feeder from your software application. 7 Start your print job.
LA.bk Page 33 Thursday, February 8, 2001 2:19 PM Loading paper, other media in the manual sheet feeder Use the manual feeder to feed paper or special media, one sheet at a time, into your printer. If you experience problems feeding envelopes or index cards in the automatic paper feeder, try printing them one at a time from the manual feeder. To avoid curling or potential jams when printing on special media, open the front output door to feed media straight out the front of the printer.
Clearing paper jams If you get a paper jam, the Paper Jam indicator light prompts you to clear the paper path. If the paper has just started to feed from the paper feeder when the jam occurs: 1 Pull the paper straight up out of the paper feeder. 2 Open and close the printer cover to resume printing. If the paper jam occurs inside the printer: 1 Remove the paper from the output bin. 2 Turn the printer off, then on.
LA.bk Page 35 Thursday, February 8, 2001 2:19 PM Note: If the paper jam is in the fuser, try opening and closing the cover. Each time you open and close the cover, the paper advances until you can pull it out. 5 Grasp the paper on both sides and pull the paper toward you. 6 Make sure there is no more paper in the printer. 7 Re-insert the print cartridge. 8 Close the printer cover to resume printing.
LA.bk Page 36 Thursday, February 8, 2001 2:19 PM Troubleshooting Tips Problem: What to do: Paper sticks together/printer feeds multiple sheets of paper. • Make sure you are using recommended paper/other media (see Paper types and sizes). Paper skews or buckles. Envelopes fail to feed correctly. 36 Chapter 3: Paper handling • Make sure the envelopes are loaded in the center of the feeder. • Try a different kind. Envelopes designed for laser printers produce better results.
LA.bk Page 37 Thursday, February 8, 2001 2:19 PM Troubleshooting 4 For help solving printing problems, refer to the following tables. If you cannot fix the problem, contact your point of purchase for assistance. You may have a printer part that requires cleaning or replacement by a service technician. Print quality problems Problem: What to do: Light or blurred characters. • Make sure you removed the sealing tape from the print cartridge.
LA.bk Page 38 Thursday, February 8, 2001 2:19 PM Print quality problems Toner smears or rubs off the page. • Run Engine Clean Cycle to remove any toner that may have accumulated (Engine clean cycle). • Select a different Media Type or Form Type setting from your Lexmark printer driver. • Try a different kind of xerographic bond paper. Solid black areas on transparencies or paper contains white streaks. • Choose a different fill pattern in your software application. • Try a different type of paper.
LA.bk Page 39 Thursday, February 8, 2001 2:19 PM Indicator lights The next section explains the various light sequences with a corresponding illustration. The indicator lights mean different things, depending on their sequence. They indicate that the printer is Ready to print (printer status information); the printer needs attention (printer attendance information); or the printer needs servicing (printer service information).
Printer status information If your printer lights look like this: Then your printer: is Ready to receive and process data. • Print a test page by pushing the operator panel button with a brief button press, or • reset the printer by pushing the operator panel button with a long button press. Each time the printer is reset, the print job in process is terminated.
LA.bk Page 41 Thursday, February 8, 2001 2:19 PM If your printer lights look like this: Then your printer: is Busy receiving data, processing data, the print engine is running, or processing/printing a test page. • If you want to reset the printer, push the operator panel button with a long button press.
LA.bk Page 42 Thursday, February 8, 2001 2:19 PM If your printer lights look like this: Then your printer: is Waiting until a Print Timeout occurs or until additional data is received. • Print data stored in the printer buffer by pushing the operator panel button with a brief button press or • reset the printer by pushing the operator panel button with a long button press.
If your printer lights look like this: Then your printer: is Resetting settings to their power-on default settings or saving settings changed in configuration mode.
If your printer lights look like this: Then your printer: is Flushing corrupted print data.
LA.bk Page 45 Thursday, February 8, 2001 2:19 PM Printer attendance information If your printer lights look like this: Then your printer: detects a Paper Jam. • Open the printer cover, clear all paper from the paper path and close the cover to resume printing.
LA.bk Page 46 Thursday, February 8, 2001 2:19 PM If your printer lights look like this: Then your printer: is prompting you to load media for manual feed. The printer stops and displays this light sequence for each piece of media you want to print. • Load media, with the side to be printed facing the front of the printer, into the manual feeder and push the operator panel button to resume printing, or • reset the printer by pushing the operator panel button with a long button press.
If your printer lights look like this: Then your printer: top cover is open or the print cartridge is not installed. • Close the cover to display the light sequence that appeared before the cover was opened. • Install the print cartridge.
LA.
LA.bk Page 49 Thursday, February 8, 2001 2:19 PM Secondary error codes If your printer lights look like this when you double-click the operator panel button: Then your printer: memory is full (Memory Full). • Reduce the complexity of the job and/or the resolution, or • press the operator panel button with a brief button press to resume printing, or • reset the printer by pushing the operator panel button with a long button press.
If your printer lights look like this when you double-click the operator panel button: Then your printer: has received a page that is too complex to print (Complex Page). • Switch the printing mode to a different printing mode via the Lexmark driver for Windows, or • press the operator panel button with a brief button press to resume printing, or • reset the printer by pushing the operator panel button with a long button press.
If your printer lights look like this when you double-click the operator panel button: Then your printer: is out of memory while formatting a page and is forced to reduce the Indicator lights 51
If your printer lights look like this when you double-click the operator panel button: Then your printer: has received a request for a PPDS font which is not installed (Font Error). • Reset the front panel by pushing the operator panel button with a long button press.
LA.bk Page 53 Thursday, February 8, 2001 2:19 PM If your printer lights look like this when you double-click the operator panel button: Then your printer: doesn’t have enough memory to save what is in the buffer (Resource Save Off). • Install additional memory or • push the operator panel button to resume printing, or • reset the front panel by pushing the operator panel button with a long button press.
LA.bk Page 54 Thursday, February 8, 2001 2:19 PM If your printer lights look like this when you double-click the operator panel button: Then your printer: has insufficient memory to free up unused space in flash memory (Insufficient Defrag Memory). • Delete fonts, macros and other data in RAM, or install additional printer memory, then issue a PJL command to begin freeing up unused space in flash memory.
LA.bk Page 55 Thursday, February 8, 2001 2:19 PM If your printer lights look like this when you double-click the operator panel button: Then your printer: has an error communicating with the host computer (Host Interface Error).
LA.bk Page 56 Thursday, February 8, 2001 2:19 PM Printer service information If your printer lights look like this: Then your printer: has a service error and printing stops immediately. • Turn the printer off and back on. If the lights are still blinking, contact your point of purchase, or call the Lexmark service number listed on your printer registration card.
Engine clean cycle For print quality problems, such as stray toner marks appearing on the paper, select the Engine Clean Cycle setting to remove any toner that may have accumulated. 1 Turn off the printer. 2 Open the top cover. 3 Turn the printer back on. 4 Load paper into the paper feeder. 5 When the Error light comes on, indicating the top cover is open, do a double button press. 6 When the Error light and Press Button light blink, close the cover. The Special Function Menu is activated.
LA.bk Page 58 Thursday, February 8, 2001 2:19 PM Print quality test pages To help isolate print quality problems, like streaking, select the Print Quality Test Pages setting. 1 Turn off the printer. 2 Open the top cover. 3 Turn the printer back on. 4 Load paper into the paper feeder. 5 When the Error light comes on, indicating the top cover is open, do a double button press. 6 When the Error light and Press Button light blink, close the cover.
LA.bk Page 59 Thursday, February 8, 2001 2:19 PM Enter Hex Trace mode When unexpected characters print or characters are missing, use Hex Trace to help you determine if there is a problem with the language interpreter or the cable. Hex Trace isolates printing problems by telling you what information your printer is receiving. To enter Hex Trace mode: 1 Turn off the printer. 2 Open the top cover. 3 Turn the printer back on.
LA.bk Page 60 Thursday, February 8, 2001 2:19 PM Restore factory defaults If changing the printer user default settings does not solve formatting problems, reset the printer to the original factory default settings. 1 Turn off the printer. 2 Open the top cover. 3 Turn the printer back on. 4 Load paper into the paper feeder. 5 When the Error light comes on, indicating the top cover is open, do a double button press. 6 When the Error light and Press Button light blink, close the cover.
LA.bk Page 61 Thursday, February 8, 2001 2:19 PM Before you call for service If you can’t solve your printer problems, it’s time to call for service.
LA.
LA.bk Page 63 Thursday, February 8, 2001 2:19 PM Supplies 5 Within the U.S. or Canada, you can order Lexmark supplies from any Lexmark Authorized Supplies Dealer. To locate the dealer nearest you, call the number on the printer registration card that came with your printer. In other countries, contact the place where you bought your printer.
LA.bk Page 64 Thursday, February 8, 2001 2:19 PM Troubleshooting Tips Problem Action Characters appear light or blurred. • Make sure you removed the sealing tape from the print cartridge. • Replace the print cartridge. Printer seems to be printing, but pages are blank. • The print cartridge may be out of toner. Replace the cartridge. • The print cartridge may be defective. Replace the cartridge. • Make sure you removed the sealing tape from the print cartridge. Printer is on, but nothing prints.
LA.
LA.bk Page 66 Thursday, February 8, 2001 2:19 PM Printer dimensions 66 Appendix A: Printer specifications Height: 8.8 in. (224 mm) Width: 13.6 in. (345 mm) Depth: 14.4 in. (365 mm) Weight: 16.5 lb (7.
LA.bk Page 67 Thursday, February 8, 2001 2:19 PM Advanced troubleshooting B If you contact the Lexmark Customer Support Center to help you resolve a printing problem, they may guide you through configuration mode to change a default setting (i.e., turning on the PPDS Activated setting if your job application uses the PPDS datastream). Use the operator panel or the MarkVision remote operator panel to set or change specific printer functions in configuration mode.
To enter configuration mode you must be in the Special Function Menu: 1 Turn off the printer. 2 Open the top cover. 3 Turn the printer back on. 4 When the Error light comes on, indicating the top cover is open, do a double button press. 5 When the Error light and Press Button light blink, close the cover. 6 Do a double button press twice to scroll down to Enter Configuration Mode.
If your printer lights look like this in configuration mode: Then your printer: Factory Default Parallel Port Enabled setting is set to Auto, the factory default. Auto If your printer encounters a memory shortage when trying to print a job and you are not using the parallel port, turn off Parallel Port Enabled to free up a little more memory. There are three settings for Parallel Port Enabled: Off, On and Auto. • Do a brief button press to scroll through the settings (Off, On, Auto) for this menu item.
LA.bk Page 70 Thursday, February 8, 2001 2:19 PM If your printer lights look like this in configuration mode: Then your printer: Factory Default Parallel Protocol setting is set to Fastbytes, the factory default. Fastbytes When the protocol is set to Fastbytes, the printer receives information at a much faster transmission rate, provided the host computer supports Fastbytes. When the protocol is set to Standard, the printer receives information at a normal transmission rate.
LA.bk Page 71 Thursday, February 8, 2001 2:19 PM If your printer lights look like this in configuration mode: Then your printer: Factory Default PPDS Activated setting is off, the factory default. Off Turn PPDS Activated on when working in applications using the PPDS datastream. There are two settings for PPDS Activated: On and Off. • Do a brief button press to change the setting (On, Off). • Do a double button press to scroll to the next menu item, Auto CRLF/LFCR.
If your printer lights look like this in configuration mode: Then your printer: Factory Default Auto CRLF/LFCR setting is off, the factory default. Off How the printer formats the end of a line depends on the computer system being used. Use this setting to select whether or not the printer automatically performs a carriage return (CR) after a line feed (LF) or a line feed after a carriage return. • If the Press Button light is off, Auto CR after LF is Off and Auto LF after CR is Off.
LA.bk Page 73 Thursday, February 8, 2001 2:19 PM This illustration represents the operator panel settings in configuration mode when an indicator light is blinking. The following tables describe the function of each setting. If your printer lights look like this in configuration mode: Then your printer: Factory Default Parallel Mode 1 setting is on, the factory default. On This setting enables or disables the pull up resistors on the parallel port signals.
If your printer lights look like this in configuration mode: Then your printer: Factory Default Parallel Mode 2 setting is on, the factory default. On This setting determines if the parallel port data is sampled on the leading or trailing edge of strobe. If Parallel Mode 2 is set On, the parallel port data is sampled on the leading edge of strobe. The parallel port data is sampled on the trailing edge of strobe if Parallel Mode 2 is set Off.
LA.bk Page 75 Thursday, February 8, 2001 2:19 PM If your printer lights look like this in configuration mode: Then your printer: Factory Default Parallel Strobe Adjust setting is off (0), the factory default. 0 This setting lets you increase the amount of time strobe is sampled to determine that valid data is available on the parallel port. • Do a brief button press to scroll through the settings (Off=0, On=+1, Auto=+2) for this menu item.
LA.bk Page 76 Thursday, February 8, 2001 2:19 PM If your printer lights look like this in configuration mode: Then your printer: Factory Default USB Port Enabled setting is set to Auto, the factory default. Auto The Universal Serial Bus (USB) lets you connect a variety of devices, i.e., a printer, to your computer with a single cable. • Do a brief button press to scroll through the settings (Off, On, Auto) for this menu item. • Do a double button press to scroll to the next menu item, USB NPA Mode.
LA.bk Page 77 Thursday, February 8, 2001 2:19 PM If your printer lights look like this in configuration mode: Then your printer: Factory Default USB NPA Mode setting is set to Auto, the factory default. Auto When USB NPA Mode is enabled, your computer can send print jobs to the printer and query printer status information simultaneously. • Do a brief button press to scroll through the settings (Off, On, Auto) for this menu item.
LA.
LA.bk Page 79 Thursday, February 8, 2001 2:19 PM Safety information C • If your product is NOT marked with this symbol , it MUST be connected to an electrical outlet that is properly grounded. • The power cord must be connected to an electrical outlet that is near the product and easily accessible. • Refer service or repairs, other than those described in the operating instructions, to a professional service person.
LA.bk Page 80 Thursday, February 8, 2001 2:19 PM Sicherheitshinweise • Falls der Drucker nicht mit diesem Symbol markiert ist, muß er an eine ordnungsgemäß geerdete Steckdose angeschlossen werden. • Das Netzkabel muß an eine Steckdose angeschlossen werden, die sich in der Nähe des Geräts befindet und leicht zugänglich ist. • Wartungsarbeiten und Reparaturen, mit Ausnahme der in der Betriebsanleitung näher beschriebenen, sollten Fachleuten überlassen werden.
LA.bk Page 81 Thursday, February 8, 2001 2:19 PM Sikkerhetsinformasjon • Hvis produktet ditt ikke er merket med dette symbolet, må det bare kobles til en stikkontakt som er jordet. • Ledningen må være koblet til en stikkontakt nær produktet. Stikkontakten må være lett tilgjengelig. • La bare kvalifisert personale ta seg av service og reparasjon som ikke er direkte beskrevet i bruksanvisningen.
LA.bk Page 82 Thursday, February 8, 2001 2:19 PM • O produto utiliza raios laser, tome CUIDADO: O uso de controlos, ajustamentos ou a execução de procedimentos diferentes dos especificados podem ocasionar exposição perigosa a radiações. • O produto utiliza um processo de impressão que aquece os materiais de impressão. Devido ao aquecimento, estes podem libertar emissões radioactivas.
LA.
84 Appendix C: Safety information
LA.
LA.
LA.bk Page 87 Thursday, February 8, 2001 2:19 PM Notices D Electronic emissions notices Any questions regarding this compliance information statement should be directed to: Federal Communications Commission (FCC) compliance information statement Director of Lab Operations Lexmark International, Inc.
Class 1 laser statement label Japanese VCCI notice The United Kingdom Telecommunications Act 1984 This apparatus is approved under the approval number NS/G/1234/J/ 100003 for the indirect connections to the public telecommunications systems in the United Kingdom. German acoustics statement The following measurements were made in accordance with ISO 7779 and reported in conformance with ISO 9296.
LA.bk Page 89 Thursday, February 8, 2001 2:19 PM Pour les autres pays : cette imprimante répond aux normes IEC 825 relatives aux produits laser de Classe I. Laserinformatie Les produits laser de Classe I sont considérés comme des produits non dangereux. Cette imprimante est équipée d’un laser de Classe IIIb (3b) (arséniure de gallium d’une puissance nominale de 5 milliwatts) émettant sur des longueurs d’onde comprises entre 700 et 810 nanomètres.
Laserprodukter i Klass I anses ej hälsovådliga. Skrivaren har en inbyggd laser av Klass IIIb (3b) som består av en laserenhet av gallium-arsenid på 5 milliwatt som arbetar i våglängdsområdet 700-810 nanometer. Lasersystemet och skrivaren är utformade så att det aldrig finns risk för att någon person utsätts för laserstrålning över Klass I-nivå vid normal användning, underhåll som utförs av användaren eller annan föreskriven serviceåtgärd.
Statement of Limited Warranty Lexmark International, Inc., Lexington, KY This warranty applies to the United States and Canada. For customers outside the U.S. and Canada, refer to the country-specific warranty information that came with your printer. Optra E312 This Statement of Limited Warranty applies to this product if it was originally purchased for your use, and not for resale, from Lexmark or a Lexmark remarketer, referred to in this statement as “Remarketer.
LA.bk Page 92 Thursday, February 8, 2001 2:19 PM If you transfer this product to another user, warranty service under the terms of this statement is available to that user for the remainder of the warranty period. You should transfer proof of original purchase and this statement to that user. Warranty Service The warranty period is 12 months and starts on the date of original purchase as shown on the purchase receipt. To obtain warranty service you may be required to present proof of original purchase.
LA.bk Page 93 Thursday, February 8, 2001 2:19 PM Extent of Warranty We do not warrant uninterrupted or error-free operation of a product.
LA.bk Page 94 Thursday, February 8, 2001 2:19 PM Additional Rights Some states do not allow limitations on how long an implied warranty lasts, or do not allow the exclusion or limitation of incidental or consequential damages. If such laws apply, the limitations or exclusions contained in this statement may not apply to you. This warranty gives you specific legal rights. You may also have other rights which vary from state to state.
LA.bk Page 1 Thursday, February 8, 2001 2:19 PM Glossary 1200 Image Quality. A print resolution setting that allows the printer to vary the size of each printed pixel, thereby producing a continuous tone effect. This setting improves the print quality of graphic fills, images and halftones. bidirectional communication. Two-way communication between your printer and a computer, using Network Printing Alliance Protocol (NPAP 1.0 standard). A bitmapped font.
LA.bk Page 2 Thursday, February 8, 2001 2:19 PM D data stream. Print data and printer control information flowing from the host system (computer) to the printer without interruption. default. An attribute, value or setting that is assumed when none is explicitly specified. defrag. To free up unused space. To defrag flash memory, the unused space or gaps are moved to the end of the memory, creating additional space. DL. Envelope measuring 110 x 220 mm. download.
LA.bk Page 3 Thursday, February 8, 2001 2:19 PM letter. Paper measuring 8.5 x 11 in. M macro. A collection of commands grouped together and temporarily or permanently stored in printer memory. manual feed. Feeding one sheet of media (paper, envelope, transparency) into the printer at a time. MarkVision. A printer utility that works with the printer’s bidirectional communication capability to provide continuous printer status and let you configure multiple printers from a single setup file. MB.
LA.bk Page 4 Thursday, February 8, 2001 2:19 PM reset. Clears the printer buffer and all temporary settings, and returns to the initial power-on state. resolution. A measure of the sharpness of a printed image, expressed in the number of dots per inch (dpi). S scalable font. A font whose characters are stored only as outlines so it is easy to change (or scale) the size of the characters (measured in points). service message. A printer message that indicates the printer needs service. setting.
LA.bk Page 5 Thursday, February 8, 2001 2:19 PM Index acoustics 88 attaching an overlay 13 connecting the printer using a parallel interface cable 4 using a USB cable 5 CRLF/LFCR 72 B E Busy light 41 energy conservation 88 Energy Star 88 engine clean cycle 57 envelopes feeding problems 36 types and sizes 27 A C cable parallel ix, 4 USB ix, 5 cartridge.
LA.
LA.
LA.
LA.bk Page 9 Thursday, February 8, 2001 2:19 PM Lexmark and Lexmark with diamond design are trademarks of Lexmark International, Inc., registered in the United States and/or other countries. © 2000 Lexmark International, Inc. 740 West New Circle Road Lexington, Kentucky 40550 www.lexmark.