E250d and E250dn User’s Guide June 2006 Lexmark and Lexmark with diamond design are trademarks of Lexmark International, Inc., registered in the United States and/or other countries. © 2006 Lexmark International, Inc. All rights reserved. 740 West New Circle Road Lexington, Kentucky 40550 www.lexmark.
Edition: June 2006 Safety information The following paragraph does not apply to any country where such provisions are inconsistent with local law: LEXMARK INTERNATIONAL, INC., PROVIDES THIS PUBLICATION “AS IS” WITHOUT WARRANTY OF ANY KIND, EITHER EXPRESS OR IMPLIED, INCLUDING, BUT NOT LIMITED TO, THE IMPLIED WARRANTIES OF MERCHANTABILITY OR FITNESS FOR A PARTICULAR PURPOSE.
Contents Chapter 1: Printer overview ............................................................................................... 5 Chapter 2: Using the control panel ................................................................................... 7 Overview of the control panel .......................................................................................................................... 7 Understanding the control panel lights ..............................................................
Contents Printing using an overlay or a watermark ....................................................................................................... 66 Using an overlay ..................................................................................................................................... 66 Using a watermark .................................................................................................................................. 67 Canceling a print job ..........................
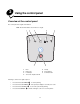
1 Printer overview 7 1 6 5 4 2 3 1 150-sheet output bin 5 Front door 2 250-sheet tray 6 Control panel 3 550-sheet drawer (optional) 7 Paper support 4 Manual feeder 5
Printer overview 1 2 3 4 5 6 7 1 Rear exit 5 USB connect 2 Power button 6 Parallel connect 3 Power connect 7 Ethernet connect 4 Dust cover (not available for some models) 6
2 Using the control panel Overview of the control panel The control panel has 5 lights and 2 buttons. Note: The Continue button also functions as a light. 1 3 2 4 7 5 6 1 Error 5 Ready 2 Paper Jam 6 Cancel button 3 Load Paper 7 Continue button 4 Toner Low / Replace PC Kit Following a common error light sequence: • Press and release Continue to resume printing. • Press and release Continue twice quickly to display a secondary error code.
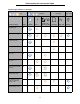
Understanding the control panel lights Understanding the control panel lights The control panel lights mean different things, depending on their sequence. Lights that are off, on, and/or blinking indicate printer conditions such as printer status, intervention, or service. The following table shows the most common light sequences. Click the indicated page for more information on what it means.
Understanding the control panel lights Common light sequences (continued) = On = Blinking Printer Condition Page Complex page 14 Continue Toner Low / Replace PC Kit Load Paper Paper Jam Error Cancel job/ Reset printer 15 Load print media 15 Load manual feeder 16 Toner low 16 Toner cartridge region mismatch 17 Photoconductor kit life warning 17 Replace photoconductor (printer hard stop) 18 Programming engine code/ Programming system code 18 Invalid engine code / Invalid network code
Understanding the control panel lights Common light sequences (continued) = On = Blinking Printer Condition Page Network interface errors / Host interface disabled 19 Service error 19 Printer error* 20 Paper jam printer error* 20 Short paper 21 Output bin full 21 Continue = Slow blink Toner Low / Replace PC Kit Load Paper Paper Jam Error Empty = Off Ready *See Secondary error codes on page 25 for more information.
Understanding the control panel lights Primary codes Ready / Power Saver Light sequence: • Ready—On What this light sequence means: • • The printer is ready to receive and process data. The printer is in Power Saver mode. What you can do: • • • Send a print job. Press Continue to print the menu settings pages for a list of current printer settings. Press and hold Cancel to reset the printer.
Understanding the control panel lights Hex Trace Ready Light sequence: Ready—Slow Blinking What this light sequence means: The printer is in the Ready mode, and Hex Trace is active. What you can do: • Advanced users can use Hex Trace to help troubleshoot printing problems. After resolving the problem, turn off the printer to exit Hex Trace. • Press and hold Cancel to reset the printer.
Understanding the control panel lights Flushing / Resolution reduced Light sequence: • • Ready—Blinking Error—Blinking What this light sequence means: • • The printer is flushing corrupted print data. The printer is processing data or printing pages, but the resolution of a page in the current print job is reduced from 600 dots per inch (dpi) to 300 dpi to prevent a memory full error. What you can do: • • • Wait until the control panel returns to Ready to print other jobs.
Understanding the control panel lights Close door Light sequence: • Error—On What this light sequence means: The printer front door is open. What you can do: Close the door. The printer will automatically reset. Insufficient collation area / Insufficient memory Light sequence: • • Continue—On Error—On What this light sequence means: The printer memory is too full to collate the print job. What you can do: • • • Press and release Continue to clear the message and continue printing the job.
Understanding the control panel lights Cancel job / Reset printer Light sequence: • • • • • • Continue—On Ready—On Toner Low/Replace PC Kit—On Load Paper—On Paper Jam—On Error—On What this light sequence means: • • The current print job is canceled. The printer is resetting to the user default settings. Any active print jobs are canceled. A user default setting remains in effect until you change it or until you restore the factory default settings. What you can do: Wait for the message to clear.
Understanding the control panel lights Load manual feeder Light sequence: • Load Paper—On What this light sequence means: The printer prompts you to load a single sheet of print media in the manual feeder. What you can do: • • • Load print media into the manual feeder. Press Continue to resume printing. Press and hold Cancel to reset the printer. Toner low Light sequence: • • Continue—On Toner Low/Replace PC Kit—On What this light sequence means: The printer is ready to receive and process data.
Understanding the control panel lights Toner cartridge region mismatch Light sequence: • • Toner Low/Replace PC Kit—On Error—On What this light sequence means: The geographic region of the printer does not match the geographic region of the installed toner cartridge. What you can do: Remove the toner cartridge, and install a new toner cartridge that matches the region of the printer (see What supplies do I need and how do I order them? on page 76).
Understanding the control panel lights Replace photoconductor (printer hard stop) Light sequence: • • • Continue—On Toner Low/Replace PC Kit—Blinking Error—Blinking What this light sequence means: The photoconductor kit is full and must be replaced. The printer will not print any more pages until the photoconductor kit is replaced. What you can do: • • Press and release Continue to print a photoconductor kit instruction page. Replace the photoconductor kit.
Understanding the control panel lights Invalid engine code / Invalid network code Light sequence: • • Ready—On Error—On What this light sequence means: The engine code and/or the network code has not been programmed or has been programmed but is invalid. What you can do: Download valid engine code to the internal print server.
Understanding the control panel lights Printer error Light sequence: • • Continue—On Error—On What this light sequence means: The printer has one of the following errors: • • • • • • Memory is full, insufficient to save what is in the buffer. A page is too complex to print or is shorter than the set page margins. Resolution of a formatted page is reduced to 300 dpi. A font error occurred. Communication with the host computer is lost. Short paper.
Understanding the control panel lights Short paper Light sequence: • • Continue—On Error—On What this light sequence means: The paper length is too short to print the formatted data. This occurs when the printer does not know the print media size loaded in the tray, or when there is a problem feeding the print media. What you can do: • Make sure the print media you loaded is large enough. • Open the front door, clear the paper path, and close the door to resume printing (see Clearing jams on page 56.
Understanding the control panel lights Secondary errors • When the Error and Continue • When the Paper Jam lights are both on, a secondary error has occurred. and Continue lights are both on, a paper jam secondary error has occurred. Press and release Continue twice quickly to display the secondary error code light sequence. The following table shows what these light sequences mean and where to go for help.
Understanding the control panel lights Secondary light sequences (continued) = On = Blinking Printer Condition Page Paper jam (duplex unsupported size) 28 Complex page 29 Insufficient collation area 32 Network interface errors 32 Font error 32 Insufficient printer memory 31 ENA connection lost 32 Host interface disabled 32 Memory full 33 Short paper 33 Continue = Slow blink Toner Low / Replace PC Kit Load Paper Paper Jam Error 23 Empty = Off Ready
Understanding the control panel lights Secondary light sequences (continued) = On = Blinking Printer Condition Page Invalid engine code 34 Invalid network code 34 Toner cartridge region mismatch 34 Change toner cartridge / invalid refill 35 Missing / Defective toner cartridge 35 Unsupported toner cartridge 36 Continue = Slow blink Toner Low / Replace PC Kit Load Paper Paper Jam Error Empty = Off Ready *Paper jams at the input sensor can be either after the paper leaves the tray and en
Understanding the control panel lights Secondary error codes Following are explanations of what the secondary error codes mean and what you can do to clear them. Paper jam at the input sensor Light sequence: • • • Continue—On Ready—On Paper Jam—On What this light sequence means: A paper jam has occurred at the input sensor, which can be either after the print media leaves the tray and enters the printer or in the manual feeder. What you can do: Clear the paper jam.
Understanding the control panel lights Paper jam in the manual feeder Light sequence: • • • • Continue—On Ready—On Toner—On Paper Jam—On What this light sequence means: A paper jam has occurred in the manual feeder. What you can do: Clear the paper jam. See Clearing jams on page 56 for more information. Paper jams between the input and exit sensors Light sequence: • • • Continue—On Toner Low/Replace PC Kit—On Paper Jam—On What this light sequence means: A paper jam has occurred.
Understanding the control panel lights Paper jam in the 250-sheet tray Light sequence: • • • • Continue—On Toner Low/Replace PC Kit—On Load Paper—On Paper Jam—On What this light sequence means: A paper jam has occurred in the 250-sheet tray. What you can do: Clear the paper jam. See Clearing jams on page 56 for more information.
Understanding the control panel lights Paper jam (duplex - unknown location) Light sequence: • • • Continue—On Paper Jam—On Ready—Blinking What this light sequence means: A paper jam has occurred somewhere in the duplex unit. What you can do: Clear the paper jam. See Clearing jams on page 56 for more information.
Understanding the control panel lights Complex page Light sequence: • • • Continue—On Ready—On Error—On What this light sequence means: The page may not print correctly because the print information on the page is too complex (that is, too large for the printer memory). What you can do: • • Press Continue to clear the error code and continue processing the print job (some of the print data may be lost).
Understanding the control panel lights Insufficient collation area Light sequence: • • • Continue—On Toner Low/Replace PC Kit—On Error—On What this light sequence means: The printer memory does not have the free space necessary to collate the print job. This may happen due to one of these errors: • • • • Memory is full. A page is too complex to print. A page is shorter than the set page margins. Memory is insufficient to save what is in the buffer.
Understanding the control panel lights Font error Light sequence: • • • Continue—On Toner Low/Replace PC Kit—Blinking Error—On What this light sequence means: The printer has received a request for a font (PPDS) which is not installed. What you can do: • • • Press and release Cancel to cancel the print job. Press and hold Cancel to reset the printer. Press Continue to clear the message and continue printing.
Understanding the control panel lights ENA connection lost Light sequence: • • • Continue—On Paper Jam—Blinking Error—On What this light sequence means: The printer cannot establish communication with the network. What you can do: • Press Continue to clear the code and continue printing. (The previous print job may not print correctly.
Understanding the control panel lights Memory full Light sequence: • • • • Continue—On Ready—On Toner Low/Replace PC Kit—On Error—On What this light sequence means: The printer is processing data, but the memory used to store pages is full. What you can do: • • • • Press Continue to clear the message and continue printing the job (the job may not print correctly). Press and release Cancel to cancel the print job. Press and hold Cancel to reset the printer.
Understanding the control panel lights Invalid engine code Light sequence: • • • Ready—On Load Paper—On Error—On What this light sequence means: The engine code has not been programmed, or the programmed code is not valid. What you can do: Download valid engine code to the internal print server.
Understanding the control panel lights Change toner cartridge/invalid refill Light sequence: • • • Toner Low/Replace PC Kit—On Paper Jam—Blinking Error—On What this light sequence means: The toner in the toner cartridge is getting low, or an invalid refill toner has been installed. What you can do: • • • • • Press and release Continue to clear the light sequence and continue processing the print job. Turn the printer off.
Understanding the control panel lights Unsupported toner cartridge Light sequence: • • • Toner Low/Replace PC Kit—On Load Paper—On Error—On What this light sequence means: The toner cartridge is not supported by your printer. What you can do: • • • • Press and release Continue to clear the light sequence and continue processing the print job. Turn the printer off. Remove the toner cartridge, and replace it with a supported toner cartridge.
3 Understanding the printer configuration menus Printing the Printer Settings Configuration sheet To help resolve printing problems or to change printer configuration settings, advanced users can print the Printer Settings Configuration sheet for instructions on advancing through the configuration menus to select and save new settings. To print the Printer Settings Configuration sheet: 1 Turn off the printer. 2 Open the front door.
Configuration menus overview Configuration menus overview Menus are represented by Continue , Ready , Toner Low/Replace PC Kit sequences. Menu items and their settings are indicated by Paper Jam and Error • Press and release Cancel • Press and release Continue • Press and hold Continue • Press and hold Cancel • Turn off the printer to exit the menus. , and Load Paper light sequences. light to advance through menus and menu items. to advance to the setting you need.
Configuration menus overview Parallel menu Use the Parallel menu to change printer settings on jobs sent through a parallel port. Setting Use this setting to Values NPA Mode Send print jobs to the printer and query printer status information simultaneously. • Off • On • Auto* Protocol Receive information at a much higher transmission rate if your printer is set to Fastbytes (if your computer supports Fastbytes), or receive information at a normal transmission rate if your printer is set to Standard.
Configuration menus overview USB menu Use the USB menu to change printer settings on jobs sent through a Universal Serial Bus (USB) port. Setting Use this setting to Values NPA Mode Send print jobs to the printer and query printer status information simultaneously. • Off • On • Auto* Mac Binary PS Configure the printer to process Macintosh binary PostScript print jobs. • Off—The printer filters PostScript print jobs using standard protocol.
4 Print media tasks and tips What types of print media can be loaded? Get the most from your printer by properly loading the trays. Never mix media types within a tray.
Where can print media be loaded in the printer? Where can print media be loaded in the printer? Your printer has two standard paper sources: a 250-sheet tray and a single-sheet manual feeder. Use the 250-sheet tray for most print jobs. Use the manual feeder for a single piece of paper, transparency, envelope, paper label, card stock, or index card. The output bin on top of the printer holds up to 150 sheets.
Selecting print media 1 2 3 4 5 6 7 1 Rear exit 5 USB connect 2 Power button 6 Parallel connect 3 Power cord connect 7 Ethernet connect 4 Dust cover (not available for some models) Selecting print media Selecting the appropriate paper or other print media reduces printing problems.
Selecting print media The laser printing process heats paper to high temperatures of 210°C (410°F) for non-MICR applications. Use only paper able to withstand these temperatures without discoloring, bleeding, or releasing hazardous emissions. Check with the manufacturer or vendor to determine whether the paper chosen is acceptable for laser printers. When loading paper, note the recommended print side on the paper package, and load paper accordingly.
Selecting print media Fiber content Most high-quality xerographic paper is made from 100% chemically pulped wood. This content provides the paper with a high degree of stability resulting in fewer paper feeding problems and better print quality. Paper containing fibers such as cotton possesses characteristics that can result in degraded paper handling. Recycled paper Lexmark supports US executive order 13101 which strongly encourages the use of recycled papers in government agencies.
Selecting print media Transparencies • Use transparencies designed specifically for laser printers. Transparencies must be able to withstand temperatures of 210°C (410°F) without melting, discoloring, offsetting, or releasing hazardous emissions. We recommend Lexmark laser printer transparencies: part number 70X7240 for letter-size transparencies; part number 12A5010 for A4-size transparencies. • To prevent print-quality problems, avoid getting fingerprints on the transparencies.
Tips on storing print media and supplies Card stock • Card stock can only be printed from the Manual feeder. • Preprinting, perforation, and creasing can significantly affect print quality and cause media handling or jamming problems. • Avoid using card stock that may release hazardous emissions when heated. • Do not use preprinted card stock manufactured with chemicals that may contaminate the printer. Preprinting introduces semi-liquid and volatile components into the printer.
Tips on preventing jams Tips on preventing jams You can avoid most paper jams by correctly loading paper and specialty media in the printer. The following hints can help prevent paper jams: • Do not load wrinkled, creased, or damp paper. • Never mix media types within a tray. • Flex, fan, and straighten the paper stack before loading it. Note: Make sure the paper stack is below the maximum paper fill indicators on the 250-sheet tray before pushing the tray into the printer.
Loading the 250-sheet tray Loading the 250-sheet tray Follow these instructions to load paper in the 250-sheet tray. 1 Remove the 250-sheet tray. maximum paper fill indicator maximum paper fill indicator Note: To load legal- or folio-size paper, extend the length of the tray. See Extending the tray for legal- or folio-size paper on page 52 for instructions. 2 Prepare a paper stack for loading by flexing and fanning it back and forth. Straighten the edges on a level surface.
Loading the 250-sheet tray 3 Adjust the rear paper guide for the print media size you will be loading. Note: There should be a slight gap between the rear paper guide and the paper stack. 4 Insert the paper stack with the print side facing down. Note: Make sure the paper stack is laying flat in the tray and is not above the maximum paper fill indicators. Improper loading may cause jams. Note: For simplex printing load letterhead paper with the design side facing down.
Loading the 250-sheet tray 5 Adjust the side paper guides to fit lightly against the paper stack. 6 Insert the 250-sheet paper tray.
Loading the 250-sheet tray 7 Extend the paper support on the output bin. Extending the tray for legal- or folio-size paper To load legal- or folio-size paper, extend the tray. You may also attach a dust cover (if available on your printer model) on the back of the printer to protect the tray while it is extended. 1 Press down on the latch at the back of the tray, and expand the tray until the extender locks into place.
Loading the 250-sheet tray Attaching the dust cover The dust cover helps protect the tray from the environment. It also keeps the tray from being knocked out of position while it is extended. Attach the dust cover to the back of the printer by aligning the tabs on the cover to the holes on the printer, then snap the cover into place. Note: This feature may not be available for some models.
Loading the manual feeder Loading the manual feeder The manual feeder is located at the front of the printer and can only feed one sheet of print media at a time. You can use the manual feeder to make quick runs of paper types or sizes that are not currently loaded in the tray. You must set the paper size before using the manual feeder. For more information, see your driver CD, or see Using the Local Printer Settings Utility on page 75.
Using the rear exit Using the rear exit The single-sheet rear exit provides a straight-through paper path to help reduce curling and potential jams. This is especially useful for specialty media, such as transparencies, labels, card stock, or index cards. To use the rear exit, open the rear exit door. When the rear exit door is open, all print media comes out the rear exit. When closed, all media is sent to the output bin on top of the printer.
Clearing jams Clearing jams When a paper jam occurs, the printer stops and the control panel Paper Jam and Continue lights come on. Press and release Continue twice quickly to display the specific secondary error paper jam light sequence. See Secondary error codes on page 25 for more information. We recommend clearing the entire paper path when a paper jam occurs. 1 Remove all paper from the 150-sheet output bin. 2 If you are feeding paper from the 250-sheet tray, remove the tray.
Clearing jams 4 With the tray removed, press down on the green duplex flap to remove the jammed pages from the duplex area. 5 Install the 250-sheet paper tray.
Clearing jams 6 Open the front door, and remove the print cartridge assembly. 1 2 3 7 Lift the green flap at the front of the printer, and remove the jammed pages from behind the flap. CAUTION:The fuser or fuser area may be hot.
Clearing jams 8 Open the rear exit door, and remove the jammed pages. 9 After you have cleared the jammed pages, reinstall the print cartridge assembly, and securely close all the printer doors. 10 Press Continue to resume printing. Note: Jam recovery is set to Auto by default. When jam recovery is set to Auto, the memory that holds the image of a page may be reused after the page is printed but before it has successfully exited the printer if that memory is needed for another use.
5 Printing tasks Manually feeding a print job The manual feeder is located at the front of the printer and can only feed one sheet of print media at a time. For information on acceptable print media to use in the manual feeder, see What types of print media can be loaded? on page 41. When using the manual feeder, send the print job to the printer before loading the print media. When the printer is ready, it will display the Load Manual Feeder light sequence, at which point you should load the print media.
Manually feeding a print job 9 10 Adjust the paper guides to the print media width. Hold both sides of the print media close to the manual feeder, and push it into the printer until it automatically engages. There is a brief pause between the time the printer engages the print media and when it feeds into the printer. Note: Do not force the print media into the feeder. Forcing the print media causes jams.
Printing on both sides of the paper (duplex printing) Printing on both sides of the paper (duplex printing) Printing on both sides of the paper reduces printing costs. You can use the 250-sheet tray or the 550-sheet drawer to print a duplex job. Note: The duplex unit only supports certain sizes and types of print media. Only A4, letter, legal and folio size paper can be used for duplex printing. The printer does not support duplex printing on any other type of print media.
Printing on both sides of the paper (duplex printing) • Short Edge means pages are bound along the short edge of the page. Portrait Back of sheet Landscape Back of sheet Front of sheet Front of sheet To duplex a print job: 1 From the computer software application, select File Æ Print. 2 Click Properties (or Options, Printer, or Setup, depending on the application) to view the printer driver settings. 3 From the Page Layout tab, select 2-sided printing.
Printing multiple page images on one page (N-up printing) Printing multiple page images on one page (N-up printing) The Multipage Printing (N-up) setting is used to print multiple page images on a single page. For example, 2-Up means two page images are printed on one page, 4-up means four page images are printed on one page, and so on.
Printing a booklet Printing a booklet The Booklet setting lets you print multiple pages in booklet form without having to reformat your document so the pages print in the proper order. The pages print so that the finished, collated document may be folded along the center of each page to form a booklet. 4 2 5 7 If the document contains many pages, a booklet may have too many pages to fold easily.
Printing on letterhead Printing on letterhead Page orientation is important when printing on letterhead. Use the following table for help when loading letterhead in the print media sources. Media source or process Print side Top of page 250-sheet tray and 550-sheet drawer Printed letterhead facedown The top edge of the sheet with the logo is placed at the front of the tray / drawer.
Canceling a print job 6 Select the overlay to use. 7 Select whether to place the overlay on top of or underneath the page image in the Overlay placement area. 8 Click OK. Using a watermark 1 From the computer software application, select File Æ Print. 2 Click Properties (or Options, Printer, or Setup, depending on the application) to view the printer driver settings. 3 Click the Other Options tab. 4 Click Watermark. 5 Select which pages receive the watermark. 6 Select the watermark to use.
Canceling a print job Canceling a job from a Macintosh computer Canceling a print job from a computer running Mac OS 9 When you send a job to print, the printer icon for your selected printer appears on the desktop. 1 Double-click the printer icon on your desktop. A list of print jobs appears in the printer window. 2 Select the print job you want to cancel. 3 Click the trash can button.
6 Installing options Accessing the system board To install memory, you must access the printer system board. CAUTION: Turn the printer off, and unplug the power cord from the wall outlet before continuing. 1 Remove the 250-sheet tray.
Accessing the system board 2 Press the button on the left side of the printer to release and lower the front door. 3 Open the rear exit door.
Accessing the system board 4 Press the two detents on the front right side of the machine, and swing the side door back. 5 Loosen the four screws on the cover, but do not remove them completely. 6 Slide the cover to the left until the screws fit into the keyholes on the cover. 7 Remove the cover and set it aside.
Adding a memory card Adding a memory card The system board has one connector for an optional memory card. The printer can support up to 64MB of additional memory (for a total of 80MB). CAUTION: If you are installing a memory card after setting up the printer, turn the printer off, and unplug the power cord from the wall outlet before continuing. Memory options designed for other Lexmark printers may not work with your printer. 1 Access the system board (see Accessing the system board on page 69).
Installing an optional 550-sheet drawer Installing an optional 550-sheet drawer CAUTION: Turn the printer off, and unplug the power cord from the wall outlet before continuing. Recognizing installed options The printer driver should automatically recognize the newly installed option when the printer is turned on. If it does not, you can add the appropriate option manually. Note: If you have not installed your printer driver yet, follow the appropriate instructions under Software tasks on page 74.
7 Software tasks Printing the menu settings and network setup pages To print the menu settings page and network setup page, press the Continue button from the Ready state. On the menu settings page: – Verify that the options you installed are correctly listed under “Installed Features.” If an option is not listed under Installed Features, turn off the printer, unplug the power cord from the wall outlet, and reinstall the option.
Using the Local Printer Settings Utility Using the Local Printer Settings Utility The Local Printer Settings Utility lets you change printer settings not available from your printer driver (for example, activating Alarm Control if you want the printer to sound an alarm when it needs attention). To access the Local Printer Settings Utility from the computer software application, select Start Æ All Programs Æ Lexmark Æ Local Printer Settings Utility.
8 Supplies information What supplies do I need and how do I order them? There are only two supply items that have to be replaced on a regular basis: the toner cartridge and the photoconductor kit, which together comprise the print cartridge assembly. The photoconductor kit typically lasts up to 30,000 pages (at approximately 5% coverage), whereas the toner cartridge has to be replaced more frequently.
What supplies do I need and how do I order them? Storing supplies Choose a cool, clean storage area for your printer supplies. Store supplies right side up in their original packaging until you are ready to use them. Do not expose supplies to: • • • • • • Direct sunlight Temperatures above 35°C (95°F) High humidity (above 80%) Salty air Corrosive gases Heavy dust Conserving supplies Conserving supplies lowers printing costs.
Knowing when you need new supplies Knowing when you need new supplies The following sections describe ways to determine when new supplies are needed. Checking the toner and photoconductor levels You can determine approximately how much toner is left in your toner cartridge and how full the photoconductor is by printing a menu settings page. This helps you decide when you might need to order replacement supplies.
Knowing when you need new supplies Recognizing the control panel light sequences The control panel displays certain light sequences to let you know when the toner level is low or when it’s time to replace the photoconductor kit.
Changing the toner cartridge Changing the toner cartridge 1 Turn the printer off. 2 Press the button on the left side of the printer to release and lower the front door. 3 Remove the toner cartridge. a Press the release button on the base of the print cartridge assembly. b Grasp the handle, pulling up and out to remove the toner cartridge.
Changing the toner cartridge 4 Unpack the new toner cartridge. Note: You can use the packing material from the new toner cartridge to ship the old toner cartridge back to Lexmark for recycling. See Changing the photoconductor kit on page 82 for more information. 5 Firmly shake the toner cartridge in all directions to distribute the toner.
Changing the photoconductor kit Changing the photoconductor kit Warning: When replacing a photoconductor kit, do not leave the new photoconductor kit exposed to direct light for an extended period of time. Extended light exposure can cause print quality problems. 1 Turn the printer off. 2 Remove the print cartridge assembly. a Press the button on the left side of the printer to release the front door. b Lower the front door. c Grasp the toner cartridge handle, and pull up and out.
Changing the photoconductor kit 3 Remove the toner cartridge: a Press the button on the base of the print cartridge assembly. b Grasp the toner cartridge handle, and pull up and out. 1 2 4 Unpack the new photoconductor kit. 5 Install the toner cartridge into the new print cartridge assembly by aligning the white rollers on the toner cartridge with the white arrows on the tracks of the photoconductor and pushing the toner cartridge in as far as it will go.
Print your printer menu settings pages. See Printing the menu settings 6 Install the print cartridge assembly into the printer by aligning the green arrows on the guides of the print cartridge assembly with the green arrows on the tracks in the printer and pushing the print cartridge assembly in as far as it will go. 7 Close the front door. 8 Turn the printer back on. 9 Reset the photoconductor counter (see the instruction sheet that shipped with the new photoconductor kit).
9 Troubleshooting General problems Problem / Question Solution / Answer What do the blinking lights mean? See Understanding the control panel lights on page 8 for information about what each light pattern means. Why am I missing characters when I print on envelopes? If you see voids (missing characters) when printing envelopes, check your printer driver settings to make sure you selected Envelope from the Paper Type menu.
General problems Problem / Question Solution / Answer Print job takes longer than expected to print. • The job is too complex. Reduce the complexity of your print job by eliminating the number and size of fonts, the number and complexity of images, and the number of pages in the job. • The printer Operating Mode is set to Quiet mode or Eco-mode. Set the Operating Mode to Normal (see Selecting printer operating mode on page 86). Paper stacks poorly in the output bin.
Print quality problems Print quality problems Many print quality problems can be solved by replacing a supply or maintenance item that has reached the end of its intended life. See the following table to find solutions to print quality problems. Symptom Cause Solution White lines • The printhead lens is dirty. • Either the toner cartridge or the fuser is defective. Try the following in the order listed: 1 Clean the printhead lens. (See Cleaning the printhead lens on page 91.
Print quality problems Symptom Cause Solution Print is too light or too dark • The Toner Darkness setting is too light or too dark. • Paper that does not meet the printer specifications is being used. • The toner cartridge is low on toner. • The toner cartridge is defective. • Select a different Toner Darkness† setting from the printer driver before sending the job to print. • Load paper from a new package. • Avoid textured paper with rough finishes. • Make sure the loaded paper is not damp.
Print quality problems Symptom Cause Solution Ghost Images • The Form Type setting in the printer driver is set incorrectly. • Toner level is low in the toner cartridge. • Make sure the Form Type setting is correct for the paper or specialty print media being used. • Replace the toner cartridge. Uneven printing The toner cartridge is not properly installed. Remove and then reinsert the toner cartridge.
Print quality problems Symptom Cause Solution Solid black pages • The toner cartridge is defective. • The printer requires servicing. • Replace the toner cartridge. • Call for service. Print media curls badly once it prints and exits to the output bin The Paper Weight setting is wrong for the type of print media being used. • Change Paper Weight† to Smooth. • Use print media that is sealed in its original packaging. • Turn the print media over. • Rotate the print media 180 degrees.
Print quality problems Cleaning the printhead lens Some print quality problems can be solved by cleaning the printhead lens. 1 Turn the printer off. 2 Press the button on the left side of the printer to release and lower the front door. 3 Remove the print cartridge assembly by pulling on the toner cartridge handle. Note: Do not press the button on the print cartridge assembly. 1 2 3 Place the print cartridge assembly on a flat, clean surface.
Print quality problems 4 Locate the glass printhead lens within the recessed area in the top of the printer. 5 Gently wipe the printhead lens with a clean, dry, lint-free cloth. Warning: Not using a clean, dry, lint-free cloth may result in damage to the printhead lens. 6 Install the print cartridge assembly into the printer by aligning the arrows on the guides of the print cartridge assembly with the arrows on the tracks in the printer and pushing the print cartridge assembly in as far as it will go.
Notices Conventions Note: A note identifies something that could help you. CAUTION: A caution identifies something that could cause you harm. Warning: A warning identifies something that could damage your product hardware or software. Electronic emission notices Federal Communications Commission (FCC) compliance information statement The Lexmark E250d and E250dn (4512-220 and 4512-230) have been tested and found to comply with the limits for a Class B digital device, pursuant to Part 15 of the FCC Rules.
Notices A declaration of conformity with the requirements of the directives has been signed by the Director of Manufacturing and Technical Support, Lexmark International, S.A., Boigny, France. This product satisfies the Class B limits of EN 55022 and safety requirements of EN 60950. Hot surface notice Power regulation notice Warning: Electrical surges can be very destructive to equipment connected to AC power sources.
Notices Noise emission levels The following measurements were made in accordance with ISO 7779 and reported in conformance with ISO 9296. 1-meter average sound pressure, dBA Printing 52 Idling inaudible Quiet Mode 49 Sleep / Power Saver Mode inaudible Product energy consumption The following table documents the power consumption characteristics of the product Mode Description Power consumption Ready The product is on, but idle.
Notices Waste from Electrical and Electronic Equipment (WEEE) directive The WEEE logo signifies specific recycling programs and procedures for electronic products in countries of the European Union. We encourage the recycling of our products. If you have further questions about recycling options, visit the Lexmark Web site at www.lexmark.com for your local sales office phone number. Laser advisory label A laser notice label may be affixed to this printer.
Notices If this product is a feature or option, this statement applies only when that feature or option is used with the product for which it was intended. To obtain warranty service, you may be required to present the feature or option with the product. If you transfer this product to another user, warranty service under the terms of this statement is available to that user for the remainder of the warranty period. You should transfer proof of original purchase and this statement to that user.
Notices Additional rights Some states do not allow limitations on how long an implied warranty lasts, or do not allow the exclusion or limitation of incidental or consequential damages, so the limitations or exclusions contained above may not apply to you. This limited warranty gives you specific legal rights. You may also have other rights that vary from state to state.
Index A Printer error 20 Programming engine code 18 Programming system code 18 Ready/Power Saver 11 Replace photoconductor kit 18 Resetting printer 15 Restoring factory defaults 15 secondary error codes 25 Service error 19 Toner low 16, 35, 36 Waiting 12 lights 8 Auto CR after LF (Setup menu) 39 Auto LF after CR (Setup menu) 39 B booklets 65 Busy light 11 C canceling a print job 67 card stock 47 characteristics, print media paper 43 cleaning the printhead lens 91 clearing paper jams 56 configuration men
Index L O labels 46 legal 52 letterhead 45, 66 page orientation 62, 66 printing 62, 66 lights 8 Load Paper light 250-sheet tray or 550-sheet drawer 15 manual feeder 16 loading 250-sheet tray 49 550-sheet drawer 49 letterhead 66 manual feeder 54 Local Printer Setup Utility 75 Operating modes 86 options memory card 72 overlays 66 P paper choosing 43 jams 56 loading 49, 54 recommended types 43 storing 47 unsatisfactory types 45 Parallel menu 39 photoconductor kit changing 82 level 78 light sequences 79 or
Index S safety information 2 secondary error codes 25 Complex page 29 Font error 31 Host interface disabled 30, 32 Insufficient collation area 30 Insufficient printer memory 31 Invalid engine code 34 Memory full 33 Paper jam in the 250-sheet tray 27 Paper jam in the manual feeder 26 Paper jams as a printed job exits the tray 26 Paper jams as it exits the tray into the printer 26 PPDS font error 31 Short paper 33 service error lights 19 Setup menu 39 storing paper 47 supplies 47, 77 supplies conserving 77 o