
Specification

Leviton Manufacturing Co., Inc. Global Headquarters
201 N. Service Rd. Melville, NY 11747-3138 Tech Line: 1-800-824-3005 Fax: 1-800-832-9538
Leviton Manufacturing Co., Inc. Energy Management, Controls and Automation.
865 Fulton St., Suite 500, New Orleans, LA, 70130 Tel: 504 608-9001
Visit our Website at: www.leviton.com/automation
©2017 Leviton Manufacturing Co., Inc. All rights reserved. Subject to change without notice.
SAT-10121
REV OCT 2017
PRODUCT DATA
In-Ceiling Loudspeaker with 6-1/2” Woofer
INSTALLATION INSTRUCTIONS
CAUTION: NOTE THAT THESE INSTRUCTIONS ARE WRITTEN WITH THE ASSUMPTION THAT THE
INSTALLER POSSESSES SKILL IN THE PROPER USE OF HAND AND POWER TOOLS, AND IS FAMILIAR
WITH THE ENVIRONMENT BEHIND THE SURFACE OF THE WALL OR CEILING WHERE THE SPEAKERS
WILL BE INSTALLED.
TO INSTALL:
1. Select speaker mounting location. Route speaker cable from source to this location. Note:
We recommend the use of 16/2 (minimum) class 3 speaker wires.
2. Attach wings to back plate of Pre-Construction Bracket (refer to Figures 1A). Only two wings
are required for each back plate. Select the mounting arrangement that best suits your specific
application. Note: The wings are designed to be shortened as required.
3. Attach the Pre-Construction Bracket in the desired location to the underside of framing
members so that after drywall installation, the bracket and the wings are sandwiched between
the drywall and the framing member (ensure “FRONT” is facing into the room) (refer to Figures
1A). If the mounting area is too congested to use both mounting wings you can drive screws
through the back plate directly into the framing member.
4. Loop the speaker wire and attach it to the wire management loops on the back of the bracket.
5. After drywall installation install speakers in holes provided by drywall installer. Follow
instructions included in speaker packaging.
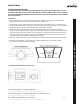
Fire Rated Back-Box Enclosure Dimensions