
Installation Manual


evr-green
™
Level 1 / Level 2 Combination
Network Charging Station For Public Applications
lll#aZk^idc#Xdb$Zkg\gZZc&"-,,"((-",),(Zkg\gZZc5aZk^idc#Xdb
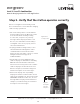
Step 3 - Verify that the station operates correctly
Before securing the head assembly, follow
these instructions to ensure that the charging
station is fully operational:
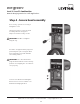
Ijgcdci]ZbV^cedlZgidZchjgZi]Vii]Z
]ZVYVhhZbWanedlZgh"je#L]Zci]ZX^gXj^i
is live and the head assembly’s wiring
^hXdccZXiZY!VhZfjZcXZd[edlZg"je
messages will be displayed. If this is not
the case, check that the head assembly’s
rectangular connector is properly seated
onto the terminal block.
>[Zfj^eeZYl^i]VadX`^c\]dahiZg!hXVcV
valid and authorized ChargePass card to
confirm that the holster unlocks. If the
]dahiZgYdZhcijcadX`i]ZXdccZXidg!XdciVXi
8]Vg\ZEd^ci8jhidbZgHjeedgiVi
&"---",*-")(-.#
:chjgZi]VicdcZd[i]ZA:9hVWdkZi]Z
station’s display are illuminated or blinking
G:9#I]^h^cY^XViZhi]Vii]ZhiVi^dc]Vh
detected an error and you’ll need to read the
station’s display to troubleshoot the error.
GZ[ZgidÆ8]VeiZg,!IgdjWaZh]ddi^c\Ç[dgV
detailed description of error messages.
DWhZgkZi]ZY^heaVnVh^ihZfjZci^Vaan
displays the station’s name and the current
state of the charging port. The port should be
Æ6K6>A67A:Ç#>[i]^h^hcdii]ZXVhZ!VcZggdg
message will be displayed instead. Refer to
Æ8]VeiZg,!IgdjWaZh]ddi^c\Ç[dgVYZiV^aZY
description of error messages.
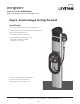
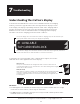
Align the
front plate
and snap
into place
Tighten the 2
security screws
6-4