
Installation Manual
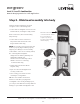


evr-green
™
Level 1 / Level 2 Combination
Network Charging Station For Public Applications
lll#aZk^idc#Xdb$Zkg\gZZc&"-,,"((-",),(Zkg\gZZc5aZk^idc#Xdb
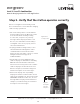
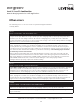
Step 2 - Slide head assembly into body
6-3
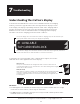
L]Zci]Z]ZVYVhhZbWan^h
connected (and the circuit is
live), you should see a
hZfjZcXZd[edlZg"je
messages on the charging
station’s display.
Ha^YZi]Z]ZVYVhhZbWan^cidWdYn[Vg
enough to connect the wiring, then:
8dccZXii]ZgZXiVc\jaVgXdccZXidgidi]Z
terminal block, ensuring it is fully seated.
If the circuit is live, the head assembly
l^aaedlZg"je#
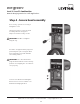
8dccZXii]ZX^gXjaVgXdccZXidgid
the pilot module and turn its outer
ring clockwise until snug.
NOTE: The circular connector is keyed and
bjhiWZegdeZganVa^\cZY#L]ZcegdeZgan
aligned, press firmly to ensure it is fully
seated. If the connector is not fully seated,
the outer ring will not tighten.
6a^\chZb^"X^gXjaVg`Znl^i]`Znhadi#
6a^\ciVWhl^i]iVWhadi#
>chZgiXdccZXidgjci^a[jaanhZViZY#
GdiViZXdccZXidgÉhdjiZgg^c\
clockwise until snug.
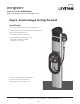
;^gbanha^YZ]ZVYbdYjaZVaai]Z
way into body.
DeZcYddgVcYX]ZX`Va^\cbZcid[
security screw holes.
>[cZXZhhVgn!egZhhYdlcdc]ZVY
assembly to seat gaskets.
TIP: The door remains unlocked for
(%"+%hZXdcYhV[iZgndjeaj\^ci]Z
rectangular connector. By holding it open,
you can proceed with the next step without
having to open it with a ChargePass card.
Key slot
Key
Tabs
Tab slots