
Installation Manual


evr-green
™
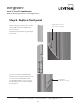
Level 1 / Level 2 Combination
Network Charging Station For Public Applications
lll#aZk^idc#Xdb$Zkg\gZZc&"-,,"((-",),(Zkg\gZZc5aZk^idc#Xdb
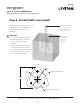
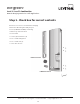
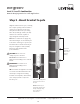
Step 3 - Mount bracket to pole
3-4
Center the opening in the
bracket over the hole in
the pole
NOTE: Bracket may be
temporarily held in place
during strapping using
tape, cable tie, or
other means.
;dgVYYZY
strength, use
these three
holes for
bolting
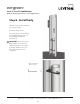
Align the bracket to the pole, ensuring
the coupler opening in the bracket is
centered over the hole in the pole.
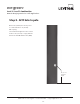
HigVei]ZWgVX`Ziidi]ZedaZjh^c\
i]gZZÇ'%bbWn%#%(%Ç#,+bb
stainless steel bands capable of
hjeedgi^c\ViaZVhi(%%edjcYh#
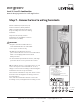
Note: These instructions apply only
when mounting to a round metal pole.
To mount to other types of poles, the
bracket must be mounted directly to
i]ZedaZjh^c\i]gZZ($-Ç&%bb
fasteners appropriate for the
pole’s material.
CAUTION:CZkZgjhZ]dhZ
clamps in place of bands.
>BEDGI6CI/NdjbjhijhZV
high tension banding tool to install
bands.
IMPORTANT: You must use a
high tension banding tool to
install bands.
TIP:;dgVYYZYhigZc\i]VcYhZXjg^in!
secure the bracket with both bolts
VcYhigVeh#Jh^c\i]Zbdjci^c\
bracket as a template, drill and tap
($-Ç"&+ie^&%bbm&#*]daZh
into the pole.