
Installation Manual


C. CLEAVE AND POLISH
All Connector and Fiber Types:
NOTE: The Thread-Lock Versa-Cleave tool is NOT recommended for cleaving Fast-Cure
Connectors. Doing so may result in damage to the tool.
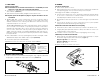
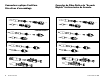
1. When the adhesive is cured, (no longer wet), scribe the fiber where it meets the bead of adhesive
at the end of the ferrule. (Figure 5)
2. Gently pull away the fiber stub, and properly dispose of it.
NOTE: Loose fiber cuttings can be dangerous. Be sure to properly dispose of fiber.
3. 12 µm “AIR POLISH” - Begin by “Air Polishing” the connector with 12 µm polishing film. Hold film at
the edge with thumb and forefinger. Gently touch connector to film and rotate using 18-20 one-inch
circles to remove fiber stub. Leviton’s 12µm film is dark pink in color.
3 µm & .3µm “PAD POLISH” - Wipe the bottom surface of the polishing puck and the surface of the
connector with a 99% alcohol wipe. Place 3µm film on the polishing pad, dull side up, and set pol-
ishing puck on the film. Gently insert the connector into the puck, and trace 15-20 Figure 8’s on the
film, using very light pressure and proceeding to firmer pressure as you progress. Repeat the same
procedure with the .3µm film. Leviton’s 3µm is yellow and the .3µm film is light blue in color.
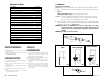
4. Inspect the fiber using the 200x inspection scope, to be sure the fiber is not scratched, cracked or
broken. Remove any debris using a lint-free wipe. (Figure 6)
5. Repeat the pad polishes if neccesary.
NOTE: When polishing LC connectors, use Leviton’s 1.25mm Polishing Puck (PN# 49886-LCP).
Multimode 62.5/125
Scribe and pull fiber away.
Singlemode 9/125
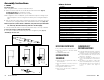
INSPECTING THE FIBER:
White area must be free of all
obstruction. Grey area should be
free of scratches and dark spots.
5
6
DI-000-49990-20B
DI-000-49990-20B
4 13
B. ARMADO
Todo tipo de conector y fibra:
1. Remueva la tapa del conector.
2. Sacuda la botella de adhesivo antes de abrirla. Remueva la tapa e instale la aguja presionándola
suavemente sobre la parte superior de la botella hasta que sienta que está fija.
NOTA: Para insertar el adhesivo, Leviton posee jeringas disponibles.
3. Inyecte pegamento en el conector, insertando la aguja en la parte posterior del mismo y exprimiendo
la botella delicadamente. Continue hasta que una gota de pegamento sea visible del otro lado y
retire la aguja. Limpie el exceso de pegamento que se encuentre en la punta de la férrula.
4. Sumerja la fibra limpia en una botella de pintura de imprimación. Asegúrese de sumergir toda la fibra
expuesta.
5. Para evitar un sellado prematuro, inserte la fibra en la parte posterior del conector en un solo
movimiento. La pintura de imprimación activará el adhesivo y el sellado.
NOTA: Luego del baño en la pintura de imprimación, sólo tendrá 45 segundos para insertar la
fibra.
6. Sostenga la fibra en su lugar por unos 10-20 segundos y espere 3 minutos para que se complete la
adhesión.
7. Si no está utilizando fibra enfundada, deslice la manga hasta el conector. Si utiliza fibra enfundada,
siga los pasos siguientes:
8. Para los conectores SC y LC, asegúsere orientar la funda correctamente, alineando las tapas de los
conectores.
Pasos adicionales SOLO para cables enfundados de 3mm:
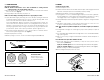
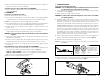
9. Deslice el tubo fijador sobre los hilos de aislamiento y el cuerpo del conector, presione el tubo en
ambos extremos. (Ilustración 4)
ST/FC/SC - 1. Extremo grueso: utilice la herramienta hexagonal de 4,52mm. (0,178 pulgadas).
ST/FC/SC - 2. Extremo delgado: utilice la herramienta hexagonal de 3,84mm. (0,151 pulgadas).
LC: Utilice el hectágono de 3,25mm (0,128 pulgadas)
10. Deslice la manga sobre la parte posterior del conector.
4