
Installation Manual
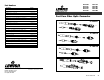


Assembly Instructions
A. PREPARE
All Connector Types:
NOTE: If using buffered cable, do not use the crimp tube in step 1.
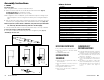
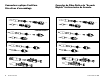
1. Slide the boot and the crimp tube onto the cable, with the small end inserted first. (Figure 1)
For 3mm Jacketed Cable: Use the ribbed boot, provided.
For 900µm Buffered Cable: Use the smooth boot, provided.
NOTE: If using an SC Connector on 900µm fiber, you must install the SC body before continuing to step 2.
Align the body with the connector housing, then insert the body into the housing until it snaps into
place.
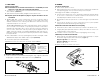
2. Strip the jacket and/or buffer using the measurements provided in the chart below, and strip in
increments of 1/4”. If using jacketed cable, trim the aramid strands as indicated, below. (Figure 2a-c)
NOTE: To help avoid tool, buffer and fiber contamination, clean jacket and exposed buffer with a
99% alcohol wipe, then with a lint-free wipe, both before and after stripping.
3. Clean exposed fiber with a 99% alcohol wipe followed by a lint-free wipe to remove any contaminants.
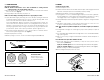
SC & FC Connector Types on 3mm Jacketed Cable ONLY:
4. Insert spacer over buffer and push all the way down, until it rests against the jacket. (Figure 3)
*NOTE: Images are not to scale.
DI-000-49990-20B
DI-000-49990-20B
1
35mm
15mm
10mm
ST/SC/FC W/JACKETED
CABLE
40mm
20mm
4mm
LC W/JACKETED CABLE
3
*2B
*2C
20mm
ALL BUFFERED CABLE
*2A
2
15
INSTUCCIONES IMPORTANTES
1. Lea y comprenda perfectamente todas las instrucciones
2. Siga todas las instrucciones y advertencias marcadas
sobre el producto
3. CONSERVE ESTAS INSTRUCCIONES.
INFORMACIÓN DE
SEGURIDAD
1. Siempre llevar gafas de seguridad cuando trabaje con
cables de fibra óptica.
2. Nunca mire directamente en la fuente que produce luz
laser.
3. Siempre disponga apropiadamente de los desechos.
4. No tenga alimentos ni bebidas en la zona
5. Lávese la cara y las manos antes de trabajar en la
terminación de la fibra.
SUGERENCIAS Y
RECOMENDACIONES
1. Es importante limpiar la fibra descubierta y el aislamiento
repetidamente con alcohol isopropil, para asegurarse de
que nada de polvo, grasa, o restos pemanezcan en la fibra.
2. No coloque las cubiertas de anillo contra el polvo sobre un
superfície sucio o que tenga polvo.
3. Al emplear las herramientas para apretar, inserte el
conector en la herramienta antes de colocar la fibra en el
conector.
4. Para mantener el radio apropiado de la fibra, emplee
siempre la almohadilla para pulir, el disco para pulir, y
películas para pulir de Leviton tal como se ha instruido en
el proceso de pulimento (véase página 14,
sección C).
Descripción Número de Parte
Conector ST Multimodo 49990-MST
Conector ST Monomodo 49990-SST
Conector SC Multimodo 49990-MSC
Conector SC Monomodo 49990-SSC
Conector LC Multimodo Individual con manga de 3mm. 49990-MLC
Conector LC Monomodo Individual con manga de 3mm. 49990-SLC
Conector FC Multimodo 49990-MFC
Conector FC Monomodo 49990-SFC
Conector LC Monomodo Individual con manga de 0,9mm. 49990-SL9
Conector LC Multimodo Individual con manga de 0,9mm. 49990-ML9
Herramienta a presión con puntas de 0,128, 0,151, 0,178 49886-FCT
Disco de pulido para LC 49886-LCP
Maletín para “Secado Rápido” 49886-FCC
Agujas de repuestos (calibre 19, bolsa de 25) 49886-FCN
Jeringas (bolsa de 25) 49886-SYR
Adaptador de Microscopio para LC 49886-LCS
Juego de endurecedor 49800-202
Herramientas para conectores de “Secado Rápido” 49800-FTK
Consumibles para conectores de “Secado Rápido” 49800-FAC
Número de Parte