Instruction Manual
Manuals
Brands
Leslie Controls Manuals
Equipment
NYC Heat Exchanger
1
2
3
4
5
6
7
8
9
10
Page 4
of 25
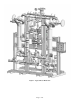
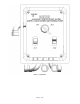
Figure 2
– Control Bo
x
1
...
2
3
4
5
6
...
...
25