
User Manual


11
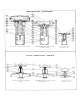
2. Screw handscrew (4) into the bonnet as far as it
will go.
3. Remove nuts and bolts (18,19 see Fig 3) from
upper diaphragm case (14).
4. Lift diaphragm case (14) while moving the case to
one side so that handscrew disc assembly can be
disengaged from diaphragm nut (8) by passing it
through the slot in the diaphragm nut. (see Fig 4)
5. Remove handscrew (4) from bonnet (7).
NOTE: Clean all parts and replace any that are worn or
damaged.
Reverse Actuator HOD
Reassembly
(see Fig 3)
1. Insert handscrew (4) into bonnet (7) and screw
down through bonnet threads.
2. Insert diaphragm case (14) making sure that
handscrew disc assembly is engaged to diaphragm
nut (8). (see Fig 4)
3. Tighten nuts and bolts (18,19 see Fig 3) into upper
diaphragm case (14).
4. Screw handscrew (4) up through bonnet (7).
5. Place handwheel (3) over stem. Install lockwahser
(2) and tighten nut (1).
Act. Size (see
Fig 1)
Lower Dia.
Casing Bolts (23,24)
Upper Dia. Casing
Bolts (18,19)
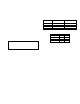
35R 15-20 15-20
55R/55AR 30-36 15-20
85R/85AR 30-36 15-20
135R 45-50 15-20
Table 4 - Torque Values (ft-lbs)
Size 1 6
35R 15-20 3-5
55R/55AR 15-20 15-20
85R/85AR 15-20 15-20
135R 30-36 15-20
Table 5 – Torque Values Hand Operating Device (ft-lbs)
NOTE
Ensure that all components being installed are free
from any nicks burrs or defects prior to assembly.