
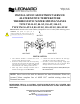
Install Instructions


INSTRUCTIONS FOR
DISMANTLING VALVE
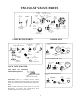
1. Shut off hot and cold supplies to valve.
2. Loosen LTR set screw.
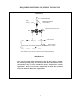
3. Remove SNAP CAP, SCREW and WASHER, POINTER
and FRICTION SPRING. (FIGURE #1).
4. Remove the 6 COVER SCREWS, then take off cover to
which the Thermostat and Gears are attached.
WHEN RE-ASSEMBLING VALVE, making sure driving ball
engages ball socket, insert new Flange Packing in base;
replace COVER, tightening COVER SCREWS in rotation;
put FRICTION SPRING in place; then replace POINTER
and POINTER ROD SCREW, WASHER and CAP.
After installing new parts, it will probably be necessary to
reset Pointer to obtain correct temperature range from Cold
to Hot. See page 2 instructions "TO RESET
ADJUSTABLE HIGH TEMPERATURE LIMIT STOP."
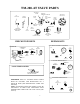
TO CLEAN PORT SLEEVE ASSEMBLY
Failure to properly blend the water may be caused by a
sticking condition in the PORT SLEEVE ASSEMBLY.
The THIMBLE should slide freely on the PORT SLEEVE.
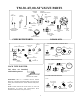
1. If a deposit of lime or sediment prevents free movement,
use a nail set or other tapered tool to unscrew the CHECK
NUT as far as it will go, then screw the PORT SLEEVE
NUT into the base. This will release the PORT SLEEVE
and THIMBLE so they can be lifted out, (Figure #2).
2. Clean with a NON-CORROSIVE CLEANING AGENT
AND SOFT CLOTH - DO NOT USE ABRASIVES - then
wash parts thoroughly, wipe with a dry cloth and re-
assemble. The PORT SLEEVE should be assembled with
the SHOULDER to the LEFT. Tighten PORT SLEEVE
NUT against end of PORT SLEEVE but be careful not to
cramp sleeve in place. Tighten CHECK NUT.
3. When replacing front be sure DRIVING BALL is inserted
in Ball Socket as shown in Figure #1.
TO REPLACE POINTER ROD WITH GEAR
1. Remove POINTER ROD SNAP CAP, SCREW,
WASHER, POINTER, and FRICTION SPRING.
(FIGURE #1)
2. Remove COVER with parts attached, from the front of
valve.
3. Remove COIL SLEEVE STUD and take off
THERMOSTAT GROUP.
4. Replace POINTER ROD with GEAR and re-assemble.
TO REPLACE (OR CLEAN) THERMOSTAT GROUP
Follow instruction for replacing POINTER ROD with
GEAR above. If a deposit has collected on the
Thermostatic Coil, clean it off with a brush in a non-
corrosive grit-free cleaning solution.
SOCKET
BALL
FLANGE
PACKING
THIMBLE
NUT
CHECK
GEAR
ROD WITH
POINTER
COIL SLEEVE
STUD
LTR
SET SCREW
DRIVING
BALL
POINTER
2.
1.
SLEEVE
SLEEVE
PORT
NUT
PORT
REMEMBER! THIS IS A CONTROL DEVICE WHICH MUST BE CLEANED
AND MAINTAINED ON A REGULAR BASIS. (SEE MAINTENANCE GUIDE
AND RECORD, MGR-1000).
4