
Install Instructions


ADJUSTMENT AND SERVICE
Leonard Type TM Thermostatic Water Mixing Valves are
simple in design and may be easily cleaned, adjusted and
repaired. If the installation is accessible, servicing may be
completed without disconnecting the valve.
NOTE: Thermostatic Water Mixing Valves are
REGULATING mechanisms, which must be regularly
maintained to provide best performance. Frequency of
cleaning depends on quality of local water conditions and
usage. (See Maintenance Guide and Record MGR-1000).
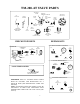
TO RESET ADJUSTABLE HIGH TEMPERATURE LIMIT STOP:
!! WARNING !!
WARNING! This Thermostatic Mixing Valve has an adjustable
high temperature limit stop, which must be checked. If
temperature is too high, the installer, MUST RESET stop
immediately. Always check the temperature of the mixed water
when the lever handle is turned to full HOT. Excessively hot
water is DANGEROUS AND MAY CAUSE SCALDING!
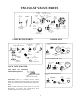
TROUBLESHOOTING INSTRUCTIONS
SEE PAGES 5, 6, 7 FOR COMPLETE PARTS BREAKDOWN, PARTS KIT
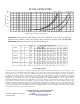
“Check for significant variations in outlet flow. Thermostatic valves will NOT provide the desired accuracy outside
of their flow capacity range. Minimum flows must be no less than shown (see Flow Capacities, page 8).
REMEMBER! THIS IS A CONTROL DEVICE WHICH MUST BE CLEANED AND MAINTAINED ON A
REGULAR BASIS. (SEE MAINTENANCE GUIDE AND RECORD, MGR-1000).
2
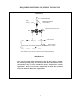
POINTER
SET SCREW
LTR
STOP
SCREW
SNAP
CAP
THERMOSTATIC
LEONARD
C
H
1. Loosen LTR set screw.
2. Remove SNAP CAP, SCREW & WASHER. Remove POINTER.
3. Temporarily place POINTER on the spline rod, turn RIGHT for
warmer temperature, turn LEFT for cooler temperature. When
valve is delivering warmest temperature desired, remove the
pointer.
4. Replace POINTER on the spline rod so that its RIGHT edge is
resting against the STOP SCREW located on the RIGHT SIDE
OF THE COVER.
5. The new maximum temperature has now been set. Test this
temperature by holding a thermometer under the flow of water to
be certain it is as desired.
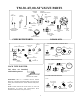
PACKINGS &
GASKETS
PORT SLEEVE
ASSEMBLY
THERMOSTAT
GROUP
CHECKSTOPS
1. Leak at pointer rod.
2. Leak between valve cover and
base.
3. Valve delivers either all hot or
all cold water, or will not mix
consistently.
4. After cleaning or replacing port
sleeve assembly, valve will not
hold temperature.
5. Hot water bypass into cold line.
6. Supplies cannot be shut off
completely.
7. Leak at checkstop bonnet.
TM-50-AT, 80-AT
KIT 1/50
TGM-1/50
KIT R/50
REBUILDING KIT
TGM-2/50
KIT R/50
REBUILDING KIT
KIT 2/50
TM-150-AT
KIT 1/125
TGM-1/125
KIT R/125
REBUILDING KIT
TGM-2/125
KIT R/125
REBUILDING KIT
KIT 2/50
TM-200-AT
KIT 1/200C
TG-1/200
KIT R/200N
REBUILDING
KIT
TGM-2/125
KIT R/200N
REBUILDING
KIT
KIT 2/200C