
Install Instructions


4
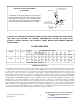
TROUBLESHOOTING INSTRUCTIONS
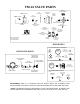
See page 5 for Parts Breakdowns
PACKINGS &
GASKETS
1. Leak at pointer rod.
2. Leak between valve cover and base.
PARTS REQUIRED:
KIT#1/26 (PACKINGS & GASKETS)
PORT SLEEVE
ASSEMBLY
3. Valve delivers either all hot or all cold water, or
will not mix consistently.
KIT#R/28 (REBUILDING KIT)
OR TM-28-1-8B BRIDGE ASSEMBLY
THERMOSTAT
GROUP
4. After cleaning or replacing port sleeve
assembly, valve will not hold temperature.
KIT#R/28 (REBUILDING KIT)
OR TM28-G2 THERMOSTAT GROUP
CHECKSTOPS
5. Hot water bypass into cold line.
6. Supplies cannot be shut off completely.
7. Leak at checkstop bonnet.
KIT#4/M20 (CHECKSTOP KIT)
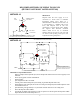
INSTRUCTIONS FOR DISMANTLING VALVE (DWG. 1)
1. Shut off hot and cold supplies to valve.
2. Remove four Cover Screws M20-2C to release entire
thermostatic control assembly.
WHEN RE-ASSEMBLING VALVE, insert Cover Gasket
M20-3C in base. Lubricate TM28-6B O'Rings before re-
inserting assembly.
After installing new parts, it will may be necessary to reset high
temperature limit. See instructions "TO RESET ADJUSTABLE
HIGH TEMPERATURE LIMIT STOP" (page 2).
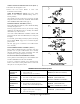
TO REMOVE BRIDGE ASSEMBLY (DWG. 2)
Remove MU-10B Pointer Rod Nut, remove TM28-1-8B Bridge
Assembly from pointer rod.
Failure to properly blend the water may be caused by a sticking
condition in the TGM-1/28 Port Sleeve Assembly. The Thimble
should slide freely on the Port Sleeve.
Clean with a NON-CORROSIVE CLEANING AGENT AND
SOFT CLOTH. DO NOT USE ABRASIVES, then wash parts
thoroughly.
To reassemble, replace Bridge Assembly on pointer rod. Driving
ball on Thimble MUST engage hole in coil bracket. Replace
pointer rod nut.
DO NOT apply grease or lubricants to the TGM-1/28 Port
Sleeve Assembly.
TO DISASSEMBLE BRIDGE ASSEMBLY (DWG. 3)
Remove TM25-3A Holder Nuts using a screwdriver in the slots
provided. Clean or replace TGM-1/28 Port Sleeve Assembly
following instructions above. When reassembling, check TM-
25-3B port sleeve packings and replace if necessary.
TO CLEAN OR REPLACE THERMOSTAT GROUP
Loosen gland nut. Push rod through cover. BE CAREFUL NOT
TO PULL THERMOSTAT COIL OUT OF SHAPE.
To clean, if a deposit has collected on the thermostat group,
brush in a non-corrosive cleaning solution. Rinse in clean water
and replace in cover with parts as shown.