
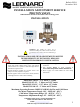
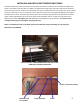
Install Instructions
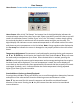

User Screens
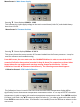
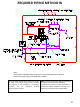
Home Screen: Current outlet temperature and Set point temperature
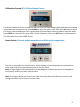
Home Screen: After initial “Full Sweep” the bottom line of the digital display indicates the
measured sweep value of the valve, hot to cold. Please record this numerical value as you will
need it for calibration Screen 2 below. If you “miss” the “full sweep” number simply unplug
the unit and plug back in and the unit will do another sweep and give you the value. The
digital display now indicates current measured temperature on the mixed outlet of the valve
and shows set point temperature on the line below. Note: A large negative value displayed at
the Cur temp line indicates the sensor is damaged or not properly wired to the main control
board.
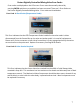
Temperature Adjustment: Temperature is easily adjusted by pressing the key code sequence
▲ ▼ ▲ ▼ ENTER key. At this point, the Setpoint will flash, and the ▲ and ▼ keys can now
be used to adjust temperature up or down. When desired value is reached, pressing the
ENTER key will store the new set point temperature and a message stating that the set point
has been saved will be displayed. If no new temperature is saved, the screen display will
revert back to the Home Screen after approximately 10 seconds and the set point will remain
unchanged. Symbols + and – indicate whether the outlet temperature is being adjusted
higher (+) or lower (-) by the controller.
Standard Menu: Options on Board/Equipped:
Pressing either the ▲ or ▼ keys will allow a user to scroll through other data points, features
and options of the valve and will show the following screens and features in order.
Note: ▼ key was used for this manual’s sequence and should be considered forward
direction in the menu. Pressing the ▲ key will reverse the order and can be considered
reverse direction.
4