
Install Instructions

SETUP INSTRUCTIONS
•NOTE! FOR RECIRCULATION PIPING ARRANGEMENT, SEE PAGE 10
WARNING
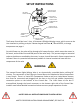
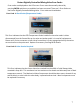
The Leonard Proton Digital Mixing Valve is an electronically controlled device utilizing DC
circuitry. The connection of the Electronic Control Box to the Mechanical Valve Components
is very simple. There is a 3-wire RTD Temperature Probe as well as a 4-wire Motor Harness
that must be connected and plugged into the box on the left and middle (respectively)
connection points on the bottom of the Control Box. The 110V Power to the box is
accomplished through the barrel connector on the bottom right side of the Control Box.
Installer must follow detailed instructions below to ensure proper operation of valve.
•NOTE! READ ALL INSTRUCTIONS PRIOR TO INSTALLATION
2
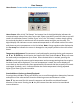
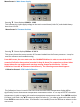
The Proton Control Box has a 2 Line, 16 character LED digital display screen, which serves as the
User Interface by utilizing a simple 3-button keypad interface:▲, ▼ and ENTER, to change
temperature see page 4.
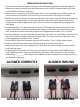
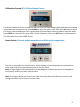
On Initial Power up, the valve will go through a full sweep function, which moves the motor its
full travel, end-to-end of hot and cold ports of the valve body. This process assigns a numerical
value to the distance travelled by the motor, in steps, that will be used in future comparisons to
indicate if there is a potential maintenance problem or internal mechanical issue with the
components of the valve
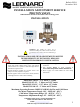
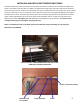
HOT INLET
CHECK VALVE
PROTON VALVE
MOTOR & BODY
COLD INLET
CHECK VALVE
PROTON VALVE
CONTROL PANEL
MIXED OUTLET
TEMPERATURE
PROBE
MOTOR WIRING
CONNECTOR
110V POWER
SUPPLY
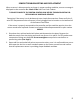
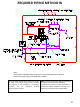
H
C
120 DEG
120 DEG
LEONARD
PROTON
TEMPERATURE
PROBE
CONNECTOR
x