
User's Manual


INSTALLATION
PAGE 10
GAS APPLIANCE FINAL ASSEMBLY
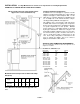
After the appliance has been properly installed and all
gas connections have been made and tested, you can
now install the log set. See Door Assembly on page 11
for door removal instructions.
INSTALLING LOG SET:
WARNING: If logs are not installed according to the
directions in this manual, flame impingement and
improper combustion could occur and result in ex-
cessive production of carbon monoxide (CO), a col-
orless, odorless, toxic gas.
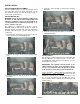
This appliance is equipped with a five-piece log set.
Carefully install the logs into the firebox as shown on
this page. All logs should fit down onto pins and mounts
provided. This will ensure a proper flame and safe
combustion.
1. Carefully place the largest log in the rear of the fire-
box as shown in the following illustration.
2. Install the front log as shown in the following illustra-
tion.
3. Install the right top twig as shown in the following
illustration.
4. Install the center top twig as shown in the following
illustration.
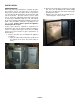
5. Install the left top twig and embers as shown in the
following illustration.
Glowing Embers
One package of ember material has been included with
this gas appliance. You will not need to use the entire
bag (additional ember material is provided for your fu-
ture maintenance needs).
IMPORTANT: The quantity and placement of the
ember material can affect stove performance there-
fore it is very important that it be placed as shown
in the picture on instruction # 5 and shown below.
Proper Placement of Ember Material: Unpackage and
divide the fine ember material (mineral wool) into
thumbnail sized fluffy pieces. Distribute the pieces over
the top of the front burner ports and filling the area in
front of and beneath the forward log and running the full
length of the log.