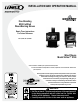
INSTALLATION AND OPERATION MANUAL Free-Standing EPA Certified Wood-Burning Stoves Retain These Instructions For Future Reference P/N 775,214M, Rev. B, 09/2007 Striker™ S160 Striker SA160 Wood Stoves Model Striker™ S160 A French manual is available upon request. Order P/N 775,214CF. Ce manuel d’installation est disponible en francais, simplement en faire la demande. Numéro de la pièce 775,214CF. These appliances must be properly installed and operated in order to prevent the possibility of a house fire.
Testing Information This manual describes the installation and operation of the Striker™ S160 non-catalytic wood heaters. These heaters meet the U.S. Environmental Protection Agency’s emissions limits for wood heaters sold on or after July 1, 1990. This heater has been developed, tested, and constructed in accordance with the requirements of UL 1482, ULC S627-and HUD standards and is listed by OMNI Test Laboratories, Beaverton, OR. It has been approved for residential, mobile home, and alcove installations.
TABLE OF Contents Testing Information..........................................................................................2 General Safety Precautions.................................................................................2 Negative Pressure Warning ............................................................................4 Creosote......................................................................................................4 Ash Disposal..............................................
13. If a creosote fire should develop, the fire department should be called immediately, and then attempts should be made to control the fire until assistance arrives. If a “runaway” fire should develop causing over-heating of the stove, the door and draft regulators should be closed immediately. The fire should die down once deprived of oxygen. After a severe chimney fire, the complete chimney system should be checked before further use. 14. Do not operate with a grate or with an elevated fire.
Fuel This unit is designed and engineered to burn, dry, wellseasoned wood only. Dry, seasoned wood is that which has been cut, split, and allowed to dry under a covered area where air is free to flow and circulate under and around the wood (not under a tarp or plastic). Make sure wood is not stacked directly on the ground, it may absorb moisture from the ground. It should be allowed to dry in these conditions for a minimum of six months, preferably one year or more.
Clearances to Combustibles Mobile Home Installations WARNING: BE ABSOLUTELY SURE THE DISTANCE BETWEEN THE HEATER AND THE SURFACE OF ANY COMBUSTIBLE CONSTRUCTION IS NOT LESS THAN SHOWN. All mobile home installations require an outside air kit (part # 71111 or 71112). The stove must be bolted to the floor and grounded to the chassis of the mobile home. Floor Protection WARNING: DO NOT INSTALL IN SLEEPING ROOM OF A MOBILE HOME.
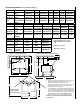
Installation Clearances - Refer to Diagrams A, B & C PIPE INSTALLATION A B (1) C D (1) E† F (1,4) G (4) 6” Single Wall Residential or Alcove USA-16” CAN-483mm 14” 356mm USA-21” CAN-610mm 12-1/2” 318mm 8” 200mm 9-3/4” 248mm USA-18” CAN-533mm 6” Single w/ Pipe Shield Residential or Alcove USA-10” CAN-330mm 8” 200mm USA-18” CAN-533mm 9-1/2” 241mm 8” 200mm 5-1/2” 140mm USA-13-1/2” CAN-419mm 6” Double Wall Residential or Alcove or Mobile Home* USA-10” CAN-330mm 8” 200mm USA-18” CAN
Leg and Heatshield Installation Note: The threaded rods used to bolt the legs to the stove are packaged with the heatshield, as a heatshield is required when a stove is installed on legs. Residential and Mobile Homes (Bolting down and grounding of stove are required only in mobile homes). Open all cartons, if any, and remove the contents upon receipt and check for any damaged or missing parts. If there is hidden damage, notify your freight company or Lennox Hearth Products dealer immediately.
Stove Installation 1. If not previously installed, install floor protection and move the heater into the desired location. 2. Position the stove on your floor protection in the exact location where it is to be located, making sure all minimum clearances are met. 3. If you are installing outside air on your stove, mark a 4” circle on the floor protection just below the oblong ring. When cut out, this hole will accommodate the flexible outside air tube. 4.
Pedestal Installation (For ash drawer pedestal see instructions included with pedestal). Residential and Mobile Homes (Bolting down and grounding are required only in mobile homes). Caution: Wear gloves during installation in case of sharp edges on the stove. 1. Remove the heater from the carton, if packaged, upon receipt and check for any damaged or missing parts. 2. Carefully put the stove on pedestal with the open end of the pedestal facing the rear.
Post Installation Checks Brick Installation 1. Check that all chimney pipe joints are securely fastened. CAUTION: Wear gloves during brick installation in case of sharp edges inside the stove. 2. Check that the heater is securely fastened to the floor (if applicable). Note: Installation of the baffle bricks and insulating blanket is easier when you can still access the flue outlet, (before connecting the flue pipe).
3. Next, install baffle bricks #21-24 by sliding the back of each brick over the center tube and support until the front of the brick clears the front tube and support. Then lift the front of the brick above the front support and tube and slide it forward as far as it can go (very important), it will hit the front of the stainless support when it is fully forward. The rear of the bricks sit on top of bricks #19-20 (Figures. 7 & 8). 4.
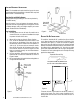
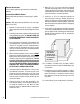
Optional Blower Installation A blower, part# 71000, can be installed on the stove to improve hot air distribution throughout the room. To install the blower: 1. Remove all the contents from the blower box. Included with the blower should be a blower speed control. 2. Remove the screws in the round knock-out plate on the back of the stove. Bend the knock-out plate back and forth until it can be removed. 3. Mount the blower as shown below.
Starting and Maintaining a Fire Be sure to clean the Nickel or Gold Plated door with Windex brand cleaner and a very soft cloth to remove any fingerprints and residues prior to the first fire. 1. NEVER USE FLAMMABLE LIQUIDS TO START OR REKINDLE A SOLID FUEL FIRE!! 2. Fully open the primary draft control by pulling the 1” plastic knob out on the left side (lower front corner) until it stops (away from the stove). This control determines the amount of air entering the stove.
Clean Glass SEE MAINTENANCE ON PAGE 17 FOR GLASS CLEANING TIPS The operator plays an important part in keeping the glass clean and free of build-ups. The first and most important part the operator plays is making sure to burn only well-seasoned firewood. Wet wood = Dirty glass. Keeping your glass door clean is partly accomplished by the air wash system of the stove, which sends clean, fresh air for combustion, over the window before it enters the fire.
Maximizing Your Stove’s Overall Efficiency It is important to know that for high, combustion efficient, clean burns, you will need to have sufficient temperatures inside the firebox for thorough combustion. The best method for determining if you have sufficient temperatures is to watch the brick lining in your firebox. When you first light your stove, the bricks will turn a dark brown or black.
Experiment with different loading configurations to achieve longer burns. Try loading the wood from side to side and nesting it in the ashes to prevent airflow under and around the wood. Fresh wood should be loaded to the back of the firebox or to the sides. Hot coals or half burned wood should be brought towards the front of the firebox. The way you load your wood can seriously affect burn times.
Troubleshooting Problem Solution 18 POOR DRAFT: Extend chimney in length or have the chimney realigned to the proper size flue. Oversized chimneys normally have poor drafts. Remember, the stoves’ draft depend solely on the natural draft of the chimney (See Drafting section on page 4). If your stove is not drafting properly, your chimney is the problem. All stoves are thoroughly tested to ensure proper draft with the correct size chimney flue.
Do’s and Don’ts DO NOT: Install or operate this stove before reading this manual. DO NOT: Close the draft beyond the point at which the flames are completely extinguished. DO NOT: Open the stove door without fully opening the draft first. DO NOT: Burn driftwood or wood that has been in salt water. This includes some mill ends and scrap lumber that has been floated in salt water on the way to the mill. (This will void your warranty). DO NOT: Handle the Nickel or Gold faceplate unnecessarily.
The manufacturer reserves the right to make changes at any time, without notice, in design, materials, specifications, prices and also to discontinue colors, styles and products. Consult your local distributor for fireplace code information. Printed in U.S.A. © 2007 by Lennox Hearth Products P/N 775,214M REV.